- Home
- Taxi App Clone
- GoJek Clone
- Overview Get to Know Our XJekPlus App
- Apps Screens & Flow Understand the Process of Booking A Service
- More Info Learn about more services & features
- Pricing See the Detail Cost of Building Gojek Clone App
- Website Visuals Dive into the Web Demo of Multi-Service Business
- Enquire Now Know more details about the Mult-Service App
- Demo Test the Apps in the Present Time
- Admin Visuals Peak into the Administrative Panel
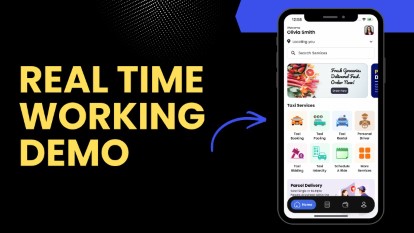
Gojek Clone - XJekPlus App 2026 EditionTime to Step into Multiple Markets with Our Advanced Gojek Clone App Online Multi-Service Platform!
How It Work?Understand the full process of booking a ride, services, or hiring experts through the Gojek Clone App. Have a look at the real-time booking video and give your utmost comfort with 101+ services.
- Grab Clone
- Grab Clone Overview Get to Know About Grab Clone
- Demo Try the Applications in Realtime
- Apps Screens & Flow See Detail Service Booking Flow
- Pricing Detail Cost of Building the App
- More Info Get Additional Details like Website, Admin Panel & KIOSK App Visuals
- Enquire Now Get to know more about the Super App
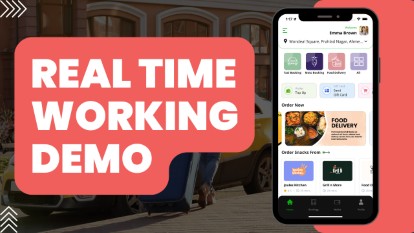
Grab CloneBuild your Super Services App with our newest Grab Clone App!
How it works?Get a deep understanding of the App features and functions.
- Super Service App
- SuperX SP Overview Get a Brief of the SuperX SP App
- Demo Try the SuperX SP App in Real-Time
- App Screens & Flow Have a Look at the Service Booking Flow of the App
- Website & Admin Panel Visuals Look at the Website & Admin Panel Visual
- Pricing See the Cost of Building the Application
- Enquire Now (Super Service App) Reach out to us for more details on the App
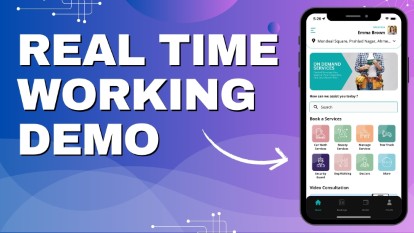
SUPERX SPStart Making Money by Building Super Service App with over 72 Services
How It Works?Grab a complete understanding of the SuperX SP App and its features and functionality in this Real-Time Video.
- Delivery Apps
- Food Delivery Know all About Food Delivery Apps
- Grocery Delivery Brief About Grocery Delivery Apps
- DeliveryKing - Master App Brief Information on Our DeliveryKing App
- Parcel Delivery Get to Know of Parcel Delivery Apps
- Taxi and Delivery App Get to Know All About Our Taxi And Delivery Combined App
- Pharmacy Delivery Basic Information About Pharmacy Delivery Apps
- More Delivery Apps See More Other Delivery Apps
- Enquire Now More details about the Delivery Apps
- More Products
- Uber for Medical Services Gain Profit by Building Medical Services App
- Uber for Car Wash & Care Earn Profits by Launching your Car Wash Services App
- Carpooling App Earn Profit with Building Carpooling App
-
 Uber for Towing & Other Services
Earn Profit by Towing and Other Service App
Uber for Towing & Other Services
Earn Profit by Towing and Other Service App
- Uber for Beauty Services Expand Salon Services Online with Beauty Service Apps
- Uber for Massage Services Make Money with Massage Services Apps
- Uber for House Cleaning Get to Know All About House Cleaning App
- Security Guard App Your Users can Book Security Guards
- Employee & Family Tracking App Get Information on Tracking App- Employees & Family Members
- Buy, Sell, and Rent - Cars, Real Estate, Items Make a Profit by Getting Hands on Buy, Sell, Rent App
- Uber for Other Individual Services Earn Money by Offering On-Demand Services
- More Products and Clones Get to Know About Other Products and Clone for Every Demand
- Our Clients
- About Us
- About us Empowering businesses with smart digital solutions.
- Events & Life @ V3Cube A culture built on growth and collaboration.
- INFRASTRUCTURE The strong tech backbone behind our solutions.
- Careers Build your career with a growth-driven team.
- Corporate Social Responsibility Giving back to society for a sustainable future.
- White Labeled Apps Launch branded apps, ready for your market.
-
 Blog
Stay informed with latest industry insights, trends, and important updates.
Blog
Stay informed with latest industry insights, trends, and important updates.
- Contact Us Reach out for support, queries, or business needs.
Our CompanyYour One Stop Solution for Your App Development
 Enquire now
More ProductsSee-through Our More Products Delivering the App for Every Need
-
App Users can send “Parcels and Items” of any Size within the City from Location X to Location Y. They also have the Option of sending Parcels to Single or Multiple Locations. After Logging into the XJekPlus Super App, Users have to choose the Right Vehicle Type based on the Size and Quantity of the Items.
-
Users can Post a Listing on the XJekPlus Super App to Sell or Rent their Commercial or Residential Properties. After Reading the Property Details, Other Users of the App who are Interested can Contact the Property Owner. You, as an App Owner, can Sell Paid or Free Plans to the Users. And this is How you Make Money.
-
Using this Modern Additional Component, Users will be able to Post an Ad on the Super App about the Cars they want to Sell or Rent. The Listing will be Complete with the Photos of the Car and its Necessary Details. The Other Users of the App who are Interested can get in touch with the Car Owner.
-
This is like Real-Time Yellow Pages because Users will be able to See and Discover Nearby Businesses such as Cafés, Gyms, Spa & Salon, Libraries, Supermarkets and Events. Using the 10th Additional Component, Users can even Locate the Store on Google Maps! The App Admin offers an option to list the businesses under Free or Paid Plans.
-
Your app makes it easy for users to book beauty services that come directly to their doorstep. They can choose from hair styling, facial and skin treatments, men’s grooming, bridal beauty, organic skin care, and many more options. The admin can update or change these services whenever required.
-
Users can quickly book Car Wash & Care Services either instantly or for a later time. All services are delivered to their chosen location. Options include car washing, battery jumpstart, fuel delivery, bike washing, EV charging, key lock help, and more. The admin panel allows easy management of all Car Wash & Care Services.
-
Taxi Booking

- Send Anything
- Store Deliveries
- On-Demand Services 14 Additional Components
- Delivery Genie
& Runner
- Online Video Consultation
- Bid for Services in Real Time
 Buy, Sell & Rent Real Estate
- Buy, Sell & Rent Cars
- Buy, Sell & Rent General Items
- Car-Pool - Car-Share
- Medical Services
- Track Family & Employees
- Nearby Businesses
- Beauty Services
- Pet Services
- Car Care Services
- Towing Services
- Other Features
- Wallet Voucher
- Driver App - Training Videos
- User App - Identity Verification
- Driver / Service Provider App - Identity Verification
- Store App - Identity Verification
- OTP verification via WhatsApp
- Gift Card
- Driver Reward
- Restricting Driver's
- Restaurant menu multiple options/toppings in Food Component
- One store under several categories in DeliverAll Components
- Free Delivery Promo Codes
- Advanced Rating
- Location Wise Banners
- Live Tracking of Taxi Ride
- Live Tracking of Ambulance
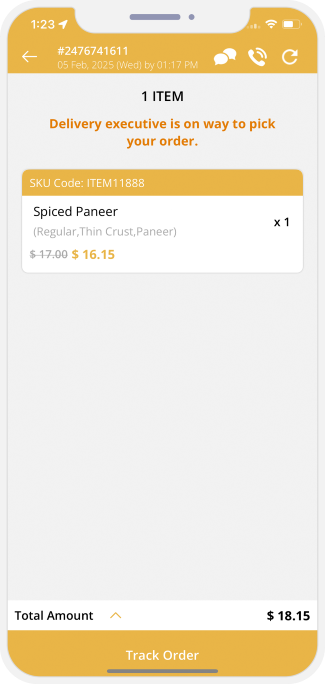
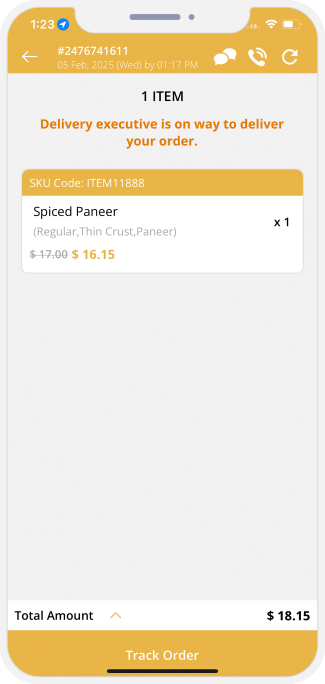
- Live Tracking of Order
- Location Wise Push Notifications
- Advanced and detailed Service Search in Service Provider Components
- Number Verification
- SKU Code
- 18+ Age Confirmation
- Separate Timeslots
- Delivery Helper
- Apply Toll
- Order Cancellation by Driver
- Order cancellation by Store
- OTP Verification to Start the Job
- Restaurant Safety Verification
- Voice Instruction for Delivery Driver
- Graphical Status
- Store As Favourite
- Money Transfer
- Membership Subscription Plan
- Manage Notification Sounds
- KOT Print via Wireless
- Tip Feature
- Favorite Driver / Service Provider
- Edit Profile
- Wallet Integration
- Manage Vehicles & Services
- Manage Documents
- Manage Gallery
- Payment
- Multiple Credit Card Management
- Booking History
- Waybill
- Heat View
- Notifications
- Promo code
- Multiple Item Images
- Feedback
- Invite Friends
- Earning Statistics
- Other Information Screens
- Advertisement Banners
- Facebook & Google Ads integration
- Contact Us & Help
- User Application's Splash Screen with App's Logo will be displayed for 2-3 Seconds. Your logo with your App name will show here.
- Partner Application's Splash Screen with App's Logo will be displayed for 2-3 Seconds. Your logo with your App name will show here.
- User can see the information related to the Application on the Screen.
- With this Screen, the User can flexibly choose the Language as well as currency of their choice. They can proceed for login or register through this Screen.
- Partner can see the information related to the Application on the Screen.
- With this Screen, the Partner can choose the Language and Currency of their choice flexibly. They can proceed for login or register through this Screen.
-

The User can login into the App by using their Mobile number.
-

The User can also login into the App by using Face ID / Touch ID / Social Media Accounts(Google & Facebook) / Apple Account.
-
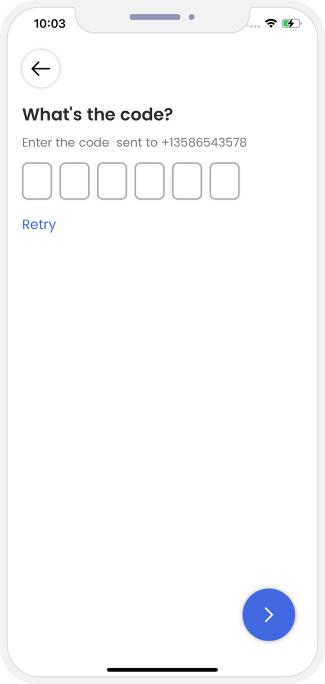
After entering the Phone number, user can either enter the OTP or the alphanumeric password. App Owner will decide and set in Admin Panel Settings of what he wants in his App >> OTP or Password. OTP can be send either using Twilio or Firebase method.
-

User can enter alphanumeric Password. (If this is set by the Admin).
- To activate Smart Login (Finger Print / Face Id), User first need to login/sign up either by mobile number or social media.
- After login, user can enable smart login option from his profile section of application.
- After enabling this option, user will see the Smart Login option in the login screen on his Device. Next time Users will be able to login using Touch ID / Face ID.
- Android Users can login using the Touch ID from their Mobile Phone.
- User will be ask to put finger on sensor.
- Its hassle free and help you to login using Touch Id.
- Note: To activate Smart Login ( Finger Print or Face ID ), User first need to login/sign up either by Mobile Number or Social Media.
- In case of iPhone device, user will be ask for Face Detection.
- After successful authorization, user will be taken to main/landing screen.
- Note: To activate Smart Login (Finger Print or Face ID), User first need to login / sign up either by Mobile Number or Social Media.
-

Users can login to the App using Mobile number & Social Media credentials (Facebook or Gmail). There will be multiple steps for registarion.
-

After entering the Phone number, User will be asked to enter the OTP or password (as set by the App owner).
-
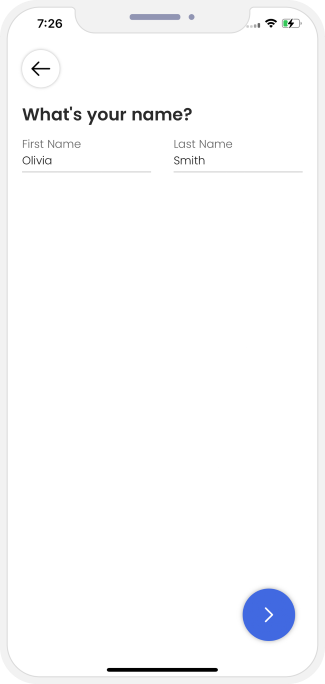
User can enter his full name in order to register on the App.
-
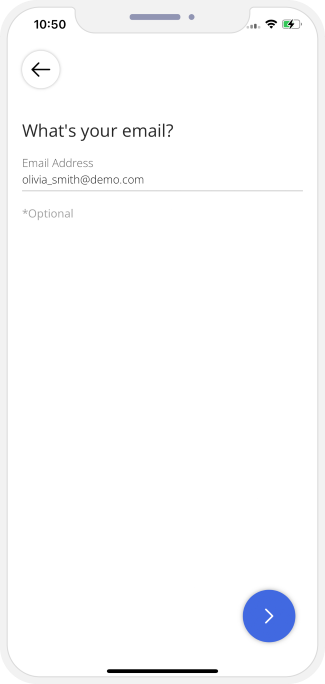
User can enter his email address and proceeed ahead. Once User is successfully registered on the App, he can login and use the Apps.
- Here the User is introduced to all the important features present in the App that include My Bookings, Favorite Service Provider, Wallet, Notifications, etc. to name a few.
- Here the Driver / Delivery Driver / Service Provider is introduced to some very important features that can help them operate seamlessly as well as smoothly. This includes My Booking, Wallet, My Profile, etc. to name a few.
-
 Taxi Booking
This is Uber kind of Taxi Booking Section. You will see all available Taxi Types her as per your location. And then can Hire or Rent a Taxi in very similar way as in Uber Taxi.
-
 Send Anything
This kind of is Uber for things instead of uber for riders. A person can send anything from Location X to Location Y using this feature. User can send large and small items, single or multiple deliveries right from here through Delivery Carriers available in his range.
-
 Order Food, Grocery & More..
This is Store Delivery Section. Users can see all Types of Stores here like Food, Grocery, Wine, Flower, etc. If they want to order Food, they’ll tap on Food Delivery to see all Restaurants in their area.
If they want to order Grocery, they’ll tap on Grocery Delivery to see all Grocery Stores available in their area.
-
 On Demand Services
This is an On-Demand Service, where users can see categories of services such as Handyman, tutors, office cleaning, security guard, babysitting, etc. If they want professional office cleaning services, they will tap on office cleaning to see all skilled cleaners or cleaning agencies nearby and book the suitable one.
-
 Hire Genie or Runner
Delivery Genie - Get any Item purchased from nearby Store / Shop / Mall as per your order/instructions and get it delivered to your door steps.
Delivery Runner - Get anything / any item / stuff picked up / dropped or delivered as you want in your nearby areas.
-
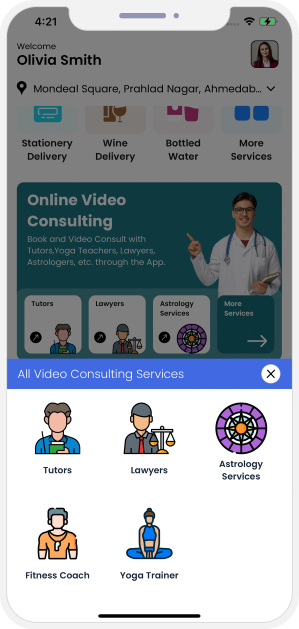 Online Video Consultation
Users can connect with experts through audio/video calls along with chats to get consultation on various topics like Legal, Telemedicine, Astrology, Teaching and Fitness.
-
 Bid for Services
Users can book the Service Providers by posting the job details and allow Service Providers to bid for that Job within the User's budget. Users will select the Service Provider based on bid offer, review and Service Provider portfolio.
-
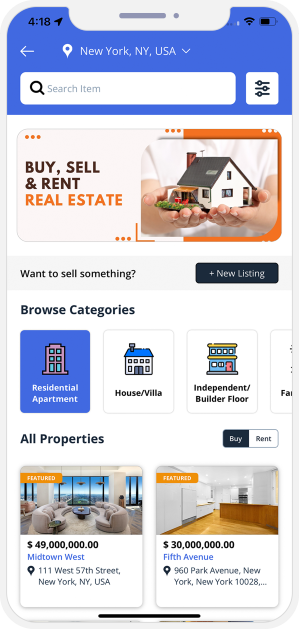 Buy, Sell & Rent Real Estate
Users can Buy, Sell & Rent Property from this Screen like Commercial, Residential, Land etc..
-
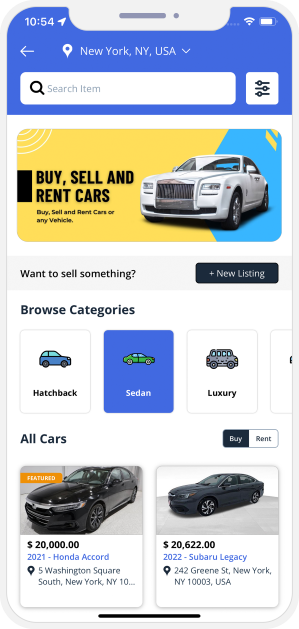 Buy, Sell & Rent Cars
User can Buy, Sell & Rent Cars from this Screen.
-
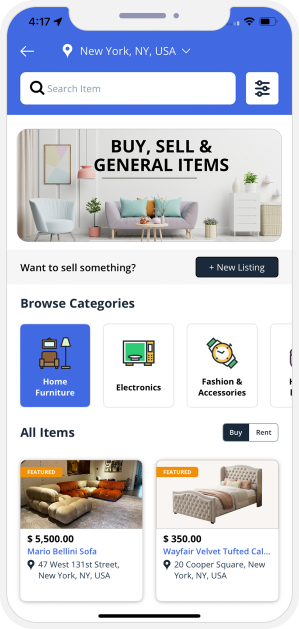 Buy, Sell & Rent General Items
User can Buy, Sell & Rent General Items from this Screen.
-
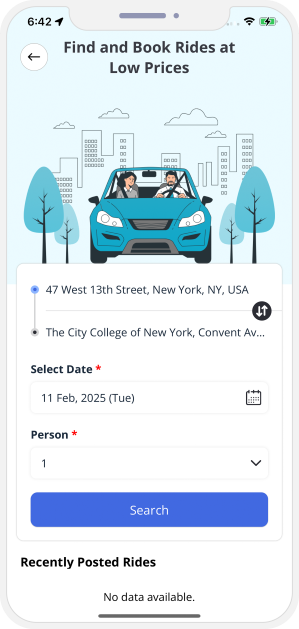 Car Pool
Users can booked Shared Ride from this screen. User can also offer a Ride.
-
 Medical Services
User can book all the Medical related services from here like Ambulance, Pharmacy Delivery, Vet, General Physicain
-
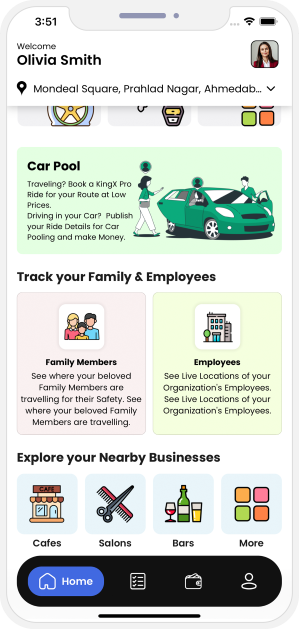 Track your Family & Employees
Once the app is installed on family members & Employee's phone, Users /Employers can view Real Time LIVE locations of their Family Members and Employees on the Google Map. When necessary, tracking preferences can be disabled.
-
 Explore your Nearby Businesses
Your users will have access to information about businesses in their proximity. Similarly like real-time Yellow Pages. The users can browse through the businesses in that area when traveling. The App Admin offers an option to list the businesses under Free or Paid Plans.
-
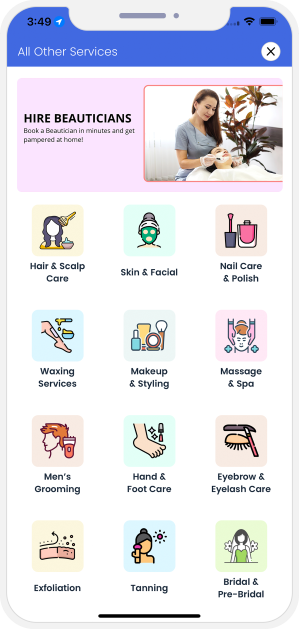 Beauty Services
Your app makes it easy for users to book beauty services that come directly to their doorstep. They can choose from hair styling, facial and skin treatments, men’s grooming, bridal beauty, organic skin care, and many more options. The admin can update or change these services whenever required.
-
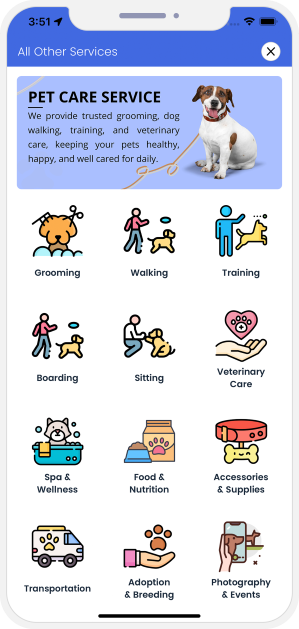 Pet Services
With just a few taps, users can find professional pet care providers through the app. They can book services like grooming, walking, pet sitting, training, veterinary support, and other special pet needs. The admin has full access to add, edit, or remove pet Care services anytime.
-
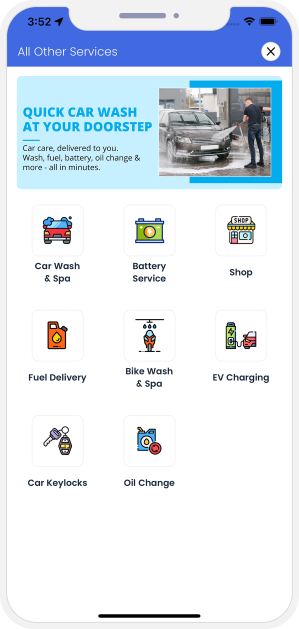 Car Wash & Care Services
Users can quickly book Car Wash & Care Services either instantly or for a later time. All services are delivered to their chosen location. Options include car washing, battery jumpstart, fuel delivery, bike washing, EV charging, key lock help, and more. The admin panel allows easy management of all Car Wash & Care Services.
-
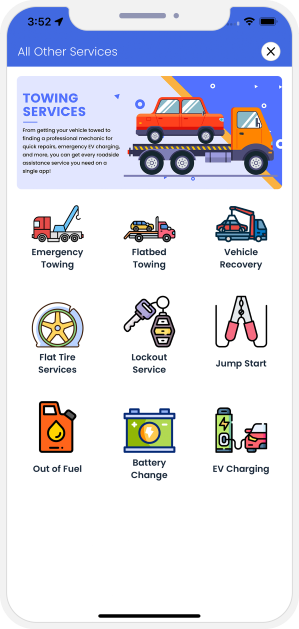 Roadside Assistance & Towing Services
The app also offers towing and other services. Users can request help for flat tires, lockouts, fuel shortages, vehicle recovery, emergency towing, and flatbed towing. All service listings can be modified by the admin whenever needed.
- The app interface provides a simple and clear layout for booking various taxi and delivery services. The home screen (left image) shows key options like Taxi Booking, Taxi Pool, Taxi Rental, Schedule, and more. A search bar is provided for users to access more services, making App user-friendly.
- Tapping on “More Services” will open a detailed menu (right image) with additional options like Moto Booking, Electric, Tuktuk, Airport, Assist and Pets. Each service is marked with icons for quick recognition. The design ensures smooth navigation and quick booking with just a few taps.
- Using this section, Riders can book a Taxi or Moto smoothly.
- Moto Ride: In this screen, you can book a Moto Ride. The Rider simply needs to tap on the Moto option, choose the type of Moto they want like Moto Bike, Scooter and Sports bike and then enter their respective pickup as well as drop location. As soon as they perform this step, they shall receive the fare details so as to maintain Ride transparency.
- Taxi Ride: In this screen the Rider can book a Taxi Ride. The Rider simply needs to enter their Pickup and Drop location, choose the Taxi they wish from the list like Basic, Normal and Luxurious and receive the fare detail thus ensuring the overall Ride transparency. User can also select the Payment mode that he wants.
- Driver sets availability online and chooses the Vehicle they wish to use.
- Rides only get sent to the Drivers that are online and fall within the nearby vicinity of Rider.
- In case of the Driver using more than one Car they need to choose the one that they would like to use for offering rides to riders.
- Once the Rider has put in the PickUp and Drop Location and selected the type of Taxi & Payment option, the App will send out a request to the Drivers in the nearest vicinity.
- There are 3 algorithms of deciding how to allot Rides to a driver:
Closest First: The Driver in the closest proximity gets the request first. If they reject, the ride in turn goes to the next and so on and so forth.
Competitive: Every driver in the given radius is given the request, and whoever chooses first gets it.
FIFO: First In First Out method allots the rides to the car waiting idle for the longest duration in the given radius of an area - When a Rider requests for a Trip, the App sends out a Request to all the Drivers in the area.
- The Drivers see a screen with all the details and a timer. They must accept or decline the request within the time frame failure of which leads to the request getting automatically declined.
- Rider here gets a glimpse of the location of the Driver and thereafter calculate the estimated time of arrival.
- Rider can Call / Message or Share the Ride details.
- The Driver receives a glimpse of the location from where they need to pick the Rider and thereafter calculate the estimated time they would take to arrive there.
- Driver can Call / Message / Share / Cancel the Ride.
- User can connect with Driver through audio or Video call along with chat option.
- Two options will be displayed on the Screen.
- Driver can request User for Pick Location photo if he is not able to find the Pickup location.
- By tapping on "Pick Up Area" button, Driver will request the Pick up area Photo.
- On the other side, User will get Pick Up Area Photo upload request in this App.
- User will get option to capture the photo or upload it from Phone Gallery.
- Driver will receive the Photo from User and can see in their App.
- User can see the photo sent to Driver in their App.
- As soon as Driver arrives at location of Rider, they slide the button to mark as Arrive.
- As soon as Driver reaches the location, the Rider is notified of the same.
- As soon as Ride starts, the Driver slides the button ‘Begin Trip’ to notify the Rider of the ride getting started. Here Driver will get option to record the Inside Taxi Video.
- The Rider gets notified with the message 'Your Trip Has Started' as soon as their Trip begins.
- Enroute the trip, the Rider can track the same live on their map. They can also use the SOS button on the App for emergency purpose and change the destination during the Ride.
- They can also share the Ride location with Family and friends if needed.
- Here Driver will get option to record the Inside Taxi Video. The Video recording feature enhances safety and provides a more secure ride experience for both Drivers and Riders.
- Here, User will also see message on Screen as "Vehicle is equipped with inside Video Recording".
- a. Google Maps In-App Navigation Feature will Show here (App Owner must Subscribe for this Service with Google for this Feature to Work).
- b. Google Maps will Show here.
- c. Apple Maps will Show here (Available in iPhone).
- d. Waze Navigation Maps will show here.
- As soon as Driver reaches the location, they slides the button 'End Trip’ to notify the end of Trip and Rider gets notified of same.
- Rider gets notified on Trip completion with the message ‘Your Trip has Completed'.
- Upon completion of the Trip, the App generates an invoice whose summary gets flashed on the screen of the rider and driver both.
- The summary mentions the details of the trip like fare, discount applied, etc. to name a few.
- InDrive like Taxi Bidding Flow : In this, User goes with a Fare Price that he agrees with Taxi Driver. A Taxi Bidding features allows Users to request Taxi Rides and let’s Taxi Drivers bid on those ride requests. Instead of a fixed price determined by the Taxi app, the price for a Ride is determined through a Bidding Process where multiple Drivers compete to offer the lowest fare for the requested Ride. This can lead to cost savings for Riders and increased business opportunities for Drivers.
- Standard Uber like Taxi Booking Flow : In this, User gets the fixed Fare based on Vehicle Type (Basic, Luxurious, Pool etc). User choose the option based on his preference and budget.
- User can see Taxi bidding banner on the Home Screen. Tapping on the banner, User can see information related to Taxi Bidding Feature.
- User can enter the Pick up and destination location in the App.
- After providing the location details, User can view list of Taxi options available.
- User can also select the payment option from this screen.
- Before sending the request User can set the Fare that he wants to pay. Here average Fare for the selected location will be shown and user can enter the fare based on it.
- Nearby all the Drivers will get the Ride request along with the Fare offered by the Rider.
- Driver can either accept the offer or can counter offer.
- In this case, Driver accepts the offer by Rider.
- Once Driver has accepted the offer, User will be notified that XYZ Driver has accepted your Offer.
- Rider then accept the request and starts the Ride.
- Driver will be notified that Rider has accepted the Offer.
- Upon receiving the request from Rider, Driver can counter offer the Ride Fare.
- New Fare notification will be send to Rider.
- In this scenario, Rider receiver multiple bids from the Drivers.
- Rider can see the Ride Fare offered by all the Drivers.
- Rider can accept or decline any request from the Driver.
- Here Rider accepts the offer from Driver - Michael Williams.
- Driver will be notified that Rider has accepted the Offer.
- Rider here gets a glimpse of the location of the Driver and thereafter calculate the estimated time of arrival.
- Rider can Call / Message or Share the Ride details.
- The Driver receives a glimpse of the location from where they need to pick the Rider and thereafter calculate the estimated time they would take to arrive there.
- Driver can Call / Message / Share / Cancel the Ride.
- Rest of the flow would be same as Taxi Booking Flow.
- We have added the intercity trip feature to our Taxi Ride Booking component. With just a few clicks, users can book Taxis via the app and commute from one city/town to another with comfort and convenience.
- Here User can opt for One way Trip or Round Trip.
- Lets see how Round Trip Feature works in the App.
- User can Select package for the selected Vehicle Type.
- After this User can Choice of vehicles as per seating capacity. Then User can Accept & confirm to send Ride Request to Driver.
- Driver sets availability online and chooses the Vehicle they wish to use.
- Rides only get sent to the Drivers that are online and fall within the nearby vicinity of Rider.
- In case of the Driver using more than one Car they need to choose the one that they would like to use for offering rides to riders.
- Once the Rider has put in the Source and Destination Location and selected the type of Taxi & Payment option, Date & Time, the App will send out a request to the Drivers in the nearest vicinity.
- There are 3 algorithms of deciding how to allot Rides to a driver:
Closest First: The Driver in the closest proximity gets the request first. If they reject, the ride in turn goes to the next and so on and so forth.
Competitive: Every driver in the given radius is given the request, and whoever chooses first gets it.
FIFO: First In First Out method allots the rides to the car waiting idle for the longest duration in the given radius of an area - When a Rider requests for a Trip, the App sends out a Request to all the Drivers in the area.
- The Drivers see a screen with all the details and a timer. They must accept or decline the request within the time frame failure of which leads to the request getting automatically declined.
- Rider here gets a glimpse of the location of the Driver and thereafter calculate the estimated time of arrival.
- Rider can Call / Message or Share the Ride details.
- The Driver receives a glimpse of the location from where they need to pick the Rider and thereafter calculate the estimated time they would take to arrive there.
- Driver can Call / Message / Share / Cancel the Ride.
- As soon as Driver arrives at location of Rider, they slide the button to mark as Arrive.
- As soon as Driver reaches the location, the Rider is notified of the same.
- As soon as Ride starts, the Driver slides the button ‘Begin Trip’ to notify the Rider of the ride getting started.
- The Rider gets notified with the message 'Your Trip Has Started' as soon as their Trip begins.
- Enroute the Trip, the Rider can track the same live on their map. They can also use the SOS button on the App for emergency purpose and change the destination during the Ride.
- They can also share the Ride location with Family and friends if needed.
- As soon as Driver reaches the location, they slides the button 'Mark as Reached’ to notify the end of Trip and Rider gets notified of same.
- Rider gets notified on Trip completion with the message ‘You have arrived at the destination'.
- To Start the Return Trip, Driver can slide the "Start Return" button from his app.
- Rider gets notified as ‘Driver has started return journey to your source location.'
- Further the flow of the App will be same as Taxi Booking described above.
- As soon as Driver reaches back to Source location, they slides the button 'End Trip’ to notify the end of Trip and Rider gets notified of same.
- Rider gets notified on Trip completion with the message ‘Your Trip has Completed'.
- Upon completion of the Trip, the App generates an invoice whose summary gets flashed on the screen of the rider and driver both.
- The summary mentions the details of the trip like fare, discount applied, etc. to name a few.
- The AI Dynamic Pricing will automatically study the weather and calculate the price. The user will be shown the updated pricing on the App screen during the weather condition, with proper comfort and quick ride booking.
- The system automatically modifies fare rates depending on the platform used (Android, iOS, web) to balance operational costs and third-party fees. The user will be shown the fare pricing, and there is no need to calculate manually, as the App is integrated with an AI Feature.
- The user can access these features from your marketing advertisement, a direct WhatsApp link on the Website, scanning the QR Code, and saving your taxi business mobile number on their phone. Now the user will go to WhatsApp Chat and type “Hi, I want to book a Taxi.”
- No app downloads, no lengthy forms, just a quick message to kick start the process. Your customers can instantly connect with your taxi business through a familiar interface they already trust.
- The AI-powered Chabot welcomes them, guides them step by step, and makes booking a taxi as easy as sending a message. It’s quick, intuitive, and designed for today’s on-the-go users.
- Next, the user will click on “Proceed.” The Chatbot will ask for some booking details, such as
- Language
- Name
- Country
- Phone Number
- Currency
- The User taps on “Confirm” to proceed.
- As the user enters the details, the Chatbot will ask for the pick-up location. The user clicks on the send location button and the chatbot detects the current location of the user and show it on the screen. The user can enter the pick-up location manually as well.
- Then, the user taps the send location button and the Chatbot confirms the location as the pick-up location.
- Then, the Chatbot asks for the drop-off location. The user clicks on the send location button and then types in the drop-off location and click on send location. The Chatbot considers the given location as drop-off location.
- After putting in the pick-up and drop-off location, the Chatbot asks for vehicle selection. The user clicks on their preferred vehicle and clicks on continue.
- Then, the Chatbot asks for any promo code that user might have. The Chatbot also shows the currently applicable promo codes and the user selects the one with most benefits.
- The driver views essential ride details such as pickup location, trip distance, and estimated fare on their Driver App. They can either accept or decline the trip.
- The user receives a WhatsApp confirmation after booking a taxi. The message includes pickup and drop-off addresses, booking type, payment mode, and a thank-you note.
- The Driver accepts the ride, and the App switches to live navigation, guiding the driver to the passenger’s exact pickup spot. The driver sees the real-time map, estimated time, and route suggestions, enabling a quick, accurate arrival.
- The passenger receives real-time ride status updates on WhatsApp: “Arriving” - Driver is on the way. Driver details, vehicle information, and contact number are shared for safety. A live tracking link is provided for convenience.
- Once the passenger boards, the driver slides onto “Trip Started” through the app. The map updates to show the full route toward the destination.
- WhatsApp notifies the passenger when the driver has arrived and when the trip begins. Status messages like “Arrived” and “Trip Started” keep the user constantly informed until journey completion.
- The driver will mark the “Trip End” when they reach the location.
- The user will receive a notification when the trip ends on WhatsApp, along with the fare to be paid to drivers in cash directly. At last, a thank you message.
- Once the user reaches the destination, an invoice generation message will pop up on the WhatsApp Chat Screen with a link to know more details.
- After the trip is completed, the driver will collect the cash as per the invoice price displayed on the App screen.
- Introduced a new feature where users can recover any items lost in the taxi during the trip.
- The user will open the App, click on “Bookings”, then select a particular trip. The details of the taxi booking will show on the screen. They tap on “Help”.
- Next, the help screen with multiple questions will be shown, where you can select the query, such as “What should I do if I left something in the car?”
- Then, the user has to enter the required details with the photo of the lost item. Finally, click on “Submit”.
- This feature will allow the User to create their own Corporate profile.
- In case the User is traveling for official purposes, he or she can use this profile to make a booking for the ride.
- The User will get all expense reports, ride details, fare, bills and other expenses in the form of an email on their official ID.
- If they are booking a personal ride, they can use their normal/personal profile in order to make the booking.
- The User will have to make their profile and select their organization.
- When they do this, a request for verification is sent across to the Organization. Once the organization has verified the profile, the corporate profile is registered.
- The User will get all expense reports, ride details, fare, bills and other expenses in the form of an email on their official ID.
- Your Users will now be able to make a booking for all their professional or work related travel using these profiles.
- User can choose between the Business profile and personal profile while booking the Ride.
- After choosing the Business Profile, User can choose the purpose of choosing Business Profile like Travel to Airport etc.
- Rider needs to simply tap on ‘Pool’ and book a seat instead of booking the entire Taxi.
- Rider can choose the number of people travelling with them.
- Book a ride for someone who does not have the application and wants to do the trip.
- This feature allows the User to select the contact details of someone else and request for the ride.
- When the driver will accept the request the another user will be notified by SMS about their trip.
- Using this feature, the driver can get new ride requests while he is still on a trip. By accepting these back-to-back trips, drivers can spend more time earning money rather than waiting for next trip.
- when a new ride request shows on the app, Driver can accept / reject the requests.
- Provide Pick up and Drop off locations
- Tap on "Rent a Taxi" option on the screen
- You will now come to a Screen that will request you to fill in details of your Pick Up location, Taxi Type and the Hour wise package.
- Once the choice is made, the user will be shown the inclusive of the package and the fixed fare for the same.
- Prices per unit of distance and per unit of time will in case of exceeding the package particulars will also be shown here.
- When the choice is made by the User a request is sent out to the Drivers.
- All Drivers who match the requirement in the area are sent the request.
- The request page shows a timer to accept the request along with other details of the Ride requested.
- Once the Driver accepts this request, the job is theirs.
- This way User can rent a Taxi and pay according to the selected Payment mode.
- User gets notified if any surcharge is going to be applied on his Ride / Job. Surcharge can be perk time extra charge or night charges, etc. The Administrator sets the surcharges from Admin panel.
- A User can book a ride / Job for a later time also. Let's say he wants to book a ride for Airport 2am midnight. In this case, he doesn't have to remember and book a ride at 1.45am. He can simply book a ride for a later time. And the system will Auto Post the ride request at 1.45am to all drivers in the range of pickup location.
- User can select the Date and Time for the Taxi Booking.
- After selecting the Date & Time, list of available Taxi types will be displayed. User can select the Taxi type that he wants to book and also selects the payment Mode.
- After providing all the details and making the payment, User can see Booking request message on the screen.
- User can see his Ride Later booking in My Bookings section along with Driver details (if assigned).
- On Driver Application Landing Screen, User can see Ride Later Booking request icon on the top.
- User can tap on the icon and can see all the Ride Later Booking requests.
- User can accept or decline any Ride Later Booking request.
- User can also gets option to reschedule the Ride if needed or can cancel it anytime.
- Once Driver has accepted the Ride, he can view two options on the screens as "Start Trip" or "Cancel Trip".
- Driver can tap on "Start Trip" to start the Trip. A Confirmation message will be shown on the Screen.
- On the Other side, User will see a message on his app as "Get ready, the Driver is on the way".
- Rest of the flow of Taxi Ride will be same as Taxi booking described above.
- The Emergency Option will be available for both the User and the Driver. The option will be shown while en route.
- Note: The Emergency Option will be available for both the User and the Driver / Service Provider while booking the other Services.
- Call 911 - The User can make a call to 911.
- Send SOS Message - The User can send SMS to Emergency Contacts that he has saved.
- Record Audio - The User can record the Audio and can send to Admin.
- Share Trip Status - The User can Share the Trip Status with his Friends and Family.
- Live Chat - User can chat with Admin in case of emergency.
- User can also write the message along with the Audio message and can send to Admin.
- Let's say a Driver is available for a ride and is driving an empty car. And some passenger just hails at him and want to hire him for a ride, the driver can simply tap on Hail Ride Option on the Map and add the destination address. Upon this the fare estimate will be calculated and route will be shown on the map. The Driver will start the ride and complete the ride in systematic way. The whole ride will be traced and an invoice will also be prepared at the end. This is the best option to make your Taxi Company earn more money if you want drivers to take rides from passengers who may not have User App on their phone. And want to keep invoicing and rides route & detail to be stored in the System. On top of all, the taxi Company earns commission on this ride.
- The feature above enables the rider to stop over at multiple points during a single ride thereby enjoying a unique pickup and drop experience with family, friends or colleagues and making the ride on a whole easy, enjoyable as well as cost-effective for the rider at large.
- You can earn more by increasing the number of trip requests thereby allowing riders to enjoy shared long-distance rides.
- The rider needs to simply enter their pickup and drop location along with other stopover points and book the ride thereafter. The driver will receive the request of the same on their application where they need to simply mark each destination.
- The trip fare gets calculated as per standard fare defined as per vehicle type and the stopover hold time would get calculated in the invoice as per the standard time rate defined per vehicle.
- The app also contains a feature where the rider can end the trip in a situation where they wish to end the trip at any destination of their choice.
- This is a very unique and useful feature that allows people to “pause” their trips along the way. This means that a user will be able to stop to buy items or to eat while their trip is on.
- When the User wants to stop the ride in the middle of the trip, they can ask the driver to “Pause” the ride in the middle of the trip. During this “pause” time, the User will be charged a separate waiting fee.
- This means that the trip charge and the waiting charge will be calculated separately and then added cumulatively in the invoice at the end of the trip. This gives you fair and unbiased billing each time.
- The User will get a notification that his Trip has been put on hold.
- The Driver can restart the Trip once User is back in the Taxi.
- The User will get a notification that his Trip has been resumed.
- User & Driver can cancel the booked Trip (once the driver has accepted the ride request and before he picks-up the User).
- If a User cancels the ride X minutes after booking the ride, he will have to pay Y amount of cancellation charges. The cancellation fees will be deducted form his Credit Card.
- Cancellation fees is optional and is set by Administrator.
- The Airport Surcharge feature will enable you to add a surcharge amount to all the Rides coming from the airport or going to the airport.
- The Admin can Geofence the area around the airport. When this is done, if a ride originates from within that area or if the drop location falls within that geo fenced area, the app will automatically add a surcharge value to the ride.
- This is a specification that allows the admin to keep a fixed flat rate for a trip from a fixed point A to a fixed point B. For e.g. the admin can choose to keep a flat fare of 'X' in between the airport and the railway station which will not vary owing to anything. These two points can also be two cities.
- Driver can tap the Destination Mode Icon at the Driver App.
- Enter your destination address. You can also set the destination as your home address or any location of your choice.
- Tap on "Start trip to destination“
- Your destination will appear as a pin on the map.
- In case when Drivers are going to a specific destination for any purpose then they can set the destination mode on and add the destination address.
- Now, those Users who are requesting for the ride, near around same destination address then drivers will get those ride request.
- This feature helps the Driver to earn more when they are traveling to predefined route or destination everyday like going home.
- Get this feature and increase the Trip request ratio and earn more.
- The app will automatically calculate the Toll that may be charged on the Route. This amount is added to the total bill in the Invoice. This feature is exclusive for specific countries only.
- In Taxi on demand Service, Rider has to provide the OTP to Taxi Driver in order to start the Ride.
- Driver will then enter this OTP in his application and start the Ride.
- User can set Preferences for Rides like Prefer a Female Driver, Taxi with Handicap Accessibility, Taxi with Helper, Pet Friendly Taxis and Taxi with Child Seat accessibility.
- Woman Users will be able to prefer Woman Drivers for their Rides. When this option is ON, Woman Users can select if they prefer Woman Drivers. In this case, 1st all Woman Drivers will be preferred and if there is no woman Driver in vicinity, male drivers will be requested for the ride.
- If your Drivers have Taxi's with Handicap Accessibility, they tick the option as YES in their Taxi's Detail Screen. And thus they will be preferred for Rides requested by Handicap Users
- If the User is traveling with a child, they will have to go to the “preferences” section of the application. When the User taps on “Preference”, they will find 3 options. They must select “Prefer Taxi with Child Seat Accessibility”.
- These options can be turn ON/OFF from Admin Panel.
- If a user needs a taxi with a helper to assist them, they can book using the Assist feature.
- Gojek clone offers booking a pet-friendly Taxi Rides through the Pet Friendly Taxi feature.
- In order to enable the preferences, the Driver has to mention in the application while setting up details about their vehicle, that they have “Child Seat”, "Handicap accessibility", "Helper" or if the Taxi is pet friendly,
- When the User wants to make a booking for a later time, they can tap on the "Enter Destination Later option".
- Using this feature your Rider can put in the destination of their trip even after the trip has begun.
- Moto service booking follows the same process as when riders book a taxi. The rider simply needs to provide their location details so that they can get connected with moto drivers nearby.
- The rider now needs to select the moto type – Scooter, Moto Bike or Cycle and thereafter choose the payment mode they would want for the ride booked.
- Rider now chooses the profile type ‘Personal’ or ‘Corporate’.
- Rider can choose the moto booking time ‘Book for Now’ or ‘Schedule for Later’.
- On selecting the moto type and payment mode the ride details thereafter gets sent to Moto drivers nearby.
- On the app of the driver, the ride request gets displayed. It is important to note that the ride request is time-bound and in case the driver fails to accept ride within the time set in timer, request automatically gets sent to the next driver. The rest of the flow though is the same as the Taxi Booking.
- We've added a Personal Driver Booking feature to the taxi booking component. With just a few clicks, users can book a professional/personal driver to drive their vehicle around the city.
- Here, the user hires a driver when they don't want to drive, for safety reasons, convenience, or inability to drive.
- Let's see how the personal Driver booking feature works in the App.
- After clicking on the Personal Driver banner, a screen will appear explaining how to use it. A personal driver is a professional driver who will drive the user's vehicle.
- You can book your personal driver using the "Book by Distance" or "Book by Hour" options.
- A screen will appear showing the "Book by Distance" option. This option allows users to book a personal driver for a trip, with the fare based on the total distance traveled from the pickup point to the destination.
- Another screen shows what "Book by Hour" means. This option allows users to book a personal driver for a specific time, from the time of the trip until the destination is reached.
- Drivers can manage their service preferences by going to the Profile section and selecting "Manage Services."
- Upon selecting "Manage Services," the Driver is directed to the Service Type Menu. To continue managing the driver-related offers, the driver clicks the "Manage Personal Chauffeur Service" option.
- Once the driver clicks the Personal Chauffeur option, they can activate the service and also specify the vehicle's preferred transmission mode (manual, automatic, or both), based on their comfort level.
- The personal chauffeur operates the customer's vehicle instead of using their own car.
- The User needs to enter the pickup and drop-off locations.
- The User will then select "Book Now" or "Book Later" and click the "Next" button to proceed.
- An animated map will appear from the pickup point to the location when the starting and destination addresses are set.
- On this screen, the user can view booking information, such as locations. The user can also view the calculated fare and promo code, and write special instructions for the driver.
- The User can then edit or add their vehicle details.
- Enter details such as the Make, Model, Transmission, License Plate, and Vehicle Color, and then attach a photo.
- Once the User taps the "Request" button, the request is immediately sent to the App and sent to all Personal Drivers within a radius of X miles/km.
- All drivers within a radius of X miles/km will receive a notification on their mobile devices with a countdown screen. They will have the option to accept or reject/ignore the incoming personal driver request. They will also see the pickup location, destination address, and requested trip, as well as vehicle details before they can accept the trip.
- To view vehicle details, the personal driver taps "More Info."
- On this screen, the Driver will check information such as the Model number, Make, License plate number, etc. Based on this, they will decide whether they are comfortable accepting the job.
- Once the Driver accepts, the User will see the Driver's details on the screen and see who is coming to pick them up. They can also track the Driver on the map. They can also contact the driver via chat, call, etc.
- Once the personal driver accepts the trip, they can see the pickup location on the map. They will then arrive at the pickup location and mark the status as "Arrived." They can view details and can also contact us via SMS or phone if they want to inquire about directions, etc.
- Once the driver arrives at the user's location, they tap the button to mark "Arrived."
- Once the driver arrives at the location, the user is notified.
- Once the trip begins, the driver "Slide to Begin Trip" to notify the user that the trip has begun.
- The user receives a notification with the message "Your trip has Started" once the trip has begun.
- In an ongoing trip, the user can track the trip directly on their map. They can also use the SOS button on the app for emergency purposes and change the destination during the trip.
- They can also share the trip location with family and friends if necessary.
- Once the personal driver arrives at the location, they "Slide to End Trip" to inform the user that the trip has ended, and the user receives a notification.
- The user receives a notification when the trip is complete with the message "Your trip has completed."
- When the trip is complete, the app generates an invoice, and the summary is displayed on the user's screen. The user can rate the driver. After the trip is complete, drivers can provide a rating to the user.
- After completing a trip, Drivers can provide a rating for the user.
- After the trip is complete, the user will pay personal driver using a card or wallet.
- The User can also book a Personal Driver for a later time. Let's say they want to book a Personal Driver to drive them home from the office at 6:00 PM. In this case, they don't want to rush or be inconvenienced the next time. The User can enter the pickup and drop-off location, as well as the date and time for the Personal Driver.
- After entering this, a moving map will appear. The user then taps the "Book Later" button.
- When the request is submitted, a pop-up message will appear indicating that the requested booking has been made. The app will automatically assign the personal driver soon and notify the user.
- The user can view the subsequent booking from the "My Bookings" list.
- The request will be received by an available personal driver in the area.
- The driver can review the details and accept or decline the request based on availability.
- After reviewing the details, the driver accepts the task.
- Upon acceptance, the user will be notified of the drive details.
- The user has the option to reschedule the ride for a later time by going to the booking list and tapping "Reschedule." The user then selects the date and time and clicks the "Set" button.
- At the time of the trip, assigned driver will arrive at the pickup location. The user will then begin the trip by clicking "Start Trip."
- The User can also book a Personal Driver by the hour. This option is ideal for flexible travel times. In this case, the fare is calculated based on the travel time.
- The user must enter the pickup and drop-off locations and click "Book Now." They must specify the booking hours for the personal driver.
- An animated map will then be displayed between the pickup and drop-off locations.
- On this screen, the user will view booking information such as location, payment method, fees, etc.
- The user can then edit or add their vehicle details.
- Enter details such as the make, model, transmission, license plate, and vehicle color, and then attach a photo.
- Once the user clicks the "Request" button, the request is immediately sent all personal drivers available within a radius of X miles/km.
- All drivers within a radius of X miles/km will receive a notification on their mobile devices with a countdown screen. They will have the option to accept or decline/ignore the incoming personal driver request. They will also see the pickup location, destination address, and requested trip.
- To view vehicle details, the personal driver taps "More Information." On this screen, the driver will check information such as the model number, make, license plate number, etc.
- Once the Driver accepts, the User will see the Driver's details on the screen and see who is coming to pick them up. They can also track the Driver on the map. They can also contact the driver via chat, call, etc.
- Once the personal driver accepts the ride, they will see the pickup location on the map. They will then arrive at the pickup location and mark the status as "Arrived."
- They can view the details and can also contact us via SMS or phone if they want to inquire about directions, etc.
- Once the Driver reaches the User's location, they tap the button to mark "Arrived."
- Once the driver arrives at the location, the user is notified.
- Once the trip begins, the Driver "Slide to Being Trip" to notify the User that the trip has begun.
- The user receives a notification with the message "Your Trip Has Started" once their trip has begun.
- The user can track the trip live on their map. They can also use the SOS button on the app for emergency purposes and change the destination during the trip. The user can also see the timer on the map.
- They can also share the trip location with family and friends if necessary.
- Once the personal Driver arrives at the location, they "Slide to End Trip" button to notify the user that the trip has ended, and the User receives a notification.
- The User receives a notification when the trip is complete with the message "Your Trip Has Completed."
- When the trip is complete, the app generates an invoice, and its summary is displayed on the user's screen. The User can rate the driver.
- After completing a trip, Drivers can provide a rating for the user.
- After the trip is complete, the user will pay personal driver using a card or wallet.
- User needs to add their location first so as to get connected with the nearest Parcel Delivery Drivers.
- Upon completing this step, they need to select the Delivery Vehicle like Scooter, Cargo Car, Truck etc..
- User can choose the payment option as Cash, Card or Wallet.
- User can add Parcel details like Receiver name, Package type, details etc.
- User can provide their Special Delivery instructions if any.
- After entering the parcel details, User can review the booking summary and can make payment.
- After providing all the details, a request will sent to nearby Delivery Driver.
- Driver now needs to accept the request within the time given in timer.
- The request is time bound and thus if the request does not get accepted within the timeslot of the timer, the request gets automatically sent to the next Driver.
- As soon as Driver accepts request, User receives the details of the Driver. User can track the Delivery Driver location on Map.
- The User can remain connected with the Delivery Driver via calls and messages.
- The Driver receives the location of the User and can track the pickup location on Map.
- The Driver remains connected via calls and messages till they arrive.
- The Driver can also cancel the Delivery.
- Upon the arrival, the Driver confirms their arrival at the location of the User by sliding the button "Slide to Arrive".
- Upon the arrival of the Driver, the User gets notified with 'Driver X Has Arrived at Your Location for Parcel Pickup’.
- To start the Delivery Process, the Driver can obtain the Sender's Signature.
- The Delivery Driver will also enter the OTP provided by the Sender to start the Delivery.
- The Driver begins their service and tracks the Delivery location where the parcel needs to be delivered.
- Upon the Driver arriving and beginning the Delivery process, the User in turn gets notified with ‘Your Delivery Service has Started'.
- Upon reaching the Delivery Address, the Drivers slides on ‘End’ to confirm the end of the Service.
- Upon the Delivery, the User is updated about delivery that the Parcel has been Delivered to the recipient.
- Delivery Driver can confirm the delivery by verifying the confirmation code provided by the Recipient.
- The Delivery driver can confirm the Delivery by obtaining the Recipient's Signature.
- Upon the end of Delivery, the invoice gets shared with them.
- The summary contains the details of the Service provide including its fare, date, discount applied (if any) , fare details and review in order to provide feedback.
- Invoice will be displayed to Delivery Driver.
- The invoice contains the total fare, payment type chosen by user. In case of cash, the Driver collects the same from the user. The summary also contains the base fare, distance, time, tax and subtotal of the entire Service provided.
- In case of the user wanting to send more than one item to more than one place, they can thereafter choose the Multi Delivery Option. To utilize this service the user needs to select the vehicle type they require for the mentioned delivery.
- The next step involves providing the pickup address from where the items need to be picked and thereafter provide the location wehre the items need to be delivered. The same would also get displayed on the map and the user would have to simply provide all the required information about the parcel.
- As soon as the user provides the address for pickup and delivery both, they need to next provide details in relation to the items being sent
- These details would include the name of the receiver, contact details, special instructions (if any), and details of the item that may include, ‘electronic/fragile’ etc. and package size.
- With the user providing all the details given above, they need to tap on ‘Deliver Now’ and in case of error made on the part of the user, they simply have to tap on ‘Reset’, thereafter they need to again repeat the steps.
- The user now needs to tap on ‘Add Delivery’ to add another location for the delivery.
- On tapping ‘Add Delivery’ they would need to provide details of the address where they want the second delivery to be made and the steps are the same as when done in the first delivery.
- The user can add multiple delivery stations repeating the same method. Thereafter, the map will show the routes of all the deliveries that have been requested
- When the User then taps on “Next” option on the bottom of the screen, he will then be taken to a screen that shows the pricing.
- The user gets the payment mode that they can choose from such as cash or card and get the option thereafter to select the person who will make the payment, that is, the sender or receiver or each recipient.
- Further the flow of delivering the Parcel will be same as described in single delivery.
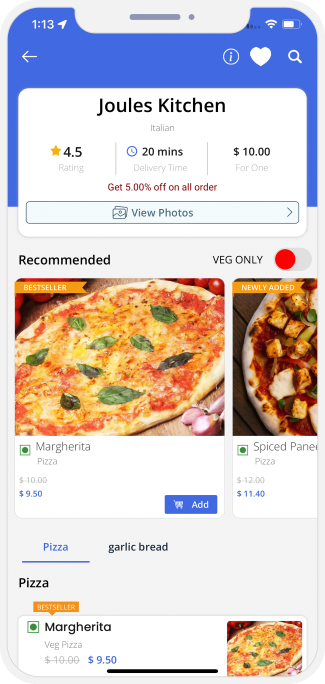
- Here the user gets a glimpse into all the Restaurants nearby as soon as they provide their location details.
- Thereafter the user would be empowered to choose the restaurants that fall within the vicinity of the location provided by them. The app will present users with a list of nearby restaurants and also give them the flexibility to filter their search on the basis of the cuisine and sort the listing thereafter.
- The Other Categories like Grocery Delivery, Pharmacy Delivery, Wine Delivery, Stationary Delivery would work same as Food Delivery.
-
User App This section helps the user efficiently place an order for their favourite meals from the restaurant of their choice and also get a glimpse into all the restaurants that are online.
-

Restaurant App This app is primarily for the restaurant owners. They can set their availability online or offline by simply sliding on the toggle. In case of the restaurant setting their availability online, they start receiving food requests from the users and in case they set their availability as offline thereafter they would not receive further food order requests from the customers.
-

Delivery Driver App This app is primarily for the Delivery Driver who delivers the meals to the Customer. The driver can set their availability to online by simply sliding on the Online toggle. Thereafter they start receiving food delivery requests and in a situation where they set their availability to offline they do not receive further delivery requests.
-
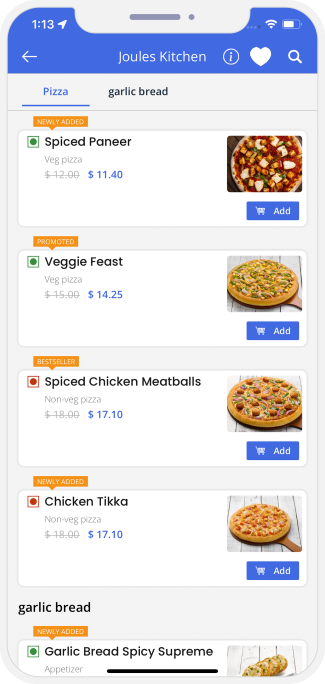 Menu Screen
Here the user gets a menu of the meals from the respective Restaurant selected by them. User can also see if the Restaurant is following the Best Safety Standards or not.
-
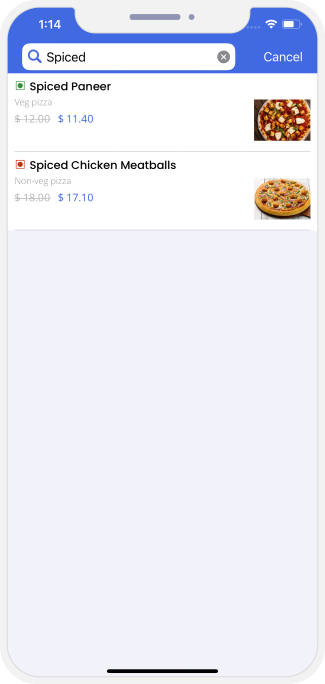 Search Food
In this screen the user can search the meals they are in search of.
-
 Add to Cart
As soon as the user locates the meals they are in pursuit of, they can thereafter add the same to the Cart.
-
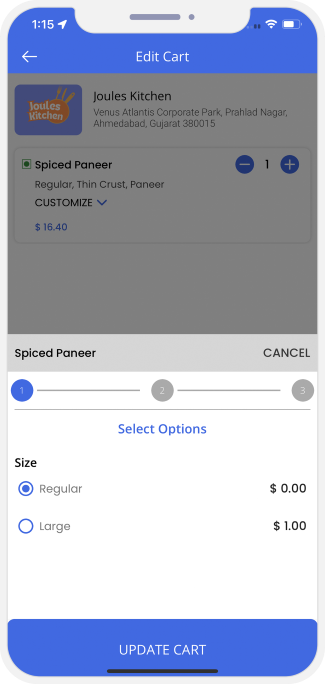
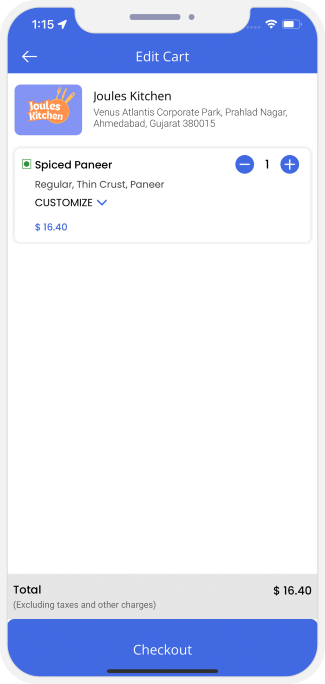 View/Edit Cart
This section assists the user to get a glimpse into the meals ordered by them and add anything extra or remove what is unnecessary.
-
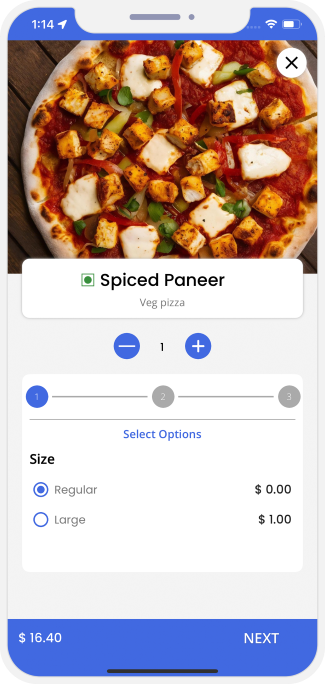
 Select Toppings
In this screen, the user will be presented with a list of toppings that they can choose from for some of the meals and thereafter customize the meals ordered by them.
-
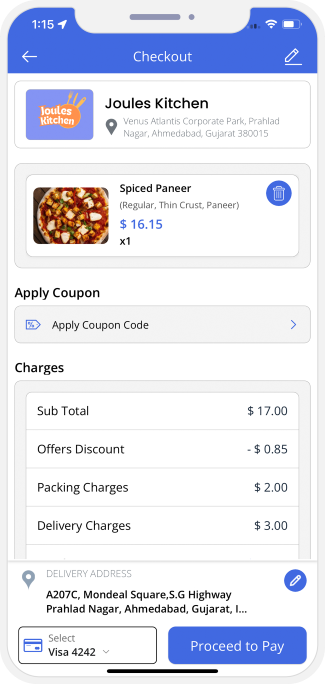 Checkout Screen
As soon as users have found the meal they are in search of and customized it, they are thereafter moved to the checkout section where they need to confirm the Delivery Address, Delivery Options, and Items. They can also apply coupon (If any).
-
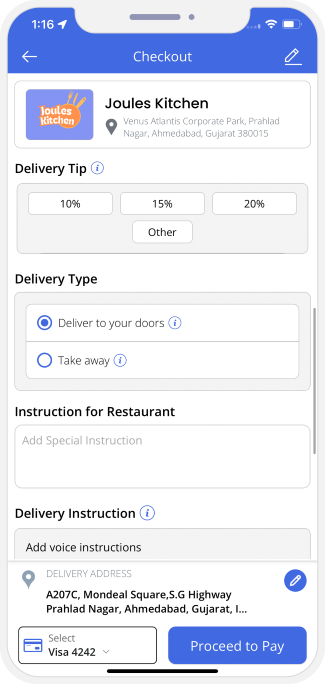 Delivery Options
Here User can select whether he wants to Opt for Contactless delivery at door or Take away.
-
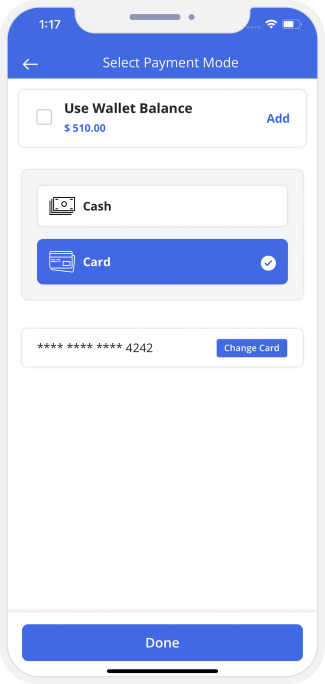 Choose Payment Method (Cash/Card/Wallet)
As soon as they confirm their purchase, users are asked to choose the payment method they would want to follow to pay for the meals ordered by them, choosing between Cash, Card or In App Wallet.
-
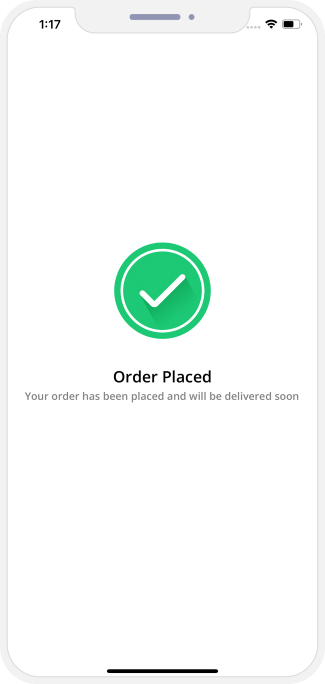
Here the user gets notified and informed thereafter that their order has been placed and shall be delivered shortly. The user also gets the Call feature so that they can place a call to the restaurant to know the exact location of their meals.
-

Once the order gets placed, the Restaurant App displays a screen containing the details of Order received. The latest Order will be displayed on top.
-
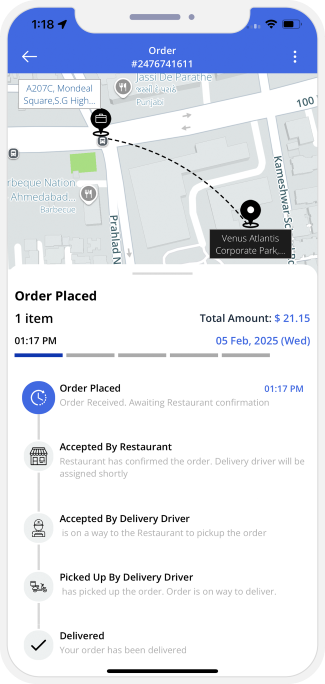
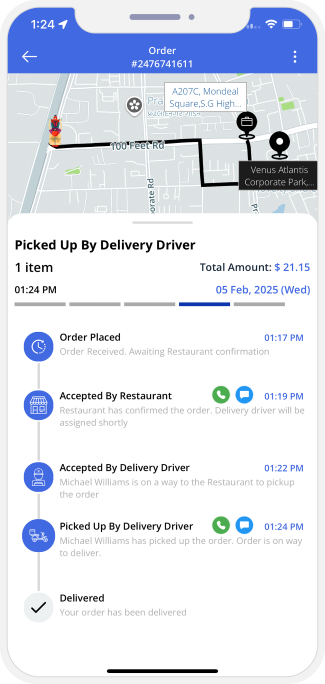
Utilizing this feature, the user can track the meal ordered by them. This order tracking page presents the user with a flowchart. In other words the overall delivery process right from the order getting placed until its delivery is shown here. Also, it helps the user know the exact location of their order and exact time of arrival.
-
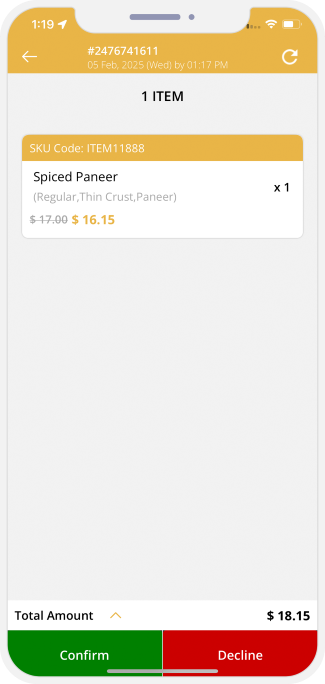
The Restaurant gets the order details and take a look into the same. Thereafter they can confirm or decline the order request as per their choice.
-
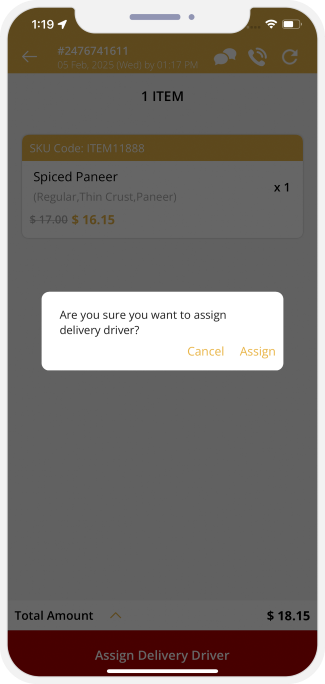
As soon as the Restaurant accepts the order request of the user, they thereafter get presented with a screen containing bill details as well as a button reading ‘Assign Driver’. Upon tapping this button, the request for pickup and delivery gets sent to the delivery driver.
-
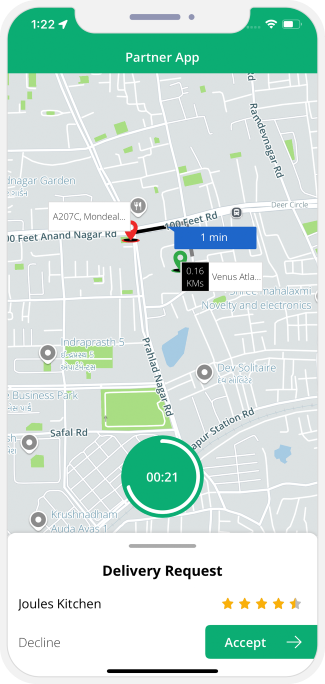
As soon as the Restaurant taps on ‘Assign Drvier’, the request thereafter gets sent to the delivery driver. The delivery driver receives the request in the form of a notification on their app along with a timer.
Note – The driver ought to accept the order within the timeframe set on the timer, failure of which would lead to the request getting sent to the next driver. -
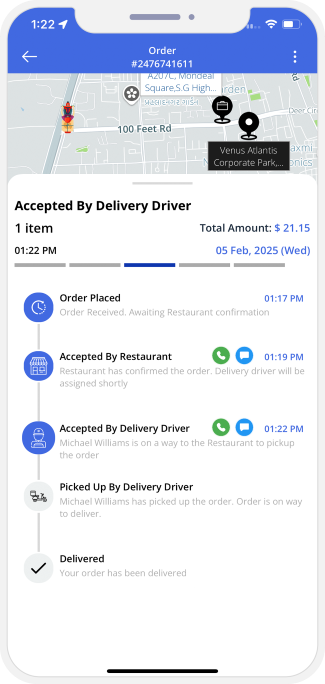
The User would get information that a driver has been assigned to pick up their order. The same will be displayed as a progression in the flowchart on the Users screen.
-
The Restaurant will be notified of the driver accepting the order. This notification will contain the message that the Delivery Driver is enroute on their way to collect the order and will also contain the details of the order.
-
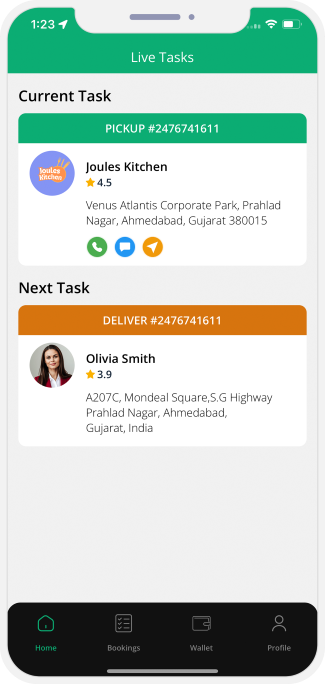
The Delivery Driver will get a view of the current task on their app. This will contain the address of the restaurant from where the order needs to be collected as well as the address where delivery needs to be made. The section also presents the driver with the Call option so that they can place a call to the restaurant and a Map to navigate to the restaurant.
-
User receives the driver's status containing their estimated time of arrival and the flowchart gets marked as per the drivers movement.
-
The restaurant will be able to track the whereabouts of the order and find out if the order has reached the recipient or not.
-
After the order gets picked up by the delivery driver, they will receive details of the person they have to deliver the meals to. Also, they get the Call option so that they can call the customer to find out the way to reach them and a Map so that they can reach in ease and deliver the meal in considerable ease.
-
Not Delivered
In case of the driver marking the order as delivered and the customer has yet not received the same, the user needs to simply tap on ‘Not Delivered’ upon which the admin gets notified of the same.
Note - The customer can place a call directly to the delivery driver also when they tap on this toggle. -
Ok, Got It
On receiving the meal, the customer needs to tap on this button so as to confirm they have received the meal.
- The user now provides rating and review to the restaurant on the basis of the quality of meal delivered to them.
- The User can also provides rating and review to the Driver based on the Delivery experience.
- User can choose the category from the Landing screen as "Services".
- User can view different available Services and book any.
- The screen presents users with all the other services present in the app like Helper, Baby Sitting, Mechanic, Security Guard, etc. and choose from them the one they want.
- On selecting the service of their choice, the User now gets presented with a subcategory of the same.
- User is presented with a list of all the nearby service provider.
- The user can also get a glimpse of the nearby service providers utilizing the Map View.
- Utilizing this feature, Service Providers can update the information in relation to the Services offered by them, including its subcategory.
- Here in this section, Users would get a glimpse of the profile of the service provider they have selected.
- The section also presents Users with the list of Services provided by that Service Provider and thereafter book the service and pay.
- The section presents user with all the past work of the Service Provider in the form of a Gallery and Reviews as well so that they can choose the correct Service Provider.
- As soon as user books the Service and chooses the mode of payment, they get presented with a Booking Summary containing the details of the Service, the mode of payment selected and the location where service would be delivered.
- User needs to choose location where they would require service. They can select from the two options – Location of User or Location of Service Provider.
- Service Provider can choose the location where he would be providing the Services.
- Service Provider can opt to provide service at User's location or his own location.
- As soon as the user has completed these steps, the Job request gets sent thereafter to the Service Provider.
- The service provider now receives the request where they need to offer their services along with the location and thereafter can accept or decline the same as per their choice.
- As soon as Service Provider accepts job request, the user gets notified of the same with the message ‘Service Provider Has Accepted Request’.
- The Service Provider gets presented with the details of the location where they need to provide the services, along with the subcategory of services that need to be provided.
- Service Provider needs to tap on ‘Arrived at Job Location’as soon as they arrive at the location of the User.
- User gets notified as soon as service provider arrives at job location with the message ‘Service Provider has arrived at your location’.
- The Service Provider starts the service now and taps on ‘Job Started’.
- With the arrival of Service Provider, the service begins thereafter and the user gets notified of the same with the message reading ‘Service Provider has Started Job’.
- As soon as service provider is done with their services, they tap on ‘Job Completed’ to notify the app and the user thereafter of job completion.
- As soon as the service provider is done with their services, the user gets notified of the same with the message reading ‘Service Provider has Completed Job’.
- As soon as the service provider taps on ‘Job Completed’, thereafter an invoice summary gets presented on the user app containing the details of the service and the payment related to the same.
- This helps the user provide unique reviews and rate the service provider based on the nature of services provided by them.
- Utilizing this feature, the service provider on completion of their job can provide review and provide rating as well to the user.
- This section present on the app of the service provider helps them select the timeslot and the days they are available to offer their services to the customers.
- User can make the Payment using Cash, Card or wallet.
-
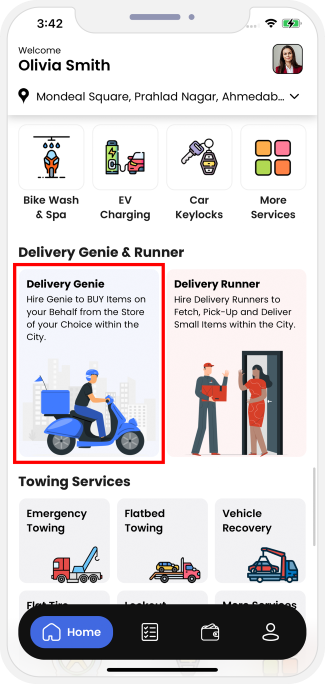
 App Home Screen
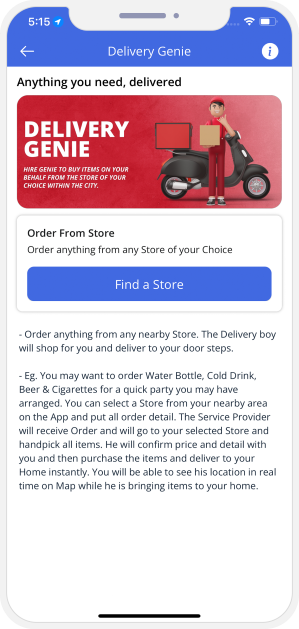
Here you can see different services that you can book. Choose "Delivery Genie" Service if you want to buy anything from anywhere.
-
 Delivery Genie Landing Screen
User here can see the information regarding Delivery Genie. To find a Store, User can tap on "Find a Store" button.
-
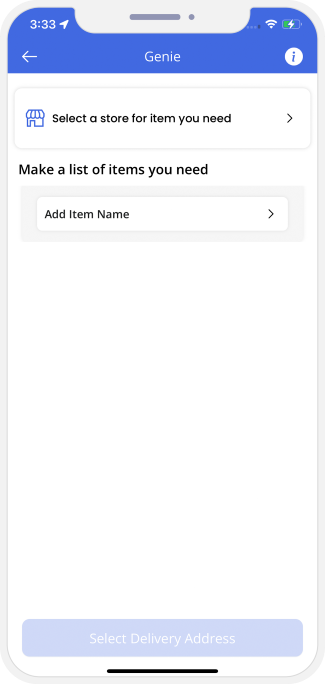 Delivery Genie
User can choose the store he likes and can add the Items that are needed. Delivery Genie feature is mentioned more below
- User can pin point the the Store that he likes on the Map.
- The address of the Store will be automatically fetched and will be displayed on the Map.
- Driver can login in his App and set his status as 'Online' or 'Offline' as per his availability.
- User can make the list of Items that he needs from the selected Stores.
- One by One, User can add all the Items that he wants and can define the quantity.
- User can enter his Delivery Address where he want the Delivery of the Items.
- Here, User can also select from the Delivery Addresses that are already saved or can add the new one.
- After adding all the Items, delivery charges will be shown on the Screen.
- Delivery charges is the fixed amount as per distance between Delivery location and the Store.
- Once User taps on Proceed button, Driver will receive the Delivery request on his App.
- User will receive the confirmation message on this screen once Delivery Driver accepts the request.
- Once Driver accepts the request. It will be added in Current Tasks list.
- User can see the status of the Delivery on his App and can also see the Driver location on the Map.
- Driver can reach to the Store and can check the list of the Items needed.
- Driver can upload the photos of each Item one by one from the Store.
- These photos will be available for the User to review.
- User can review the images uploaded by the Driver. They can confirm whether the Items they have ordered are same or not.
- Once all Products are reviewed, User can further see the Billing amount and the status of the Delivery.
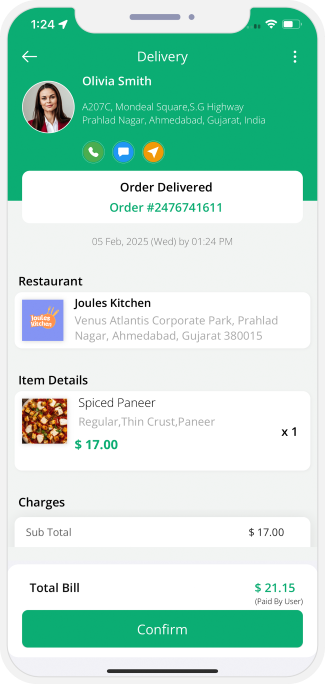
- Driver can confirm the delivery once he has reached to User’s place and delivered the Products.
- Once Driver confirms the Delivery, User can see notification on the App that the Delivery has been done successfully.
- User can review and rate Driver after the Delivery is done.
- Driver can review and rate User after the Delivery is done.
-
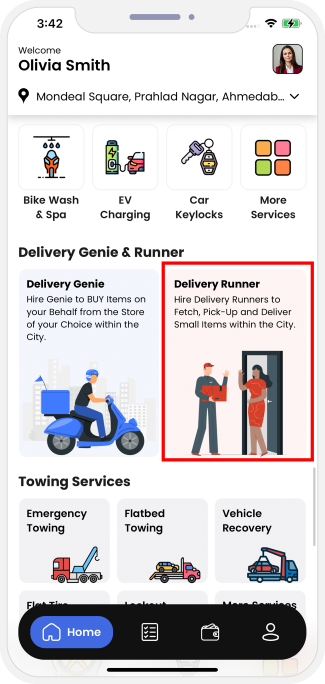 App Home Screen
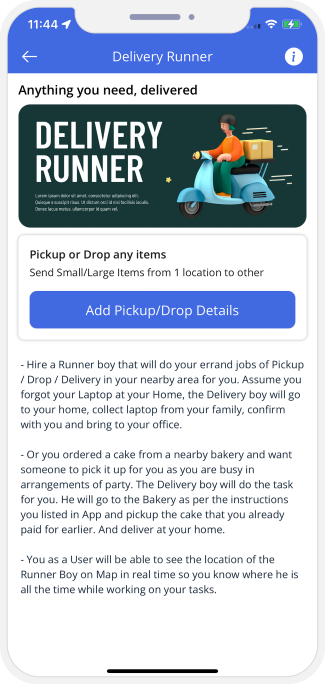
This is the Landing Screen of the Gojek Clone App wherein you will see all types of Deliveries available. Here you can select the Delivery Runner Services.
-
 Delivery Runner Landing Screen
Hire a Runner boy that will do your errand jobs of pickup / Drop / Delivery in your nearby area for you.
-
 Select Address and Add Items
Here User can select the pickup address and the items that needs to be picked up.
- Here you can pick up the location from where you want the pickup something.
- You as a User will be able to see the location of the Runner Boy on Map in real time so you know where he is all the time while working on your tasks.
- Driver can login in his App and set his status as 'Online' or 'Offline' as per his availability.
- Here User can select the pickup address and the items that needs to be picked up.
- Once the details are entered, User can select whether Delivery Driver need to make payment or not at the pickup location.
- User can enter his Delivery Address where he want the Delivery of the Items.
- Here User can also select from the Delivery Addresses that are already saved or can add the new one.
- After adding all the Items, delivery charges will be shown on the Screen.
- Delivery charges is the fixed amount as per distance between Delivery location and the Pickup address.
- Once User taps on Proceed button, Driver will receive the Delivery request on his App.
- User will receive the confirmation message on this screen once Delivery Driver accepts the request.
- Once Driver accepts the request. It will be added in Current Tasks list.
- User can see the status of the Delivery on his App and can also see the Driver location on the Map.
- Driver can reach to the pickup location and check the list of the Items needed.
- Driver can upload the Photos of each item / stuff one by one from the pickup location.
- These photos will be available for the User to review.
- User can review the images uploaded by the Driver. They can confirm whether the Items they have added are same or not.
- Once all Items are reviewed, User can further see the Billing amount and the status of the Delivery.
- Driver can confirm the delivery once he has reached to User’s place and delivered the Items.
- Once Driver confirms the Delivery, User can see notification on the App that the Delivery has been done successfully.
- User can review and rate Driver after the Delivery is done.
- Driver can review and rate User after the Delivery is done.
- Users can connect with experts through video calls to get consultation on various topics like Lawyers, Astrology, Teaching, Yoga and Fitness.
- Here we are taking example of Tutor Video consultation. User can select the Category as Tutor.
- List of Subcategories will be displayed. User can select the Subcategy as Math.
- Based on the selected Categories, list of nearby Service Provider will be displayed.
- User can tap on any Service Provider from the list and can see his Profile details like the Service he provides, Gallery and Reviews.
- User can provide special instructions (if any) and can book the Service Provider.
- User can proceed to book the Services by choosing the Payment options (Card or Wallet)
- User can also make payment using the previously saved Card.
- As soon as the user has completed these steps, the Job request gets sent thereafter to the Service Provider.
- The service provider now receives the request where they need to offer their services along with the location and thereafter can accept or decline the same as per their choice.
- As soon as Service Provider accepts job request, the user gets notified of the same with the message ‘Service Provider Has Accepted Request’.
- User can see that Service Provider has accepted the request.
- Service Provider can start the Services by tapping on the "Start Video Consulting".
- After the Video Consultation is over, User can see the Invoice Summary and can make the Payment using Card or wallet.
- After the Video consultation, Service Provider can view the Invoice summary and can collect the payment.
- Users can book the Service Providers by posting the Job details and allow Service Providers to bid for that Job within the User's budget. Users will select the Service Provider based on bid offer, reviews and Service Provider portfolio.
- Post and Bid feature available on iOS Apps and Android Apps.
- User can select the Category & Subcategory of the Service they want. Eg. Painting Service - Interior Painting
- After choosing the Category, User can provide more details about the Task like Budget, Location, Date, Time, files and Special Instructions.
- User can tap on the "Post" button and can post the Task details.
- Based on the Task details, a notification will be send to all the nearby Service Providers that fall in the selected category and budget.
- User can see the Tasks posted in My Bookings (Bidding) section.
- In Task details, they can see the response of all the Service Providers.
- Services Provider will see Bids in their My Booking Section.
- Tapping on View details button, they can see the Task details and can "Accept" / "Decline" or "Make An Offer".
- Service Provider can counter offer User by providing the Task charges and Instructions if any.
- Service Provider can then see the Status of bidding in My Bookings.
- User will get notification in the app that Service Provider has countered offered.
- User can then accept / decline or revise the offer. User can enter the amount that he wants to pay and the Instructions.
- User will then wait for the Service Provider to answer.
- They can see the status of the Bidding in My Bookings Section.
- Service Provider would see the budget offered by the User and again accept / decline or Re offer.
- Lets say Service Provider agreed and accepted the offer. Same notification will be sent to the User for confirmation.
- User can then give the confirmation by accepting the offer.
- User can select the payment mode as Cash / Card / Wallet.
- Service Provider can start Task and see the Job location in the Map.
- Service Provider can also see the details of the Service requested by the User.
- User can see the status of the Task as "Service Provider has arrived at your service address" in his app step by step.
- Service Provider can also see the status of the Task as "You have arrived at the Service Address". They can slide the "Begin Task" button and can start the Service.
- User can see the Service as started.
- They can slide the "End Task" button and can End the Service.
- User can make the payment after the Service is done. And can also see the Invoice summary.
- Service Provider will be asked to collect the money as shown in invoice.
- User can Rate and review each other after the Task is completed.
- Service Provider can Rate and review each other after the Task is completed.
- Users can Buy & Sell Real Estate Properties like Apartments, Homes/Villas, Warehouses, Industrial Sheds, etc. on the App.
- Users who want to Buy a Property can tap on the “Buy, Sell & Rent Real Estate” Section. As soon as they tap here, an entire page with Nearby Properties for Sell will be displayed.
- User can view list of all the available nearby Properties.
- The User can search Property by name OR can filter it by “Property Type”, “Property Facing”, “Furnishing”, “Floor”, etc.
- The User need to select required filters and then tap on “APPLY” button at bottom.
- It will show the Properties based on the filter selected.
- If users like a Property, they can tap on it and see its Details.
- On the “Property Details” screen, users can view more Images of the Property uploaded by the owner, its Resale Value, Location, and a Short Description.
- Also, users can see its Listing Type, Area, Furnishing, Number Of Floors, Bedrooms, Available Amenities, etc.
- Users can view the Property’s Location on the Map as well.
- To get in touch with the Property Owner and get more Details, users can fill out an Inquiry Form.
- User interested in the property will send an "Inquiry” form providing the contact details like Name, Email etc.
- By tapping on "Submit" button, the user receives a notification informing "The inquiry has been sent successfully, and the owner will get in touch shortly".
- Users can also connect with the owner by tapping the "Call" tab at the bottom of the screen for further discussion.
- Users can easily post a new listing for a property that they want to sell.
- Users who want to Sell a Property can tap on the “Buy, Sell & Rent Real Estate” Section.
- As soon as they tap here, they will be redirected to a new screen where they can tap on “New Listing” to post property details.
- After tapping on “New Listing,” an entire list of different property categories will be displayed.
- Now, users can select their Property type (say, House/Villa).
- On the “New Post” page that appears, they can start filling in the details of the property, like area, furnishing, society name, number of floors, property age, etc.
- After entering all the Property details, the user can upload multiple images of their property that buyers will see.
- After uploading images, the user will be redirected to the “Add Location” Screen.
- Here, the user can pin the exact location of the property and add a proper address that will be visible to users browsing their property.
- If the property owner doesn’t want their Address to be displayed in the listing, they can choose to hide it by unselecting the given checkbox.
- Next, the user can add the resale price and review the property details they have filled out before posting the listing.
- The user can review the photos they have uploaded, the pinned location, and the address before posting the listing.
- When the user Tap on the Map icon he can see the option to navigate the location of the Real-Estate Property
- Finally, they can choose a suitable plan (Free or Paid) depending on their requirements.
- If the User selects a Paid plan he can pay via Wallet or Card.
- Buying a paid ad can help the user list the property as "Featured" and reach more buyers.
- Users will get a confirmation notification after they submit their Property listing on the App.
- Users can now see their listing under "Posted Properties" and manage it from the same page.
- Users can delete and review the listing whenever they want.
- Once Property is approved by the Admin, it will be displayed on the Application.
- Users can Buy, Sell & Rent Cars like Luxury, SUVs, Sedan etc. on the App.
- Users who want to Buy or Rent a Car can tap on the “Buy, Sell & Rent Car” Section.
- As soon as they tap here, an entire screen with nearvy available Cars for Sale & Rent will be displayed.
- Now, Users can browse different categories according to their needs and find relevant Car in the chosen category.
- The User can search Car by name OR can filter it by “Fuel Type”, “Transmission”, “KMS / Miles Driven”, “Condition”, etc.
- The User need to select required filters and then tap on “APPLY” button at bottom.
- It will show the Cars based on the filter selected.
- Tapping on any Car, User can view Car details like Name, Model, Fuel Type, Transmission etc.
- User can also see the location of Seller.
- User can contact Owner by tapping on "Contact Owner".
- As soon as User taps on "Contact Owner", a form will be displayed.
- User can enter his details like Name, email and contact details.
- After entering all the details, User can taps on Submit button to submit his query.
- By tapping on "Submit" button, the user receives a notification informing "The inquiry has been sent successfully, and the owner will get in touch shortly".
- Users can also connect with the owner by tapping the "Call" tab at the bottom of the screen for further discussion.
- User can taps on "Buy,Sell & Rent Cars" On Home Screen and can easily post a new listing for a Car that they want to sell.
- Users who want to Sell & Rent a Car can tap on the “New Listing” button.
- User can enter choose Car Type like Hatchback, Sedan, Luxury, SUV, Mini SUVs etc.
- User can enter more details like listing type (Rent / Sell), Make, Model, Fuel Type etc.
- After entering all the Car details, the user can upload multiple images of their Car that buyers will see.
- After uploading images, the user will be redirected to the “Add Location” page.
- Here, the user can pin the exact location of the Car and add a proper address that will be visible to users browsing their Car.
- If the Car owner doesn’t want their Address to be displayed in the listing, they can choose to hide it by unselecting the given checkbox.
- Next, the user can add the resale price and review the Car details they have filled out before posting the listing.
- The user can review the photos they have uploaded, the pinned location, and the address before posting the listing.
- When the user Tap on the Map icon he can see the option to navigate the location of the Car.
- Finally, they can choose a suitable plan (Free or Paid) depending on their requirements.
- If the User selects a Paid plan he can pay via Wallet or Card.
- Buying a paid ad can help the user list the Car as "Featured" and reach more buyers.
- Users will get a confirmation notification after they submit their Car listing on the App.
- Users can now see their listing under "Posted Cars" and manage it from the same page.
- Users can delete and review the listing whenever they want.
- After Admin's approval, Car details will be displayed on the Application.
- Users can buy and sell general items like electronics, furniture, lawn & garden tools, etc.
- To find an item, the user needs to go to the “Buy, Sell & Rent General Items” section.
- On the landing page, users will see the options like Browse Categories, Find an Item, etc.
- Users can now tap on the category (say, Home Furniture) to start browsing for the item they are looking for.
- By tapping on an item, a Detailed Information Page will appear.
- The User can search General items by name OR can filter it by “Condition”, “Age (In Years)”, etc.
- The User need to select required filters and then tap on “APPLY” button at bottom.
- It will show the General items based on the filter selected.
- On the Item Details page, users can see a Short Description of the item, and other information like Listing Type, Brand/Model, Condition, etc.
- Users can also see the Rent or Sale price of the item and the Location of the owner on the map.
- If the user wishes to Purchase/Rent the item or get more information, they can tap on Contact Owner.
- By tapping on Contact Owner, an Inquiry form will appear.
- User interested in the General Item will send an "Inquiry” form providing the contact details like Name, Email etc.
- By tapping on "Submit" button, the user receives a notification informing "The inquiry has been sent successfully, and the owner will get in touch shortly".
- Users can also connect with the owner by tapping the "Call" tab at the bottom of the screen for further discussion.
- Users can Buy, Sell, & Rent General Items on the app.
- The user who wants to sell an item or put it on rent has to post a listing first.
- The user has to tap on “Buy, Sell, & Rent General Items” and then, tap on the “New Listing” option on the page that appears.
- The user now has to select the item category such as home furniture, electronics, fashion & accessories, lawn & garden tools, etc.
- Suppose the user selects Home Furniture. Now, under the subcategory, they can select items such as sofas, chairs, tables, etc. that they want to sell or rent out.
- After choosing the subcategory, the user needs to fill out item information like listing type, item name, condition, etc.
- Next, they can add multiple images of the item for the buyer/renter’s reference.
- The user can pin the location on the map.
- After tapping on “Add Location,” they need to enter the detailed address.
- If they don’t want other users to see their address, they can opt out of it by unselecting the checkbox.
- In the next step, the user needs to add the resale/rent price of the item and review all the entered details.
- The user can review the photos they have uploaded, the pinned location, and the address before posting the listing.
- When the user Tap on the Map icon he can see the option to navigate the location.
- Once the user reviews the uploaded information, they can proceed by selecting a suitable plan (Free or Paid).
- If the User selects a Paid plan he can pay via Wallet or Card.
- By purchasing a Paid Plan, the user will be able to showcase their listing as “Featured".
- Featured Ads get priority and are displayed on top of all other posts.
- As soon as the user chooses a payment plan, a push notification will pop up with a confirmation message.
- Under “Posted Items”, the user will be able to delete the listing if they want and review it.
- After Admin's approval, Item will be displayed on the Application.
- To book a carpool ride, the user needs to tap on “Car Pool” and then select “Book a Ride”.
- On the page that appears, the user needs to enter the destination they are leaving from and where they are going.
- They can select the date on which they are traveling and the number of passengers.
- By tapping on “SEARCH”, the app will display relevant carpool rides.
- The user can tap on Driver Details to see more information about the driver and car.
- The User can see list of Rides available.
- The User can tap any Ride and can see more details.
- Also, the Rider can voice call the Driver and also place a call by tapping on the phone number.
- After viewing the Driver’s details, the user can book the ride.
- To book the seats, the User (Rider) needs to tap on "Continue."
- The user can choose to pay for the booking via their in-app wallet balance, card, or cash if they want to.
- By tapping on "Done," the rider will see a push notification with a confirmation message.
- Driver - To see the passenger details and approve the ride, the Driver needs to go to “Publish Rides”.
- Then, select the Published Ride to see the details like passenger name, number of seats booked, chosen mode of payment, etc.
- The Driver can now Accept or Decline the Ride request.
- As soon as the Driver accepts the request, they will get a push notification with a confirmation message.
- Users can post ride details and offer carpool services to other users who want to travel the same route.
- To publish the ride details, users need to tap on “Car Pool”.
- Then, they can select a suitable option like Publish a Ride, Book a Ride, or View My Rides.
- To publish a Ride, the user needs to provide details like the departure and destination addresses, the date & time when the trip starts, the number of passengers they can take, and the price per seat.
- Users can also see the recommended price per seat based on the distance they enter.
- Next, the user (Driver) needs to enter the details like their name, contact number, car details, and additional notes if they want.
- The Driver needs to Upload Documents for Verification such as address proof, Driving License, Vehicle Document, and Vehicle Insurance.
- On the same page, the Driver can review the Ride Plan.
- After reviewing the details, the user needs to Tap on “Publish Ride” to post it on the app.
- The user will get a confirmation message as soon as their Ride is Published.
- By tapping on "My Rides", the user will be able to see the details of published rides and booked rides.
- Book An Appointment: Using this section of the App, a User can book appointment with Medical Experts like General Physicain, Physiotherapist, Nurse, Psychologists, Cardiologist etc
- Video Consultation: User can also opt for Video Consultation option and can book Video Consultation of Orthopedic, General Physician, Neurologist, Dietician etc.
- Other Medical Services: The Major Services that User can book from this section are Pharmacy Delivery, Ambulance, Vet etc..
- To book an Appointment, User can select the Services from Book An Appointment/Service like General Physican, Physiotherapist, Nurse, Psychologists etc.
- Here, lets take the example of General Physician.
- All other Services in this Category will work same as General Physician.
- User can view the list of nearby available Service Providers / Doctors / Nurse / Vet / Physiotherapist etc
- They can also navigate their location in the google Map
- Utilizing this feature, Doctors can update the information in relation to the Services offered by them, including its subcategory.
- Here in this section, Patients would get a glimpse of the profile of the Doctor they have selected.
- The section also presents Patients with the list of Services provided by that Doctor and thereafter book the service and pay.
- The section presents Patient with all the past work of the Doctor in the form of a Gallery and Reviews as well so that they can choose the correct Doctor.
- As soon as Patient books the Service and chooses the mode of payment, they get presented with a Booking Summary containing the details of the Service, the mode of payment selected and the location where service would be delivered.
- Patient needs to choose location where they would require service. They can select from the two options - Location of Patient or Location of Doctor.
- Doctor can choose the location where he would be providing the Services.
- Doctor can opt to provide service at Patient's location or his own location.
- As soon as the Patient has completed these steps, the Job request gets sent thereafter to the Doctor.
- The Doctor now receives the request where they need to offer their services along with the location and thereafter can accept or decline the same as per their choice.
- As soon as Doctor accepts job request, the user gets notified of the same with the message ‘Doctor Has Accepted Request’.
- The Doctor gets presented with the details of the location where they need to provide the services, along with the subcategory of services that need to be provided.
- Doctor needs to slide the button to ‘Arrived at Job Location’as soon as the doctor arrives at the location of the Patient.
- Patient gets notified as soon as Doctor arrives at job location with the message ‘Doctor has arrived at your location’.
- With the arrival of Doctor, the service begins thereafter and the user gets notified of the same with the message reading ‘Doctor has Started Job’.
- Doctor needs to slide the button to ‘Begin Job’.
- As soon as the Doctor is done with their services, the Patient gets notified of the same with the message reading ‘Doctor has Completed Job’.
- As soon as Doctor is done with their services, they Slide the button to ‘End Job’ to notify the app and the Patient thereafter of job completion.
- As soon as the Doctor taps on ‘Job Completed’, thereafter an invoice summary gets presented on the Patient app containing the details of the service and the payment related to the same.
- As soon as the Doctor taps on ‘Job Completed’ thereafter an invoice summary gets generated on their screen containing the payment details, services and the mode of payment chosen by Patient.
- This helps the Patient provide unique reviews and rate the Doctor based on the nature of services provided by them.
- Utilizing this feature, the Doctor on completion of their job can provide review and provide rating as well to the user.
- User can book the ambulance from the Application by choosing the type of the Abmulance they want like General Purpose Ambulance, Mobile ICU Ambulance or Basic Life Support Ambulance.
- They can see the rates according to the selected Ambulance type.
- User can see the ambulance available on the Google Map also. They can further choose the payment mode and can request the Ambulance driver.
- Ambulance driver sets availability online and chooses the Vehicle they wish to use.
- Request only get sent to the Ambulance drivers that are online and fall within the nearby vicinity of Patient.
- In case of the Ambulance driver using more than one Ambulance they need to choose the one that they would like to use for offering Request to Patients.
- Once the Patient has put in the PickUp and Drop Location and selected the type of Ambulance & Payment option, the App will send out a request to the Ambulance drivers in the nearest vicinity.
- There are 3 algorithms of deciding how to allot Requests to a Ambulance driver:
- Closest First: The Ambulance driver in the closest proximity gets the request first. If they reject, the Request in turn goes to the next and so on and so forth.
- Competitive: Every Ambulance driver in the given radius is given the request, and whoever chooses first gets it.
- FIFO: First In First Out method allots the Request to the Ambulance waiting idle for the longest duration in the given radius of an area - When a Patient requests for a Ambulance, the App sends out a Request to all the Ambulance driver in the area.
- The Ambulance driver see a screen with all the details and a timer. They must accept or decline the request within the time frame failure of which leads to the request getting automatically declined.
- Patient here gets a glimpse of the location of the Ambulance driver and thereafter calculate the estimated time of arrival.
- Patient can Call / Message or Share the Request details.
- The Ambulance driver receives a glimpse of the location from where they need to pick the Patient and thereafter calculate the estimated time they would take to arrive there.
- Ambulance driver can Call / Message / Share / Cancel the Request.
- As soon as Ambulance driver arrives at location of Patient, they slide the button to mark as Arrive.
- As soon as Ambulance driver reaches the location, the Patient is notified of the same.
- As soon as Ambulance service starts, the Ambulance driver slides the button ‘Begin Trip’ to notify the Patient of the Ambulance service getting started.
- The Patient gets notified with the message 'Your Trip Has Started' as soon as their Trip begins.
- The location of the Ambulance will be visible on the Map. There will be SOS button on the App for emergency purpose and change the destination.
- They can also share the location with Family and friends if needed.
- As soon as Ambulance driver reaches the location, they slides the button 'End Trip’ to notify the end of Trip and Patient gets notified of same.
- Patient gets notified on Trip completion with the message ‘Your Trip has Completed'.
- Upon completion of the Ambulance service, the App generates an invoice whose summary gets flashed on the screen of the Patient and Ambulance driver both.
- The summary mentions the details of the Ambulance service like fare, discount applied, etc. to name a few.
- User can see all the nearby available Stores. They can choose any store and can see the available Items.
- User can add the Items / product in the Cart and can buy.
- User can track the entire order from their Application.
-
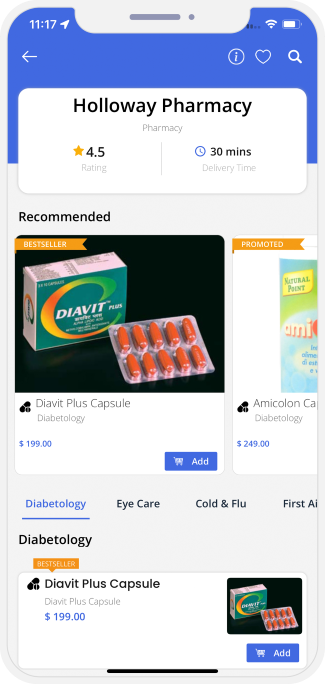 User App
This is the section that will enable the User to place an order from the Pharmacy Store of their choice. They will be able to see all the Pharmacy Stores that appear online on the App.
-
 Store App
This page will allow the Pharmacy Store owners to make themselves available by sliding the Online or Offline option. When online, they can receive orders when Offline they will not be shown to the customers and thereby will not receive any orders.
-
 Delivery Driver App
The Driver can set his availability to pick and drop the order on this page. The Driver can make himself available by sliding the radio button to Online. if turned to Offline, the driver will not receive any request for delivery.
-
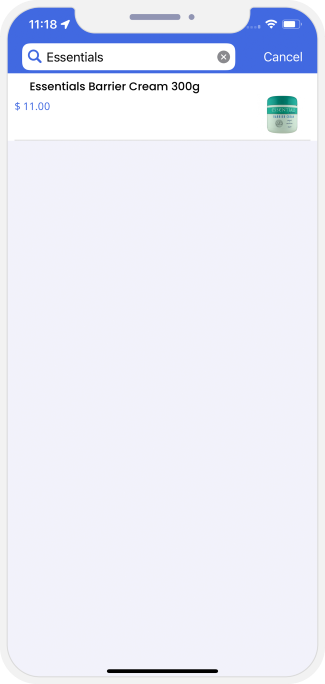 Search Medicines
This screen allows the User to search for the Pharmacy items that they are looking for.
-
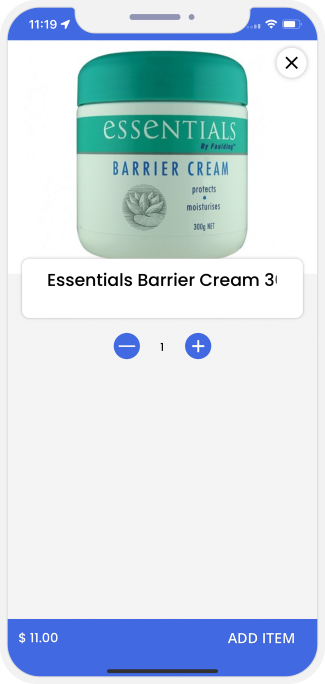 Add to Cart
After the User makes selection, they can add their favorite Items to the basket.
-
 View/Edit Cart
This screen is where the user can modify or edit the Pharmacy Items placed in the cart.
-
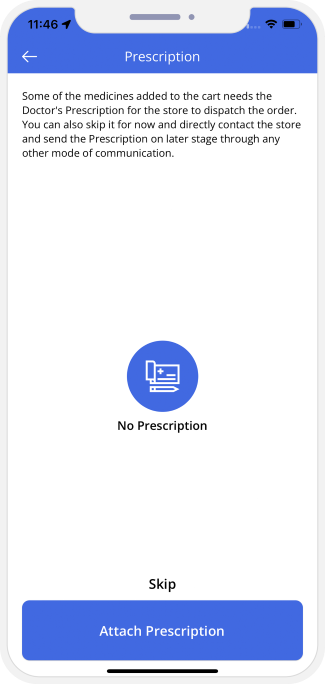 Attach Prescription
There are some Medicines that require Prescription. Once those Medicines will be added in the Cart, User will have to upload the Prescription for the same.
-
 Upload Prescription
User can upload multiple Prescriptions. User can also skip uploading prescription and can directly contact the Pharmacy Store.
-
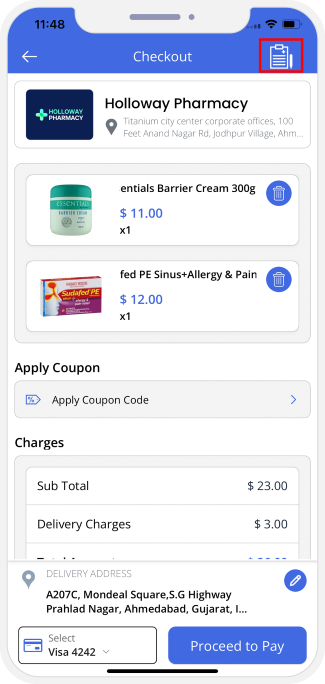 Edit Prescription
User can edit/change the prescription once it is uploaded.
-
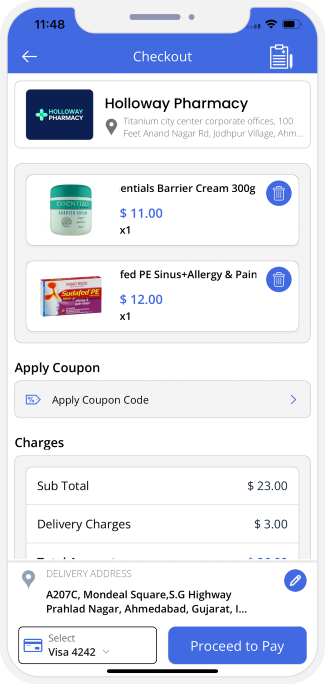 Checkout Screen
This screen will allow Customer to checkout and confirm the purchase. Here they can choss the option for "Delivery to your Doors" or "Take away".
-
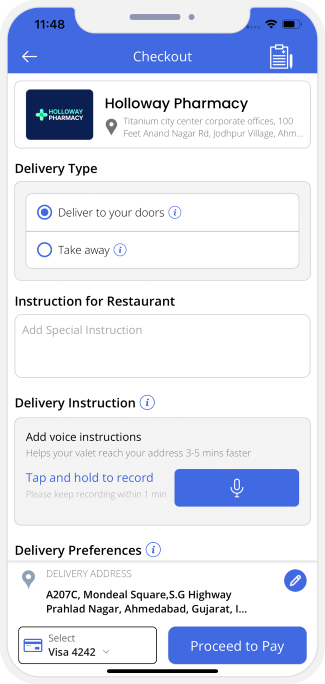 Delivery Options
Once User choose the "Deliver to your Doors", he can opt for Contactless Delivery.
-
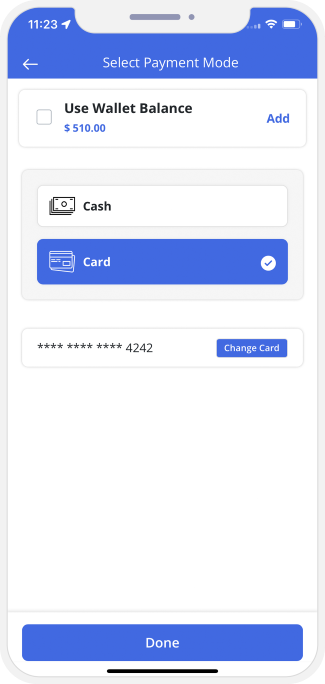 Choose Payment Method (Cash/Card/Wallet)
The final step in the checkout screen will allow you to choose the payment method for the order.
-

The User is notified that his order has been placed. It also states that the order will be delivered shortly, shows the options of Call, so that he can call the Pharmacy Store and Navigate to help reach the Pharmacy Store using the Map
-

Once the order is placed the Pharmacy Store app immediately shows a screen where the order details are shown. The Order is presented in the NEW ORDERS section.
-
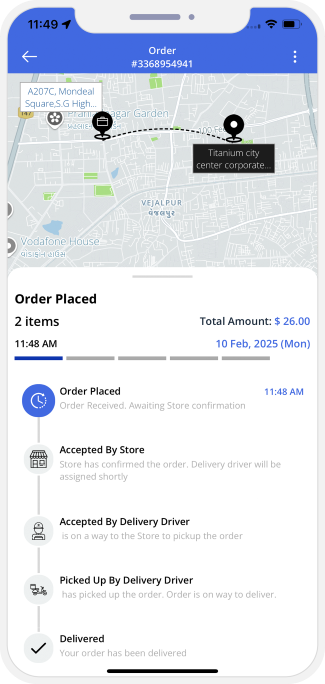
The User can now track their order over a Map. This page will show a flowchart with all the stages of the order right from the order being placed to it being delivered. The Map will also help locating exactly how far the order is.
-
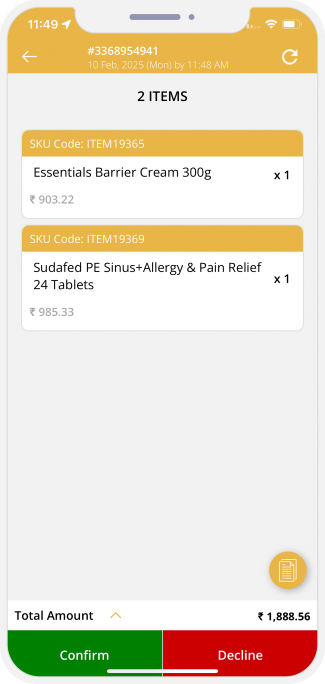
Pharmacy Store can view the Order details and can confirm or decline the Order.
-
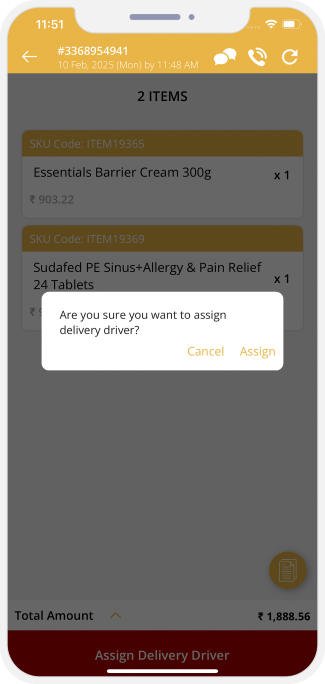
Once the Pharmacy Store accepts the placed order, they will be shown a screen with the bill details and a button that says “ASSIGN DRIVER”. On tapping this button, the request for pickup and delivery of the order will be sent out to the Delivery Driver.
-
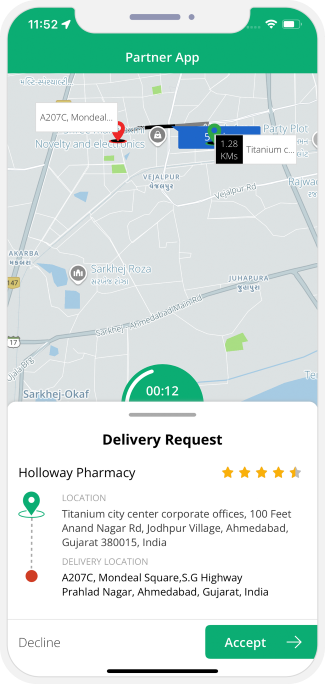
The Delivery Driver sees the request as a notification on his screen along with a timer. The Driver must accept the order within the given time or else the request will automatically get canceled and passed on to another driver.
Note – The driver ought to accept the order within the timeframe set on the timer, failure of which would lead to the request getting sent to the next driver. -
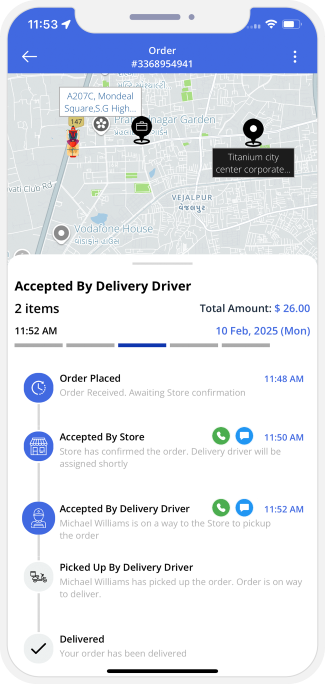
The User will now be shown that the Driver for pickup of order has been assigned. This will be shown as a progression in the flowchart on the screen of the User.
-
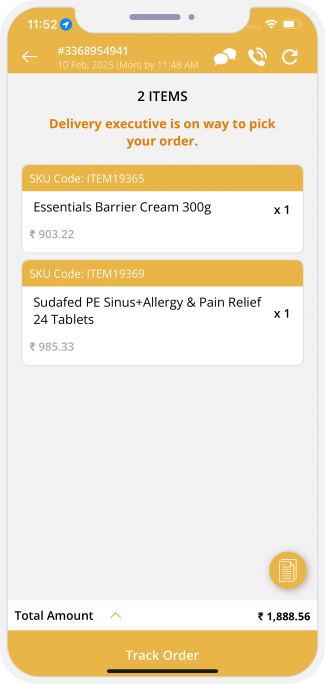
The Pharmacy Store will be notified after the Driver accepts the order. The notification will state that the Delivery executive is on his way to collect the order. This screen will continue to show the particulars of the order as well.
-
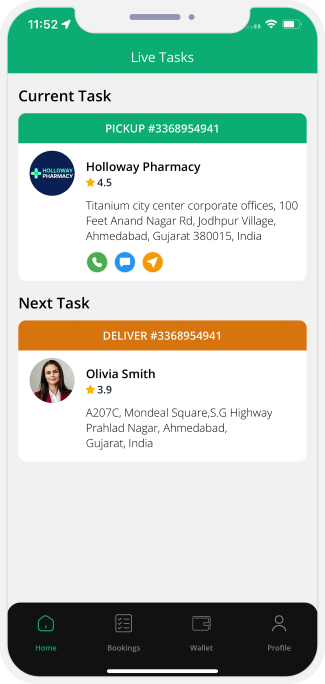
The Delivery Driver will be able to see the Current Task on this page. It will show the address of the place that the order has to be collected from and the address of the delivery for the order. This page also shows the options of Call, so that he can call the Pharmacy Store and Navigate to help reach the Pharmacy Store using the Map.
-
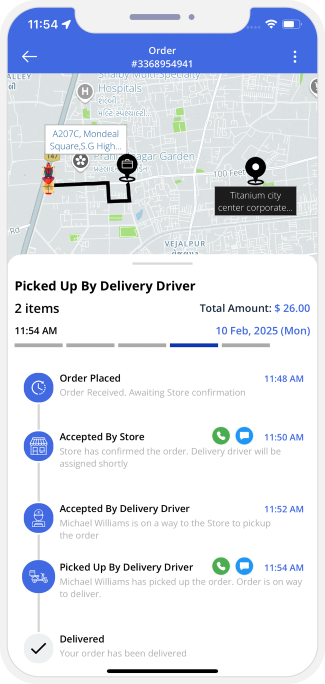
The User can now see the status of the Driver along with an estimated time of arrival. The flowchart gets appropriately marked as per the movement of the Driver.
-

The Pharmacy Store too will now be able to track the exact status of the order. The Pharmacy Store will be able to see whether the order has reached the recipient or not.
-
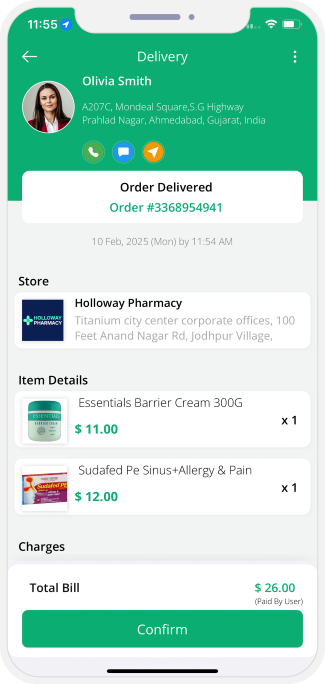
After the order is picked up by him, the will now be able to see the address of the Recipient. They will also have the option of Calling the Customer for instructions and tracing the location on a map so that they can drive and reach them easily.
-
Not Delivered
In case the driver marks the order as delivered, however, the customer hasn't received it, the User can tap on this button and the admin will be notified. The ustomer can also call the Delivery driver directly by tapping this button
Note - The customer can place a call directly to the delivery driver also when they tap on this toggle. -
Ok, Got It
This button is to be tapped when the customer confirms that the Pharmacy has been delivered successfully.
-

- The User can Review the Pharmacy Store based on the quality of the item that they received.
- The User can also rate the Driver based on their experience of having the item delivered.
-
Lorem Ipsum is simply dummy text of the printing and typesetting industry. Lorem Ipsum has been the industry's standard dummy text ever since the 1500s, when an unknown printer took
-
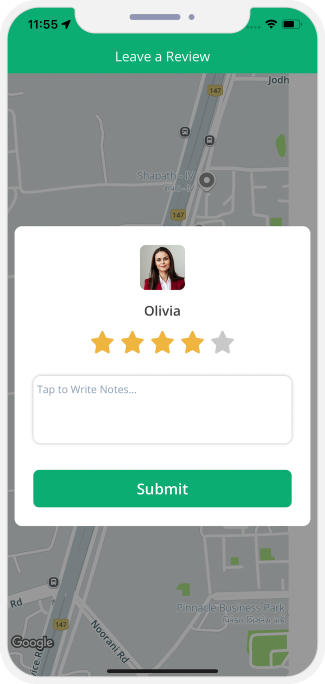
- The Driver will be able to review and rate the Store based on the readiness and preparedness of the order.
- The Driver can also rate the Customer based on their experience of delivering the product.
- Users can connect with experts Doctors via video calls to get consultation.
- Here we are taking example of General Physician Video consultation. User can select the Category as General Physician.
- Based on the selected Categories, list of nearby Doctors will be displayed.
- User can tap on any Doctor from the list and can see his Profile details like the Service he provides, Gallery and Reviews.
- User can provide special instructions (if any) and can book the Doctor Consultation.
- User can proceed to book the Services by choosing the Payment options (Cash / Card or Wallet)
- User can also make payment using the previously saved Card.
- As soon as the user has completed these steps, the Job request gets sent thereafter to the Service Provider.
- The service provider now receives the request where they need to offer their services along with the location and thereafter can accept or decline the same as per their choice.
- As soon as Service Provider accepts job request, the user gets notified of the same with the message ‘Provider Has Accepted Request’.
- User can see that Service Provider has accepted the request.
- Service Provider can start the Services by tapping on the "Start Video Consulting".
- After the Video Consultation is over, User can see the Invoice Summary and can make the Payment using Cash, Card or wallet.
- After the Video consultation, Service Provider can view the Invoice summary and can collect the payment.
- Users can track their family members and employees in real time with just a tap.
- To start tracking, users need to create profiles by tapping on “Setup Profile”
- By entering the Invite Code and Phone Number, users can link the XJekPlus User App and Tracking App (installed on family members/employees’ devices).
- After linking the apps, users can see the profiles of their family members/employees.
- By choosing one of these profiles, users can start tracking the person.
- Tracking App - This is the Separate App for the Users who will be tracked.
- Tracking app’s splash screen will appear as soon as you open the app.
- Users will be able to learn a few things about the app on the introductory screen.
- User can set up their profile by entering their phone number.
- After entering their phone number, the user can create their password and tap on the “next” button to proceed.
- The user can also click on the “eye” button to see the password before going to the next screen
- Then, the user needs to enter their first and last name.
- After selecting the “Track Family Members/Employees” option from the menu, this screen will appear.
- The user can see the steps to pair the User app and the Tracking app.
- A pairing code will be displayed on the app.
- On the Tracking app, the User needs to enter the Pairing Code.
- After entering the code, they need to tap on “SUBMIT” to successfully pair it with the User app.
- On the Tracking App, the User will be notified that the verification code has been sent to their registered mobile number.
- By Tapping on “OK”, they will be able to go to the next screen.
- The User will receive an OTP on their registered mobile number.
- By entering the OTP on the tracking app, the user will be able to successfully pair the two apps (user and tracking app)
- Here, the user needs to enter the OTP sent to their registered mobile number.
- After that, they must tap on “VERIFY.”
- The user will see this screen on the Tracking mobile app when it is successfully linked with the user app. To proceed, tap on “CONTINUE.”
- The User will see this screen on the User app when it is successfully linked with the tracking app. To proceed, the user needs to tap on “CONTINUE.”
- On the Tracking app, the User will be able to see their location on the map.
- Employees can deactivate the tracking after the Working Hours.
- At the bottom, the User will be able to see their GPS and location tracking status.
- Also, they will be able to share their current location by tapping on the given button.
- Users will be able to see their Family Member / Employee’s profile.
- By tapping on the “LIVE TRACK” button, the user will see the live location of the person on the map.
- On the Tracking screen, the User will be able to see the Person’s name, Tracking status, and also have the option to call the person they are Tracking.
- On Tracking App, Users can see who all are tracking their Live Location on the Map. They can easily manage these profiles from this screen.
- Users can Explore Nearby Businesses like Cafes, Spas, Salons, Hospitals, Gyms, Malls, etc. using this App.
- Users can tap these categories (say, cafes, shopping, libraries) to Explore all the Businesses in that specific category near them.
- If the user taps on ‘More’, a list of Business Categories will be displayed.
- A list of all the Nearby Businesses in the chosen category will be displayed on the screen.
- Now, the user can tap on the usiness of their choice to see More Details like their Timings, Distance from the User’s Current Location, etc.
- On the same page, the user can see the options to Call the Business, Book a Taxi, Order Online from the place, view available Offers & Discounts, and see its location on the Map.
- When users open the beauty section, they can view a wide range of available services. These include hair care, skin and facial treatments, nail services, waxing, hair removal, and more.
- Users simply choose the service they are looking for. Once selected, the app smoothly opens the related sub-categories, helping them explore and book the exact treatment they want.
- User is presented with a list of all the nearby service provider.
- The user can also get a glimpse of the nearby service providers utilizing the Map View.
- Utilizing this feature, Service Providers can update the information in relation to the Services offered by them, including its subcategory.
- Here in this section, Users would get a glimpse of the profile of the service provider they have selected.
- The section also presents Users with the list of Services provided by that Service Provider and thereafter book the service and pay.
- The section presents user with all the past work of the Service Provider in the form of a Gallery and Reviews as well so that they can choose the correct Service Provider.
- As soon as user books the Service and chooses the mode of payment, they get presented with a Booking Summary containing the details of the Service, the mode of payment selected and the location where service would be delivered.
- User needs to choose location where they would require service. They can select from the two options – Location of User or Location of Service Provider.
- Service Provider can choose the location where he would be providing the Services.
- Service Provider can opt to provide service at User's location or his own location.
- As soon as the user has completed these steps, the Job request gets sent thereafter to the Service Provider.
- The service provider now receives the request where they need to offer their services along with the location and thereafter can accept or decline the same as per their choice.
- As soon as Service Provider accepts job request, the user gets notified of the same with the message ‘Service Provider Has Accepted Request’.
- The Service Provider gets presented with the details of the location where they need to provide the services, along with the subcategory of services that need to be provided.
- Service Provider needs to tap on ‘Arrived at Job Location’as soon as they arrive at the location of the User.
- User gets notified as soon as service provider arrives at job location with the message ‘Service Provider has arrived at your location’.
- The Service Provider starts the service and slides to begin the job.
- With the arrival of Service Provider, the service begins thereafter and the user gets notified of the same with the message reading ‘Service Provider has Started Job’.
- As soon as service provider is done with their services, they slide on 'Job Completed' to notify the app and the user thereafter of job completion.
- As soon as the service provider is done with their services, the user gets notified of the same with the message reading ‘Service Provider has Completed Job’.
- As soon as the service provider taps on ‘Job Completed’, thereafter an invoice summary gets presented on the user app containing the details of the service and the payment related to the same.
- Utilizing this feature, the service provider on completion of their job can provide review and provide rating as well to the user.
- User can make the Payment using Cash, Card or wallet.
- The pet care section displays all available pet services in one place. Users can browse options such as pet walking, grooming, special care services, and other pet-friendly solutions.
- After choosing a service, the app shows the relevant sub-categories, making it easy for users to find the right care for their pets and proceed with booking effortlessly.
- User is presented with a list of all the nearby service provider.
- The user can also get a glimpse of the nearby service providers utilizing the Map View.
- Utilizing this feature, Service Providers can update the information in relation to the Services offered by them, including its subcategory.
- Here in this section, Users would get a glimpse of the profile of the service provider they have selected.
- The section also presents Users with the list of Services provided by that Service Provider and thereafter book the service and pay.
- The section presents user with all the past work of the Service Provider in the form of a Gallery and Reviews as well so that they can choose the correct Service Provider.
- As soon as user books the Service and chooses the mode of payment, they get presented with a Booking Summary containing the details of the Service, the mode of payment selected and the location where service would be delivered.
- User needs to choose location where they would require service. They can select from the two options – Location of User or Location of Service Provider.
- Service Provider can choose the location where he would be providing the Services.
- Service Provider can opt to provide service at User's location or his own location.
- As soon as the user has completed these steps, the Job request gets sent thereafter to the Service Provider.
- The service provider now receives the request where they need to offer their services along with the location and thereafter can accept or decline the same as per their choice.
- As soon as Service Provider accepts job request, the user gets notified of the same with the message ‘Service Provider Has Accepted Request’.
- The Service Provider gets presented with the details of the location where they need to provide the services, along with the subcategory of services that need to be provided.
- Service Provider needs to tap on ‘Arrived at Job Location’as soon as they arrive at the location of the User.
- User gets notified as soon as service provider arrives at job location with the message ‘Service Provider has arrived at your location’.
- The Service Provider starts the service now and taps on ‘Job Started’.
- With the arrival of Service Provider, the service begins thereafter and the user gets notified of the same with the message reading ‘Service Provider has Started Job’.
- As soon as service provider is done with their services, they tap on ‘Job Completed’ to notify the app and the user thereafter of job completion.
- As soon as the service provider is done with their services, the user gets notified of the same with the message reading ‘Service Provider has Completed Job’.
- As soon as the service provider taps on ‘Job Completed’, thereafter an invoice summary gets presented on the user app containing the details of the service and the payment related to the same.
- Utilizing this feature, the service provider on completion of their job can provide review and provide rating as well to the user.
- User can make the Payment using Card or wallet.
- When users open the beauty section, they can view a wide range of available services. These include hair care, skin and facial treatments, nail services, waxing, hair removal, and more.
- Users simply choose the service they are looking for. Once selected, the app smoothly opens the related sub-categories, helping them explore and book the exact treatment they want.
- User is presented with a list of all the nearby service provider.
- The user can also get a glimpse of the nearby service providers utilizing the Map View.
- Utilizing this feature, Service Providers can update the information in relation to the Services offered by them, including its subcategory.
- Here in this section, Users would get a glimpse of the profile of the service provider they have selected.
- The section also presents Users with the list of Services provided by that Service Provider and thereafter book the service and pay.
- The section presents user with all the past work of the Service Provider in the form of a Gallery and Reviews as well so that they can choose the correct Service Provider.
- As soon as user books the Service and chooses the mode of payment, they get presented with a Booking Summary containing the details of the Service, the mode of payment selected and the location where service would be delivered.
- User needs to choose location where they would require service. They can select from the two options – Location of User or Location of Service Provider.
- Service Provider can choose the location where he would be providing the Services.
- Service Provider can opt to provide service at User's location or his own location.
- As soon as the user has completed these steps, the Job request gets sent thereafter to the Service Provider.
- The service provider now receives the request where they need to offer their services along with the location and thereafter can accept or decline the same as per their choice.
- As soon as Service Provider accepts job request, the user gets notified of the same with the message ‘Service Provider Has Accepted Request’.
- The Service Provider gets presented with the details of the location where they need to provide the services, along with the subcategory of services that need to be provided.
- Service Provider needs to tap on ‘Arrived at Job Location’as soon as they arrive at the location of the User.
- User gets notified as soon as service provider arrives at job location with the message ‘Service Provider has arrived at your location’.
- Service Provider can upload the Car Photo Before starting the Car Wash services.
- The Service Provider starts the service and slides to begin the job.
- With the arrival of Service Provider, the service begins thereafter and the user gets notified of the same with the message reading ‘Service Provider has Started Job’.
- Service Provider can upload the Car Photo after the Car Wash service is done.
- As soon as service provider is done with their services, they slide on 'Job Completed' to notify the app and the user thereafter of job completion.
- As soon as the service provider is done with their services, the user gets notified of the same with the message reading ‘Service Provider has Completed Job’.
- As soon as the service provider taps on ‘Job Completed’, thereafter an invoice summary gets presented on the user app containing the details of the service and the payment related to the same.
- Utilizing this feature, the service provider on completion of their job can provide review and provide rating as well to the user.
- User can make the Payment using Cash, Card or wallet.
- From the list of all the different services that are offered on the App, the User needs to select the services that they require, like Emergency Towing, Flatbed Towing, Vehicle Recovery, Flat Tire and Lockout Service etc.
- The Admin gets the freedom to set the particulars for the different categories as well as subcategories.
- Based on the selected categories of services chosen by the User, all the Tow Truck Drivers that offer the selected services falling within the preset radius would be shown in the Map and List View respectively.
- User can choose any Tow Truck Driver from the options provided to have a look through their detailed profile and send them a Job Request.
- This feature enables the Tow Truck Driver to manage the services offered by them.
- This feature presents the Users with the best Tow Truck Drivers along with the respective Services they offer and Galleries containing all their work and past reviews they received for the same thus empowering them to select the service/services from the Tow Truck Driver, add special instructions (if any) for the Tow Truck Driver and know the service charges for the same.
- With this feature, the User can take a glance through the images uploaded in the gallery of the Tow Truck Drivers along with take a look through the Reviews of the Tow Truck Driver selected by them.
- With this feature, User would need to provide their current location and choose their preferred mode of payments from options like cash, card or wallet along with apply a promo code if any.
- User needs to choose location where they would require service. They can select from the two options – Location of User or Location of Service Provider.
- Service Provider can choose the location where he would be providing the Services.
- Service Provider can opt to provide service at User's location or his own location.
- Once the Book Now tab is tapped by User, the request would get sent to the selected Tow Truck Driver
- The selected Tow Truck Driver would receive a notification on their mobile with the Countdown Screen and get the option to Accept/Decline the incoming job request along with take a look through the details of the job before accepting the request.
- As soon as The Tow Truck Driver accepts the Job request, the Job will be added to ongoing Jobs.
- The User can monitor the status of the ongoing job.
- The Tow Truck Driver can track the Job location in Map.
- The Tow Truck Driver anytime can call, message or cancel the Job. He can also see special instructions if any.
- The Tow Truck Driver will mark Job status as "Arrived" once he has arrived at Job location.
- User will get a notification saying that Tow Truck Driver has reached to Job location.
- The Tow Truck Driver can slide the Begin Job button when he is ready to start the Job. Tow Truck Driver & user both can track the Job progress.
- User will receive a notification that the Job has started and in progress.
- Once the job gets completed, the Tow Truck Driver would use the Slide Tab to mark the end of job.
- An in-app notification would get flashed on the screen of the User in order to help them understand that their services have gotten completed.
- Once the Job has completed, Tow Truck Driver can add the additional charges if any.
- As soon as task gets completed, the invoice summary would get displayed on the screen of the User.
- User can Rate and review each other after the Task is completed.
- Service Provider can Rate and review each other after the Task is completed.
- User can make the Payment using Card or wallet.
- The Admin can add as many as Vouchers, based on user's travelling pattern. Admin will provide the Vouchers to Customers externally. Customers can then Redeem the Voucher in Apps.
- The user can redeem the voucher in their App wallet from the App itself. Open the App, click on “account’ then tap on “wallet voucher”.
- Next, a pop-up will appear on the screen with a discount code. User will click on the “Apply” button.
- Now the voucher money has been redeemed, and the money has been added to the user’s digital wallet.
- Users can view the transaction or amount credited in the “My Wallet” section.
- Taxi drivers logged into the app can now access training videos that guide them on using the app, such as managing their vehicle, updating their profile, and handling documents.
- The videos are easily accessible by navigating to the profile section of the App.
- This features is available for taxi services only.
- Identity verification strengthens platform credibility by ensuring that users are real and by asking them to submit a few documents. A secure document verification process minimizes fake registrations, protects your platform from fraudulent activities, and ensures only genuine users access services.
- Once the user has successfully registered, they will be asked to verify their identity to get access to the services. To activate the account, the user will be asked to submit authentic documents such as a selfie, government IDs, and proof of address.
- Now, the user will upload the document one by one. First, the user will go to upload a selfie, either upload a photo or take a photo at that time through the camera, and click on “Upload”. It will go under review, which will be conducted by the admin.
- The photo must be clear and visible and not be blurred or dark, if it is, then it might get rejected.
- After, the photo user will upload the front and back sides of their government ID. This should also be visible and clear. Also, add the expiry date of it.
- Next, the user will be asked to upload a current, valid address proof document. It should not be rotated, and all the information should be visible properly. Documents should not be uploaded with any locked files. Finally, click on “Upload” to submit.
- Now the user will wait for the admin’s approval. After that, they can access the service in the App. The admin panel modifies which document will be needed to upload.
- The driver/ service provider will also be asked to verify their identity before starting to earn. After registering on the App, they will submit some personal and vehicle documents.
- To verify the identity, upload documents such as a selfie, government IDs, and address proof. Also, upload the driving license and registration certificate of the vehicle. All the uploaded documents should be clearly visible and can be accessed easily. Documents should not be uploaded with any locked files. Click to upload a clear selfie directly from photos or open the camera and click at that very moment.
- The selfie of the service provider/ driver goes under review by the admin. If the photo is not clear, the admin can ask to upload it again. Follow the instruction while uploading and write the expiry date of the document.
- They will upload all other documents in the same way and should be visible. The admin panel modifies which document will be needed to upload. After all the required documents are approved, then service provider/driver can start to offer services.
- Stores also need to verify their existence in reality. The store has uploaded some documents to the App after successful registration. They will upload the logo, the government ID of the owner, the address proof, the business establishment license, and the proof of business ownership.
- Start by uploading the store logo either from the gallery of the phone or by opening the camera and clicking at that moment. Follow the instruction while uploading and write the expiry date of the document. Click on the “Upload” button to submit.
- The logo image of the store is under review, and it will be approved by the admin. There is a chance of rejection or being asked to upload again with a clear and visible photo.
- Upload other documents required in the Store App for identification in the same way. The admin can modify or select which document is needed for the verification process.
- Mobile Number Verification via WhatsApp adds an extra layer of securiy to the login process.
- User can enter the Mobile number and can choose the Verification Method as
- Verify by SMS
- Verify by WhatsApp - User will receive the verification code via Whats App.
- This option is manageable by Admin. You as an App Owner can keep this option as On or Off.
- User can enter the Verification code and login into the App.
- This feature will be applicable to User App, Service Provider App and Store App.
- User will also get the OTP Verification option in Web Panel.
- Users of the App can send Gift Certificates to their loved ones using the GoJek Clone App.
- The user needs to select the "Send Gift Card" option.
- As soon as they choose the option, they will be redirected to the “Send Gift Card” Screen where they can choose a Gift Card Theme (like Birthday, Anniversary, Christmas, etc.), enter the Card Amount, write a Personal Message, and Recipient Details (Name, Email Address, Phone Number).
- As soon as the User enters the Receiver’s details, they can tap "Pay Now" to proceed with payment.
- The user can review the Gift Card before making the Payment.
- User can make Payment using Wallet or Card.
- As soon as the payment is completed and the Gift Card is sent to the recipient, Payment Confirmation will appear on the screen.
- As soon as the Gift Card is sent, the recipient will receive an SMS and email.
- The User can see the Instructions for redeeming the Gift Card in the SMS and email.
- To redeem the received Gift Certificate, the user needs to go to the ‘My Profile’ section and tap on 'Redeem Gift Card'.
- Now, the User can enter the Gift Card Code and claim it.
- The Gift Card Amount will be added to User's In-App Wallet.
- It’s a loyalty program by which drivers can achieve level/badge by providing good service and more trips to users. Drivers get the rewards based on the level/badge they achieve.
- Driver rewards can be defined based on the levels/badge (i.e. Silver, Gold, Platinum and Diamond). So for example if a driver archives :
- Silver Level then X Amount of funds will get credited in his In-App wallet
- Gold Level then Y Amount of funds will get credited in his In-App wallet
- Platinum Level then Z Amount of funds will get credited in his In-App wallet
- Drivers can achieve these levels by meeting criteria defined for that Level within specific time duration set for that level.
- At any day between defined duration if driver achieves the defined criteria then he will get the level/badge and amount defined for that level credited in his In-App wallet immediately.Amount will be credited one time only in In-App wallet.
- Once Driver archives the level, it will show forever in his Profile.
- This feature will allow Driver to mark Ride status as “Arrived” unless he is in X Meters/Feet distance from the Rider’s Pickup Location.
- Driver will see the message on the Screen as "The Trip cannot be started as you are still far from the Pickup Location requested by the Rider."
- This features allow Restaurant owners to add multiple Toppings and Options for each Food Item. Let us explain the depth of Options and Toppings with an example of Pizza. Below options can be set and sold with the Pizza. Customer will have to pay additional cost for the available Options on top of Pizza’s Cost:
- Margherita Pizza Cost : 15 USD
- Customer can select the Size: Small - 15 USD, Medium - 25 USD, Large - 30 USD
- Customer can select the Base: Thin Crust - 5 USD, Soft Crust - 5 USD, Pan - 5 USD
- Customer can select the Toppings: Tomato - 2 USD, Onion - 2 USD, Cheese - 3 USD
- Using this features App owner can show each store in more than 1 Categories.
- For example, A store will show in Food and Grocery Category, it sells Food and Grocery Items. Store will register in 1 Category and later can ask Admin to add him in multirole Categories as it would be doing business in more than 1 Categories.
- App Owner can set the Promo Code for Specific Stores or for all Stores. Free Delivery Promo code can be ON/OFF.
- Having this, the Customer will see that Delivery is Free but in real the Store Pays for it as part of promotion.
- This features allows User to provide ratings and feedback for the Items in very detailed way.
- The feedback will be helpful to Restaurant Owner and Delivery Driver to improve their Service.
- User can select the multiple options as "Yes" or "No" and can provide his feedback for the Restaurant.
- App Owner will be able to create Application’s Home Page Banner’s Specific to Target Location. User will see Banner according to the Location Address in User Application Home Page Screen.
- Users can now see ‘Live Activities’ on their iPhone’s Lock Screen. On unlocked iPhone devices, live activities are displayed as a Banner.
- If the iPhone is unlocked, ride progress is displayed along with other details like the taxi number, model number, and profile picture of the driver.
- Taxi rides’ live progress is displayed on the iPhone's Lock Screen along with the taxi number, model number, and profile picture of the driver.
- Live updates of the taxi ride are displayed on the unlocked iPhone screen too.
- Users can now see ‘Live Activities’ on their iPhone’s Lock Screen. On unlocked iPhone devices, live activities are displayed as a Banner.
- If the iPhone is unlocked, Ambulance Service progress is displayed along with other details like the Ambulance Number, Model Number, and Profile Picture of the Ambulance Driver.
- Ambulance Service live progress is displayed on the iPhone’s Lock Screen along with the Ambulance Number, Model Number, and profile Picture of the Ambulance Driver.
- Live updates of the Ambulance Service are displayed on the unlocked iPhone screen too.
- Available on iOS devices only, Live Activity is the feature that enables users to check the status of their food order without opening the app.
- Users can see the current status of their order on the Lock Screen and as a Notification.
- The user can see the visuals of the real-time progress of their order, delivery countdown, and the restaurant’s name.
- Users will receive prompt status updates as push notifications from the app once the order is delivered to their address.
- App Owner will be able to send Push Notification to all Users of selected Location.
- With this new Search Services, a User can Search Services based on keywords and wont have to scroll till end of screen while looking for all Services.
- Firebase Authentication provides backend Services to authenticate users by verifying their phone number. Using this technology, you can avoid verification of User's Phone Number that uses expensive 3rd party SMS.
- User can enter his phone number and verify.
- An OTP will be sent to user on his number for verification.
- SKU code is added to help Restaurant/Store owners to identify a specific item when order is received.
- Restaurant would be able to see all the Orders a lot with SKU of Item.
- This feature allows Users to upload their Identity Card for purchase of items that require age proof and get verification done.
- This is Feature is especially applicable for Story Delivery Service.
- For Eg.: Liquor Delivery
- User need to upload his age verification Identity proof card.
- He can take the photo or can choose from Phone Gallery,
- Delivery Driver will verify the Identity proof and deliver the Product.
- User can see the day wise timeslots for any Store they have selected.
- Stores can manage the day wise timeslots from their Application. Stores can select Weekdays and Weekend for Stores as per your region's culture.
- Feature is available in Parcel / Courier Delivery App. Helper Feature in Parcel Delivery App. A Helper person will come along with a delivery driver to help in transporting the heavy items. Administrator can define Delivery Vehicles with higher Rates where a Helper is available to assist the Delivery Driver for loading and unloading of Cargo/Goods.
- User can choose the Vehicle type which provides helper with it.
- There are few Vehicle Types set by the Admin that require helper with it. This is set by the Administrator.
- Driver can set the vehicles which he has for the Delivery.
- Many countries dont have Toll API.
- In such cases, Driver will be able to add Toll charges at the end of the ride. Once confirmed by Rider, it will be added to the Ride Invoice.
- Here Driver will enter the Toll charges or any other charges manually.
- The request will be sent to User for approval of the charges.
- This feature in application in Store Delivery services.
- A Driver can also cancel the order for any specific reason.
- Driver can choose the reason of the cancellation of Order and then cancel the Order.
- A Store can view the order placed by the user.
- They can confirm or decline the order as per availability of Items.
- Stores can Decline the order by choosing the appropriate reason like Driver not available, Items out of Stock or any other reason.
- In Service on demand Service like beautician, massage etc., User need to provide the OTP to the Service provider in order to start the Service.
- Service Provider will then enter the OTP in his Application and start the Service.
- This feature is applicable in Food Delivery Service. Restaurants can upload pictures of their kitchens to let customers know about how they follow best safety and cleanliness processes in their premises.
- User on the other side can see the photos in store detail screen.
- - Restaurant can upload the images that would showcase the safety guidelines that they follow.
- - They can add / edit / delete the photos anytime.
- User can send the Voice instruction for Delivery Driver while placing the order.
- Feature is available in Food & Grocery Delivery App. Customer can leave voice messages instructions for Delivery Drivers.
- Delivery Drivers can then listen to the voice instruction and can follow the delivery process accordingly.
- This feature shows status of booked Ride, Jobs, Ordered Food, Grocery Delivery to Rider / Customer via Graphical Icons as in App Notifications.
- So, your customer wants delivery from their favourite store? Don’t worry! With the Mark Store as Favourite feature present on the app of your customer, they can order the items from the stores they feel is the best by simply marking it as a favourite.
- This feature will make sure that your customers are always happy when they wish to enjoy items from the store whose delivery they may have liked in the past.
- Looking for a seamless way to make payments easy for your customers and assist the service providers to receive the money directly in their wallet. Then, the wallet-to-wallet money transfer feature will turn out to be a blessing in disguise for your customers and service providers.
- Through the pre-integrated wallet present, your customers can smoothly make payment through their wallet and have it sent to the service provider’s wallet especially if they do not have the change for the services that they have booked.
- All that they would need to do is select from the two options present in the wallet to whom they wish to send, the user or service provider and then choose their respective mobile number or email address and then they need to transfer the money from their wallet to the wallet of the service provider.
- This feature will surely be a blessing in disguise for your customers and service providers who may be wary of sharing their card details.
- Admin can define the Membership plan for Service Provider / Drivers like 2 months subscription and 1-week subscription plan.
- Service Provider / Drivers can subscribe for the Plans and can provide the Services.
- The unique feature that will ensure that no service provider is able to provide their services until they have subscribed to the subscription plans present on the Membership Subscription Plan.
- All that the service provider needs to do is enter their application and then tap on My Subscriptions.
- If the User Tip's Driver via Credit Card, he will need to enter the Tip amount and it will be processed from his Credit Card. The App Owner will not get any commission on the Tip amount. The Tip will be listed on invoice but no Tax or Commission will be levied on it.
- If the tip is given in Cash, it will nowhere appear on the invoice or reports.
- The User can mark the Driver / Service Provider as favorite from his App. Also, he can remove the Driver / Service Provider from the favorite list anytime.
- In the case when you do the Trip /Job with any Service Provider and you want that Service Provider again, then mark the Driver / Service Provider as Favorite.
- This feature allows the system to set the Priority in sending the request to all favorite Drivers / Service Providers first whoever is marked as favorite by the User.
- This way User gets the chance to book the Trip with any specific Driver.
- Once the Trip is completed the User will be prompted to rate the Trip and provide the feedback.
- Apart from this, the User will get the option to mark the Driver as a favorite so that next time they got the chance to do the Trip again with them.
- The User can Update and Edit their profile whenever they like.
- The Service provider can update and edit their profile whenever they need to.
- The User and the Service provider will both have an in App wallet.
- This wallet can be recharged or topped up whenever they want.
- Users can pay for the Job using Wallet.
- Service Provider can manage his Services, Vehicle, Rates from here.
- They can active/deactivate the Services.
- The Driver will be able to manage all their vehicles from this panel.
- They can manage their vehicles for Rides, Deliveries or manage other services from here too.
- They can add or remove the vehicles too from this panel.
- The Service Providers will be able to upload all the documents related to their vehicle that are required. Such as Registration Certificate, Insurance Certificate, PUC, etc, from the profile setting in the app.
- Service Provider can manage his Image gallery and can upload the images to showcase to the customers.
- Users & Drivers can manage their Credit Card information through this screen. The card detail is NOT stored in the APP or in the App's database. It's stored in the safe vault of the Payment Gateway Company. We just call the card using token and the secure transaction happens on the App.
- Users and Drivers can top up their wallet too.
- User will have facility to add / save multiple cards in the App.
- They can make payment from any Card and can delete if needed.
- User can view all his Past and also upcoming Bookings.
- Upon tapping on the list, the detail and invoice of past booking can be viewed.
- Service Provider can view all his past and also upcoming Bookings.
- Upon taping on date on calendar, Service Provider will be able to view summary of that day including Total earnings, Average Ratings, Completed Jobs. And can then tap on any Booking to view it's detail and invoice.
- The Waybill for the Driver will be displayed here with all the necessary details.
- Service Providers will be able to view the Heat Map and identify the areas that are generating maximum requests. This can be helpful so that they too can reach that area in order to pick up more rides or Deliveries.
- User can view list of Notifications added by the Administrator of the App.
- App Owner will be able to create Promo code Specific to Target Location. Only Users belongs to that location can use that promo code.
- This section offers users with a coupon that they can apply for the next service that they book and empowers them to choose from any one of them.
- Users can see multiple images / video of any Item.
- Store Owner can upload Image(s) or Video of all the Items.
- The User as well as the service provider will be able to provide feedback about their experience with each other. They can give a star rating or write a review.
- Service Provider can upload their bank details from this panel on the App.
- Users and Service Provider will also be allowed to invite friends to download and start using the Application.
- The Service Providers will be able to monitor how much earnings they have made over a stipulated time duration.
- This panel will give you all the other relevant information like About Us, Privacy Policy, Live Chat, Terms and Conditions, Contact US and FAQ.
- Showcase your offers and promotions on the Home screen of the App. When the users open the App, they can see your advertisement.
- You can keep advertisement, promotional content and any kind of information that you want to highlight about the App right here.
- Using this feature, the site owner can put the Facebook advertisements in the apps and generate revenue from it.
- Using this feature, the site owner can put the Google Ads in the apps and generate revenue from it.
- Users and Drivers can contact App Administrator through the Contact Us Page.
- They can also check the FAQ's for detail.
Delivery AppsLaunch your Delivery Business with Our Latest Delivery Apps
How Does It Work?If you wish to buy All in One Delivery App then, experience the real-time demo of the App. The video explains entire process from registration to review for all store and restaurant deliveries.
 ✕
✕GoJek Clone - XJekPlus App Graphical Flow for Single App with Multiple Services
We know You are Curious to see How Our App Works that's why We Created a Detailed Flowchart of the XJekPlus App that Describes the App's Entire Operation. Take a Look at this Page for Screen-By-Screen Instructions on How to use this On-Demand Multi-Services App to get a sense of the Application's Professional Profitability.
Do you want to Launch your own Gojek-like Business or Offer your Users an App like Gojek? Then, You are at the Right Place, my Dearest Entrepreneurs. We at V3Cube have Developed the BEST Gojek Clone App there is in the Industry. Our Team of Expert Professionals holds a Robust and Strong 10 years of Mobile Application Development Experience. Therefore we have Only Superior Apps to Offer for both Android and iOS. Our App Portfolio is Diverse. We have Successfully Cloned many Original Apps from around the World and Made it Better! Smart Entrepreneurs, Are You Thinking why should You Trust Us with your Dream Project? It is Because We’ll Take the Entire Responsibility of White-Labelling your Gojek Clone Apps & Website, Submit & Upload the Apps to your Stores, and Provide Brilliant After-Sales Support. We will White-Label our Ready-to-Launch Base App as per your Branding such as Name & Logo, Change Colour with 1 Preferred Colour of your Choice, Integrate 1 Local Gateway, SMS Gateway, etc.
Apart from this, We will Also Add Your Local Currencies and Languages to the App so that You can Go Ahead and Launch them Anywhere in the World.We Strictly Follow a Non-Disclosure Policy. Our NDA Ensures that We Never Reveal that We Developed and Designed your App by Removing Our Name and Logo from your Apps & Website. Also, We will Not Share Your Ideas with Any of Our Other Clients. We will Never Use your Logo or your Brand’s Name Anywhere in Our Portfolio. We Don't Just Sell you an App, We Offer You a Full-Package Assistance. We will Launch the Apps for you on the Google Play Store and the iTunes App Store. With the Host of Free Features and Facilities that We Offer You, Gojek Clone is the RIGHT Choice for You.
Overview of 18 Components - XJekPlus Apps

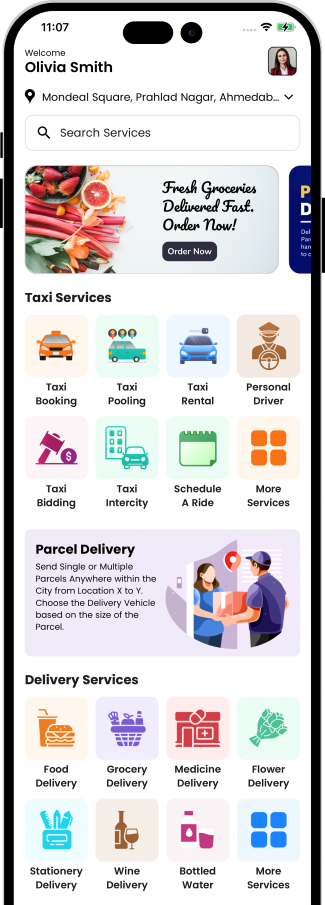
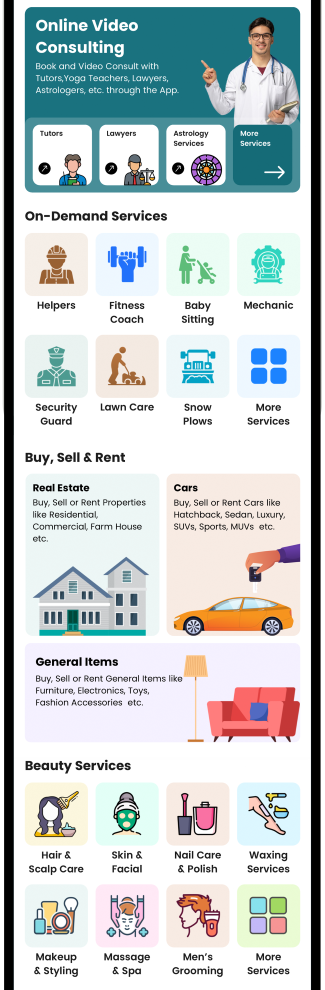
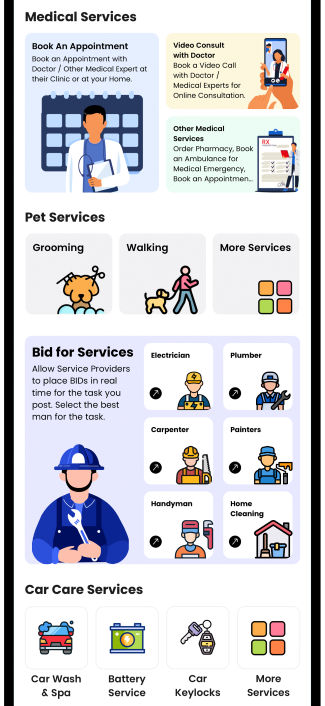
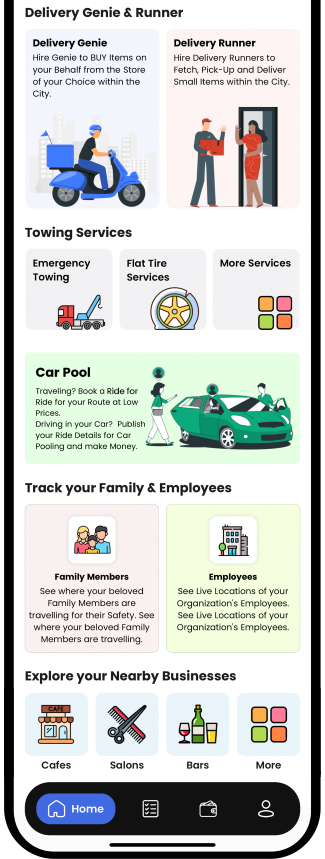
 Detailing
 -
4 Base Components
Step by Step Graphical Flow Of XJekPlus Apps
Loading Screen


App Introduction Screen
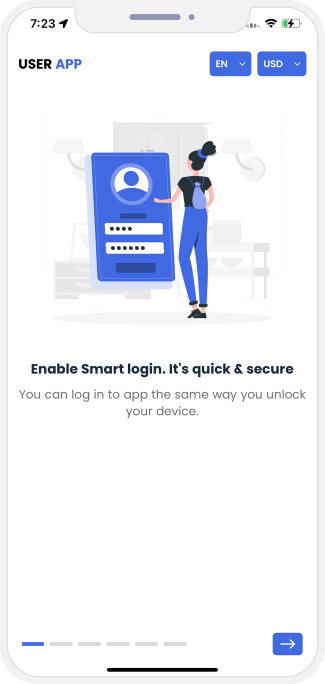
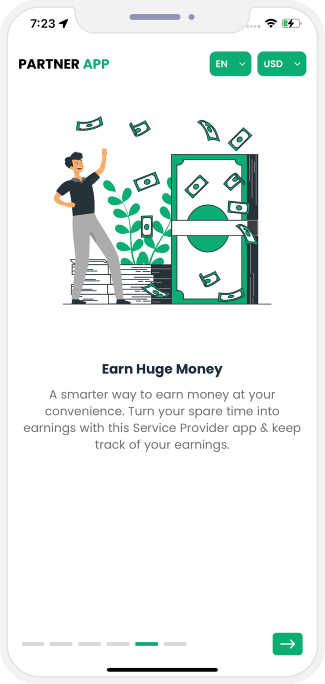
Application Login
Touch Id / Face ID Login (For Android Phone Users)
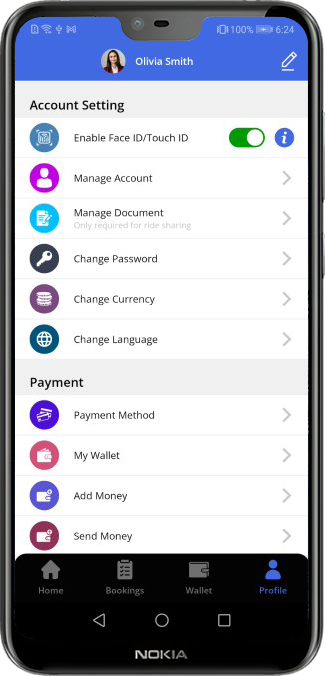
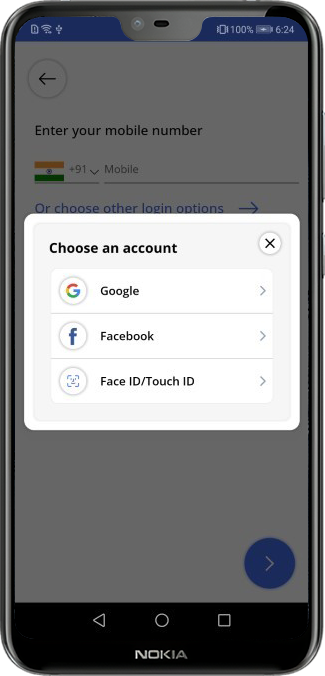
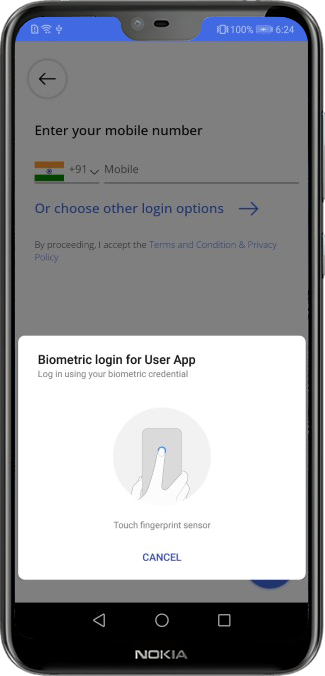
Face Id Detection (For iPhone Users)
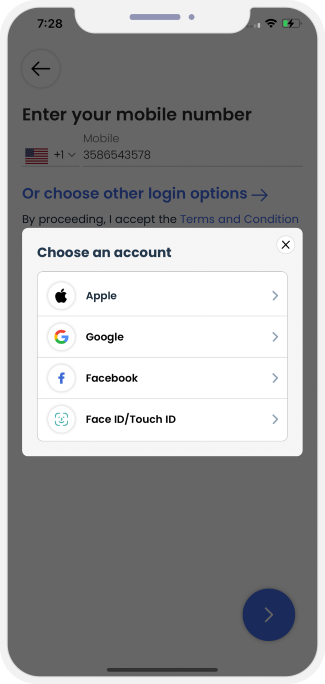
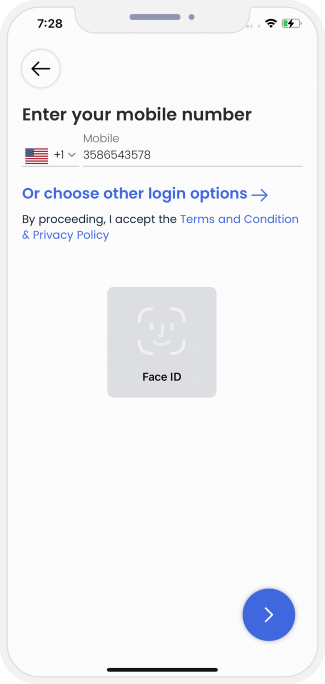
Registration
Application Menu
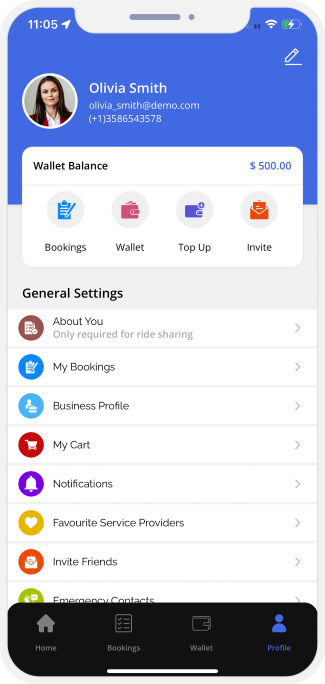
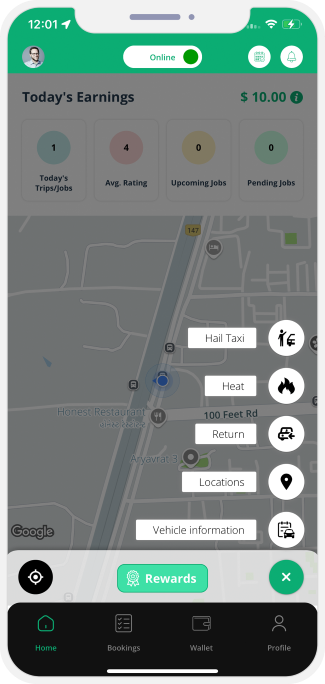
4 Base Components
Newly Available 14 Paid Components
Component 1: Taxi Booking
(You as an App Owner can choose one algorithm for your App. You can either go with Standard Uber like Flow or InDrive like Bidding Flow for Taxi Booking.)Select the Ride Option
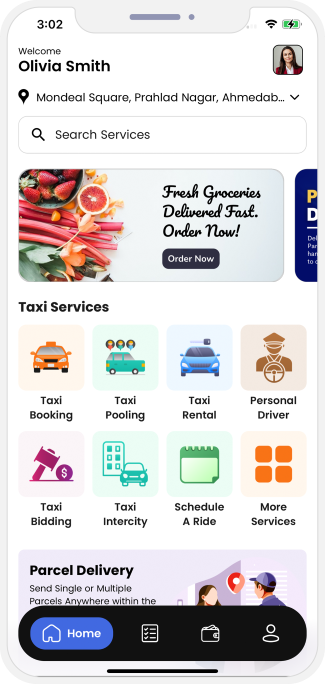
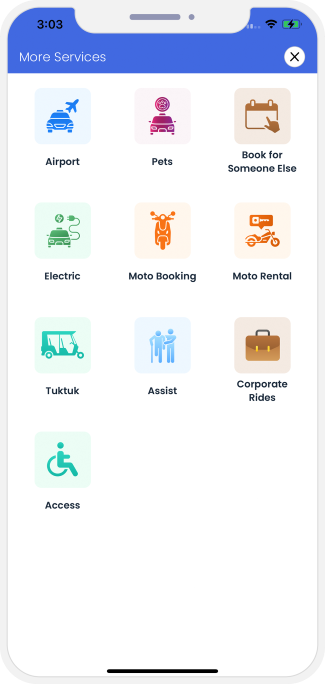
Standard Uber like Flow (Option 1)
Here you will get an idea of how the Taxi part works in the App of the Rider and the Driver respectively thus ensuring smooth Ride experiences.


Driver Gets Online and Start Accepting Rides
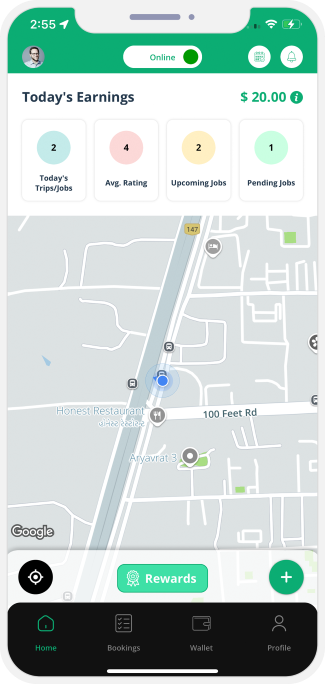
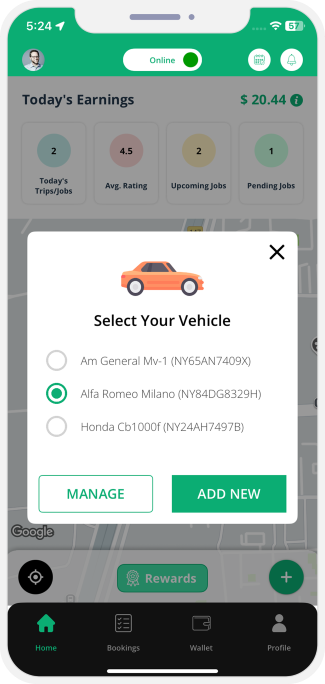 Driver Sets Availability (Online / Offline) to get Ride Requests.
Sending Ride Request
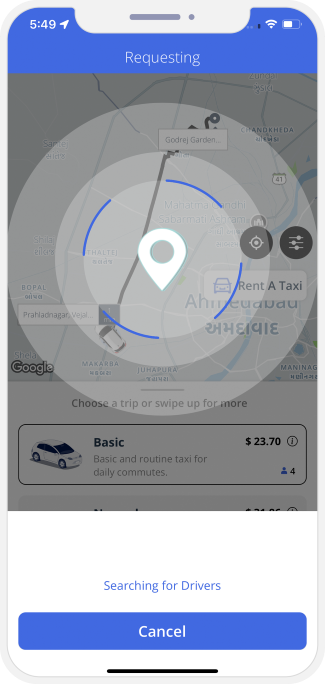
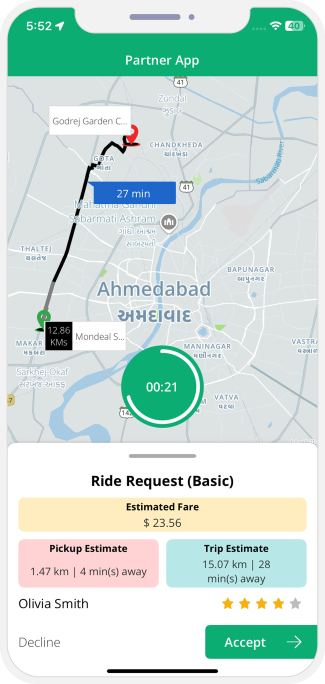
Driver Arriving
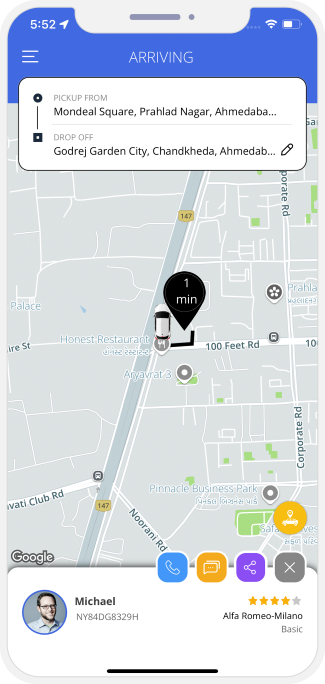
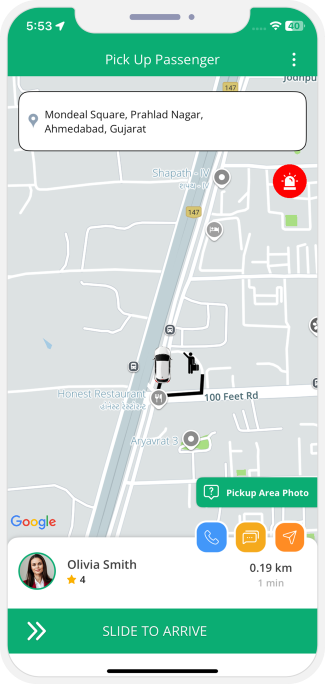
Internal Chat between User and Service Provider
As soon as the Driver accepted the request of the User, thereafter, both can seamlessly chat with each other through the In-App chat feature. The feature however works only till the Trip / Job begins.
* The feature is available for all services.
Choose Call Type
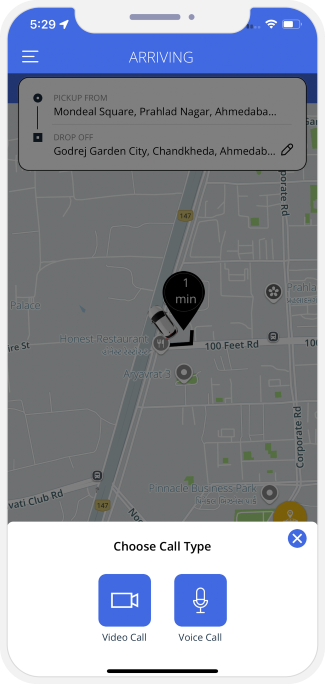
VOIP (Voice Over Internet Protocol) or Call Masking
This section allows the Driver and the User to remain connected with each other via internet calls. This feature prevents the private numbers of both, the Driver / Service Provider as well as the User from getting revealed to each other.
Video Call
Along with phone call and text chat option, user and Driver / Delivery Driver / Service Provider can also use the Video call option to communicate with each others. This section allows the Driver and the User to remain connected with each other via Video call.
Upload Pickup Area Photo
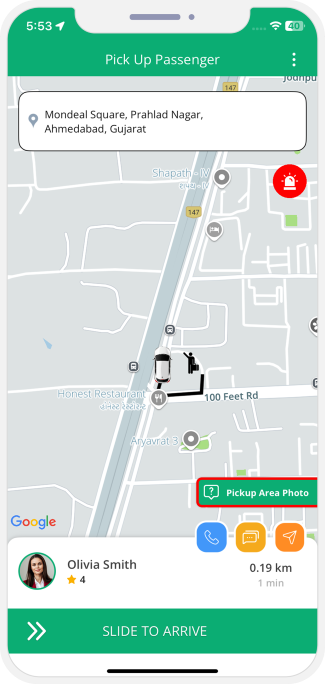
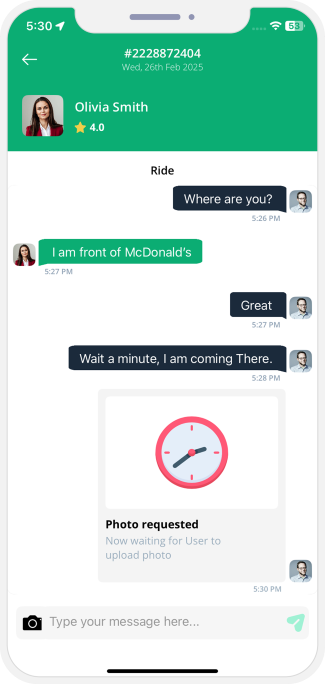
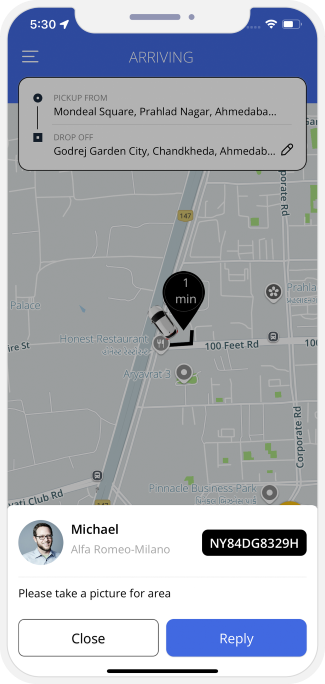
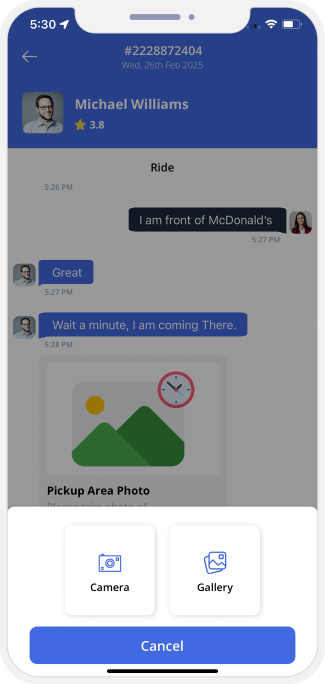
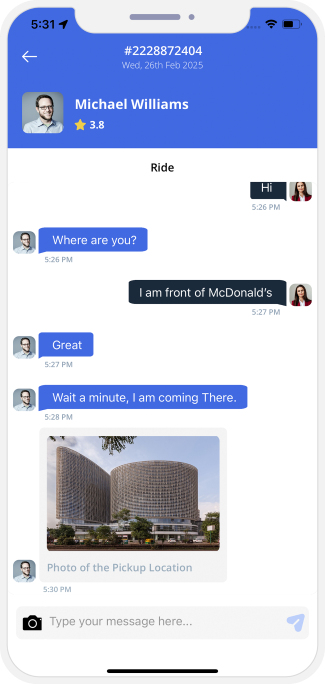
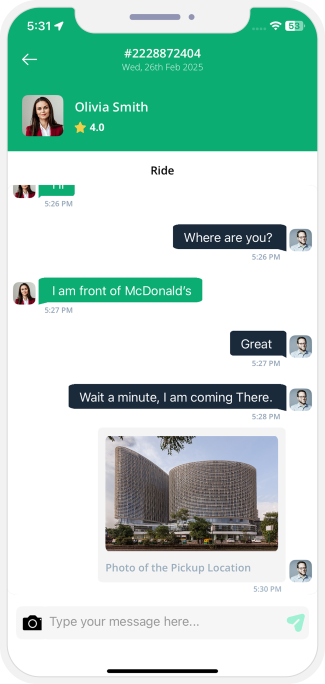
Driver Arrives at Location
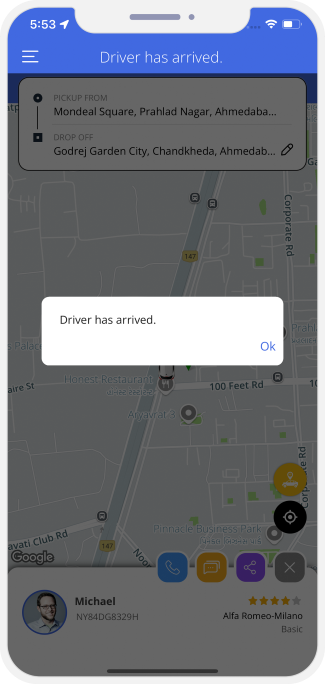
Trip Begins
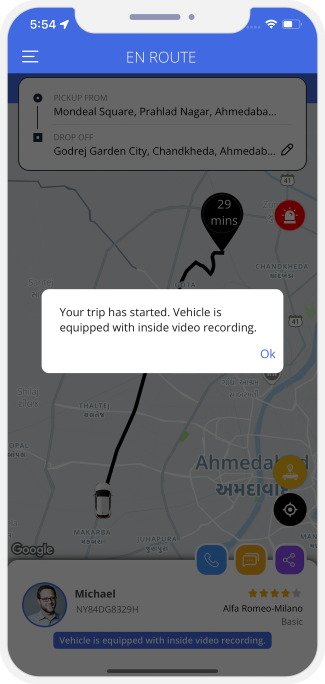
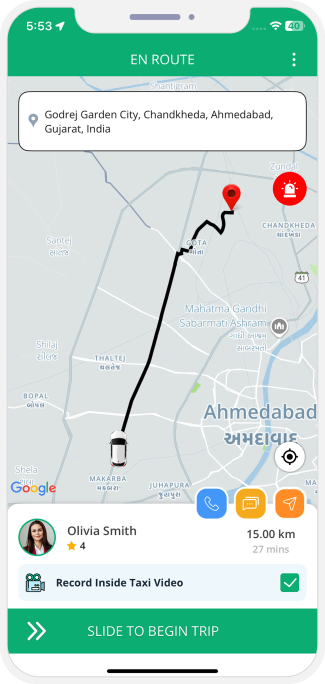
Enroute - Ongoing Trip
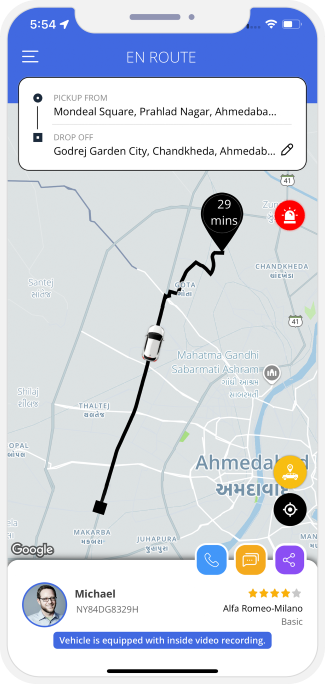
Video Recording for Driver App
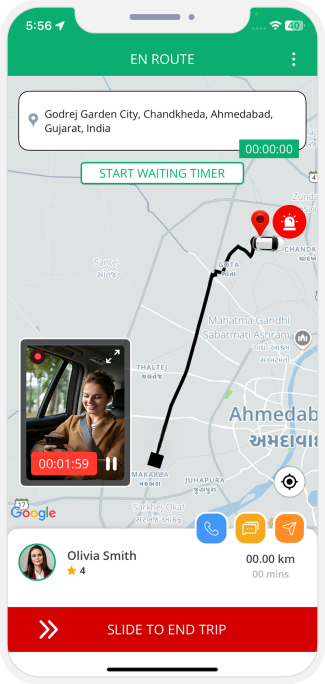
Google In-App Navigation in Driver App
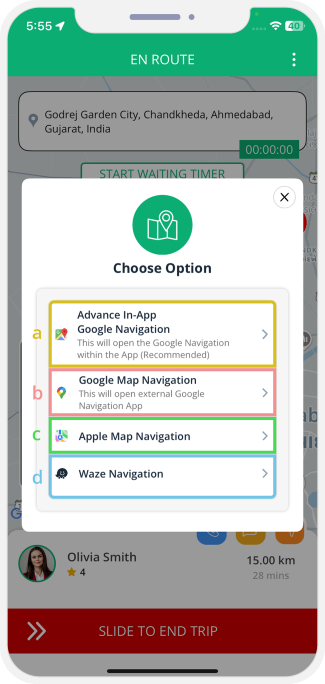
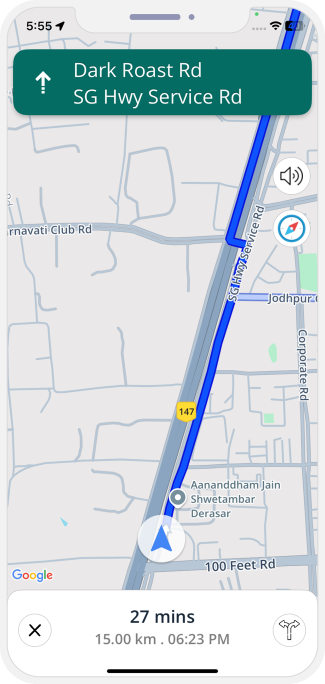
Trip Completed
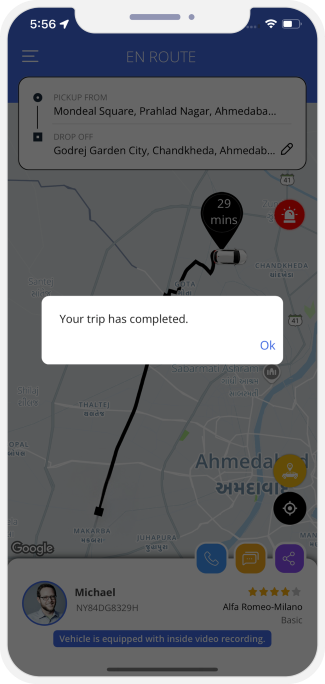
Summary of the Invoice
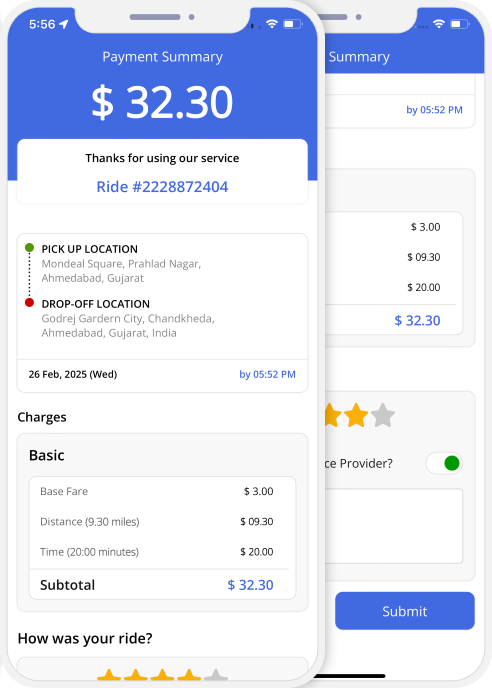


Component 1: Taxi Booking
(You as an App Owner can choose one algorithm for your App. You can either go with InDrive like Bidding Flow and Standard Uber like Flow for Taxi Booking.)InDrive like Bidding Flow (Option 2)
Here you will get an idea of how the Taxi part works in the App of the Rider and the Driver respectively using Taxi Bidding.
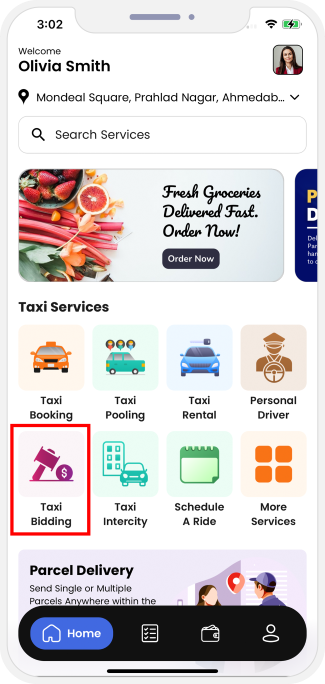
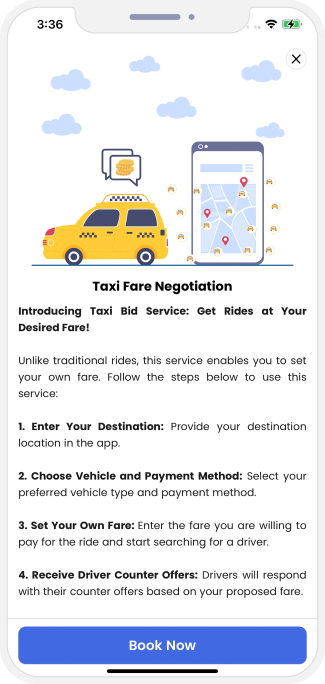
Booking A Taxi Using Taxi Bidding Feature
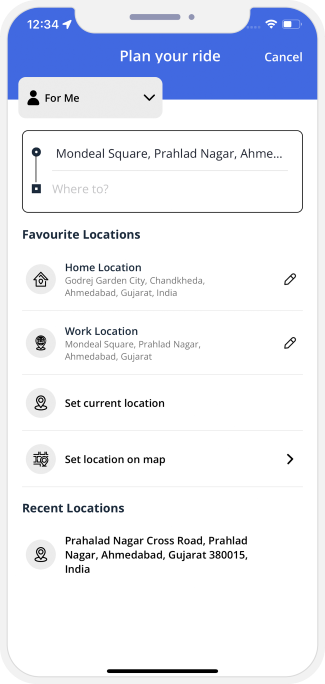

Sending Request

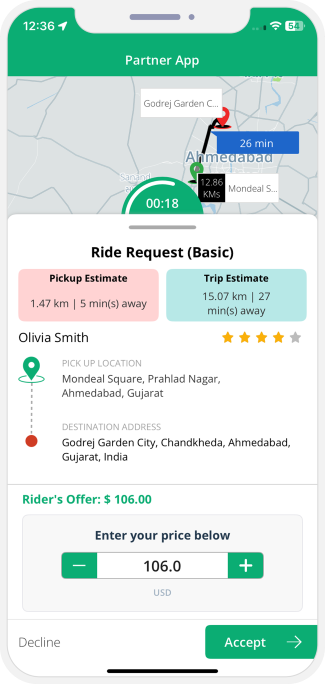
Driver Accepted the Offer (Case 1)

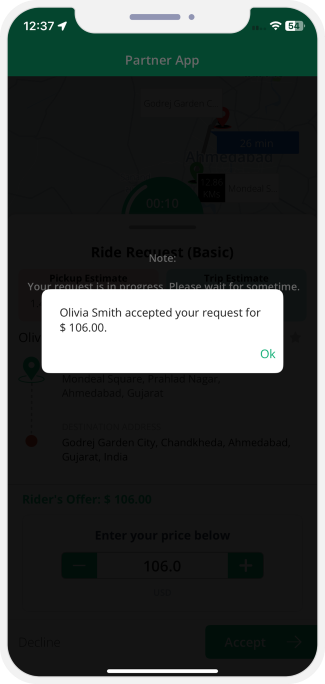
Multiple Bids (Case 2)
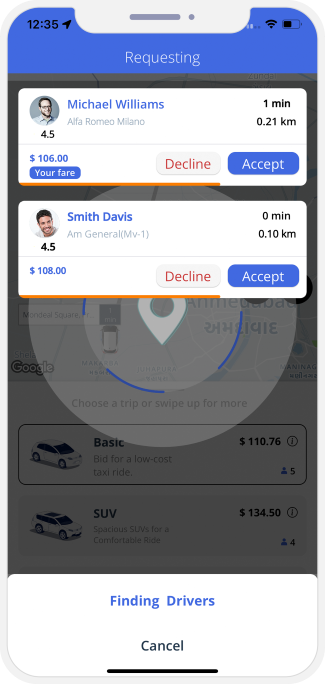

Rider Accepting One Offer

Driver Arriving
Intercity Trips
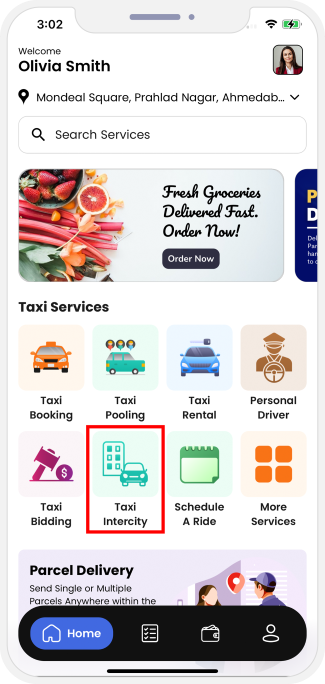
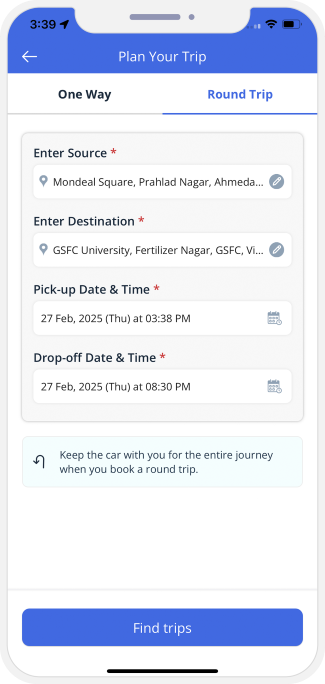
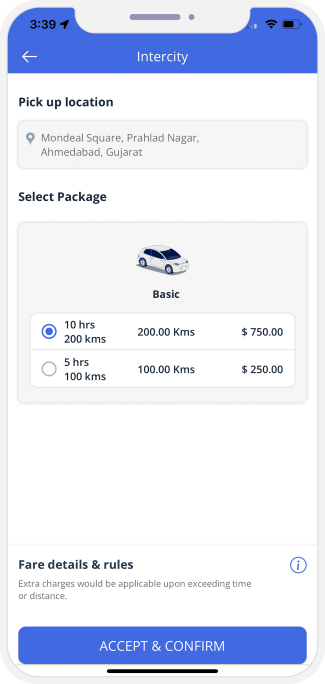
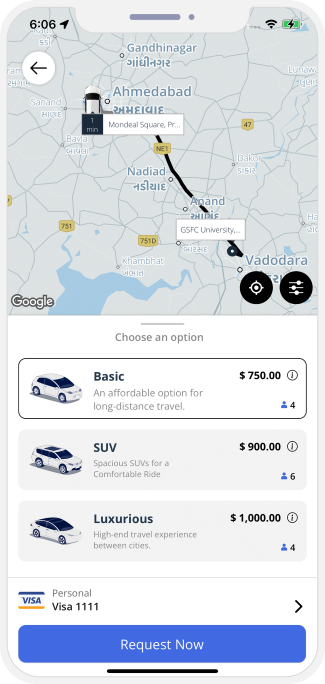
Driver Gets Online and Start Accepting Rides
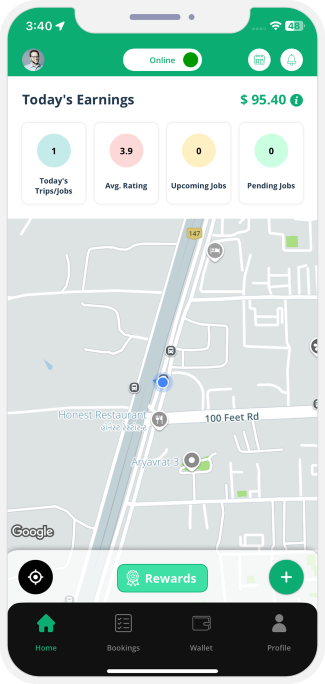
 Driver Sets Availability (Online / Offline) to get Ride Requests.
Sending Ride Request
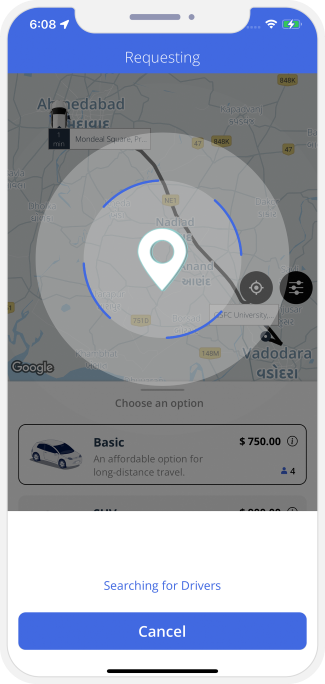
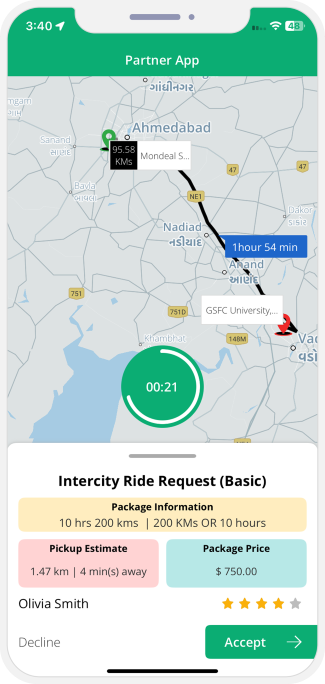
Driver Arriving
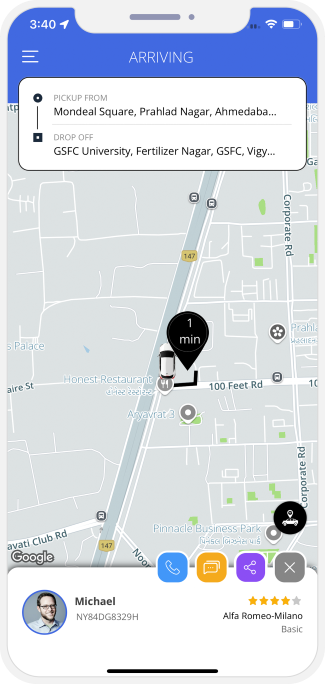
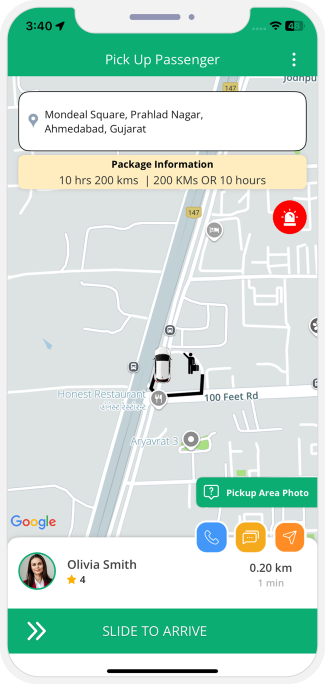
Driver Arrives at Location
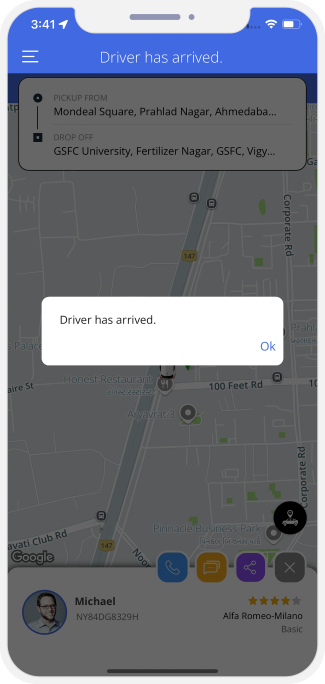
Trip Begins
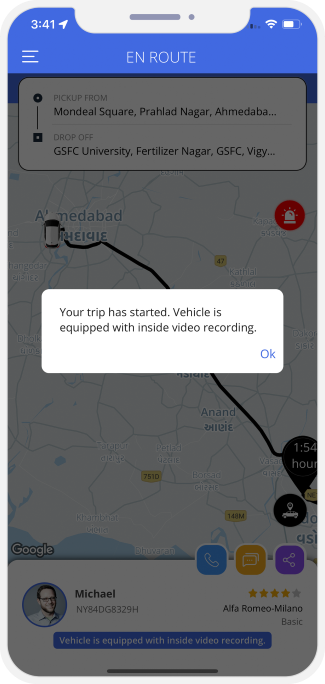
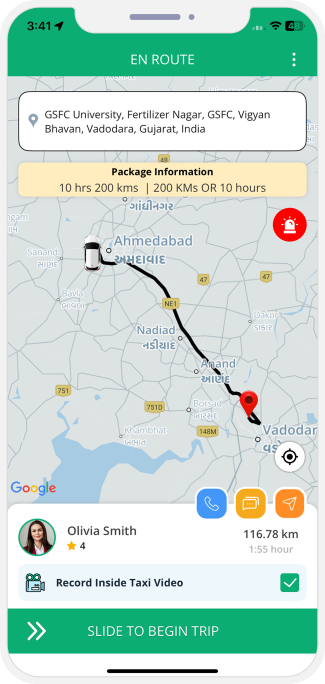
Ongoing Trip
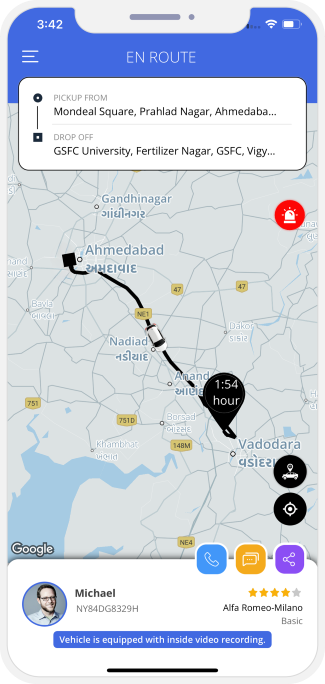
Trip Completed

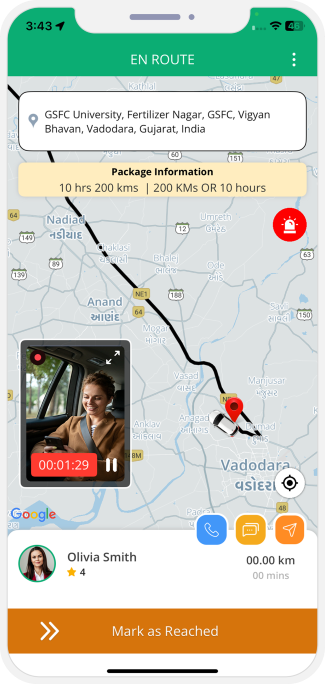
Return Trip
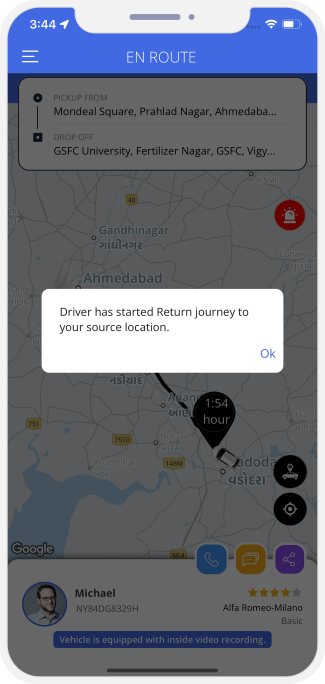
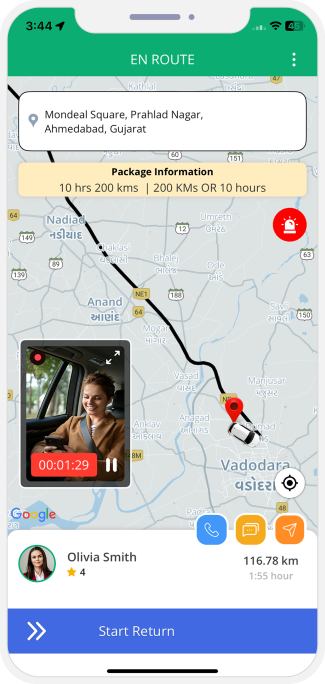
Trip Completed
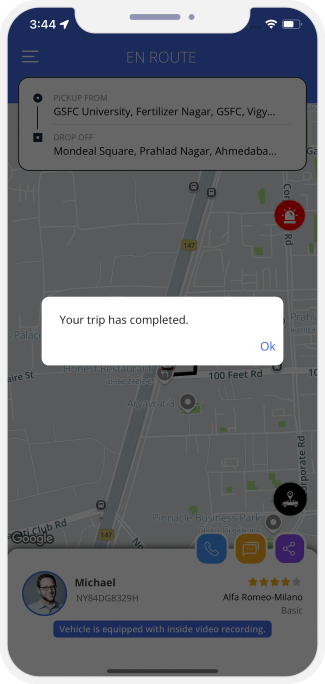
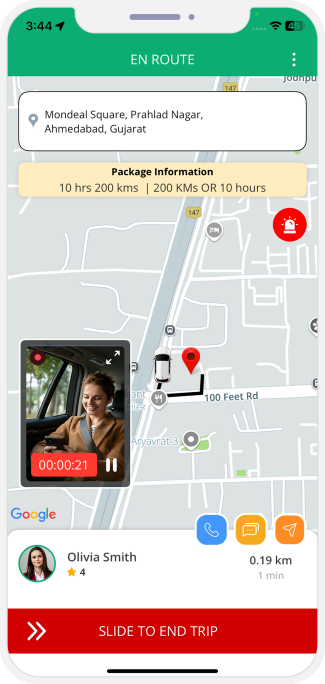
Summary of the Invoice

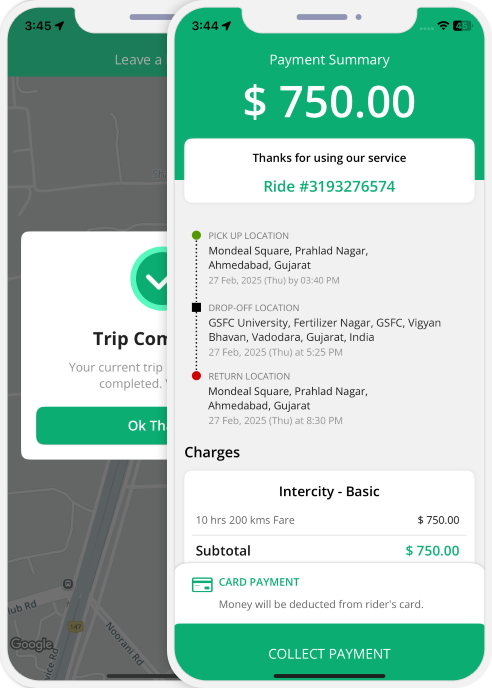
AI - Artificial Intelligence Features
AI Dynamic Pricing

-
Based On the Weather
AI-Based Fare Generationbook a taxi through WhatsApp
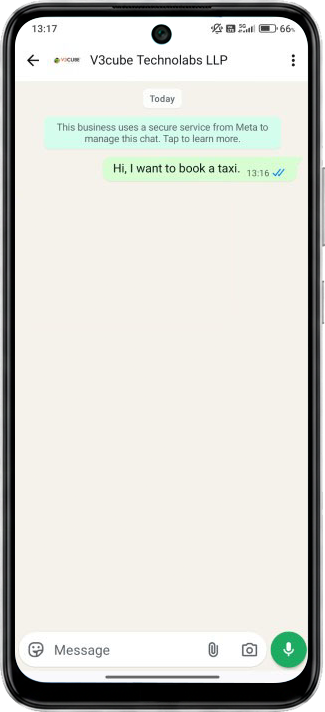
 Start the Chat
Provide the Required Details
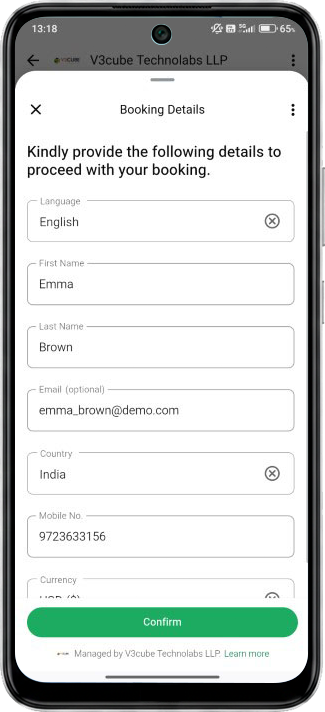
Enter Pickup Location
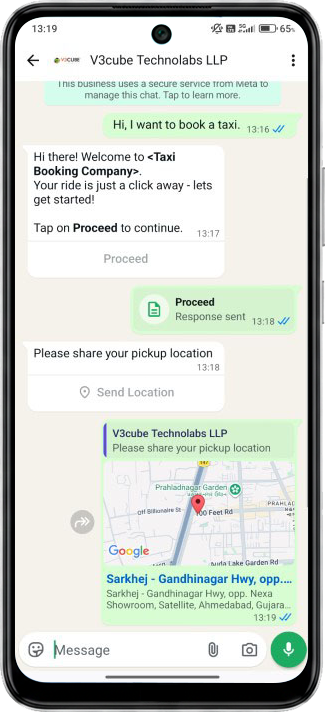
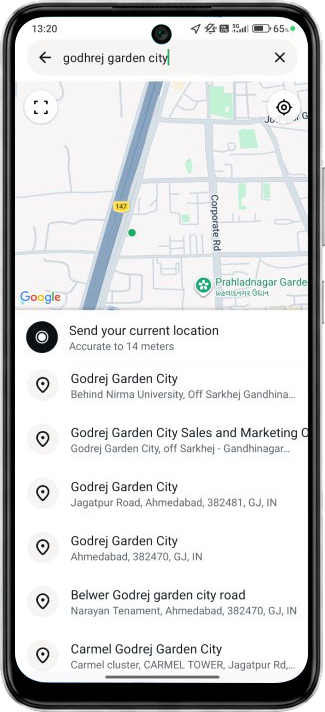
Share Drop-off Location
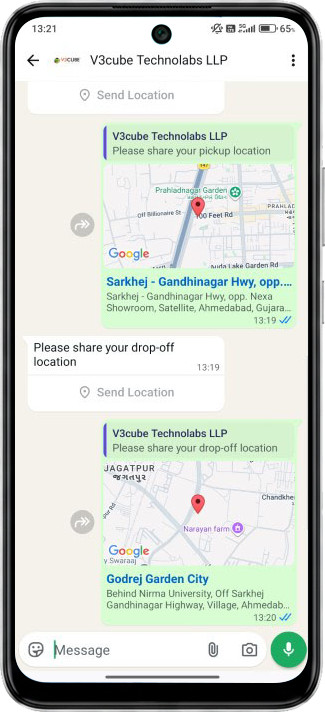
Choose Your Vehicle
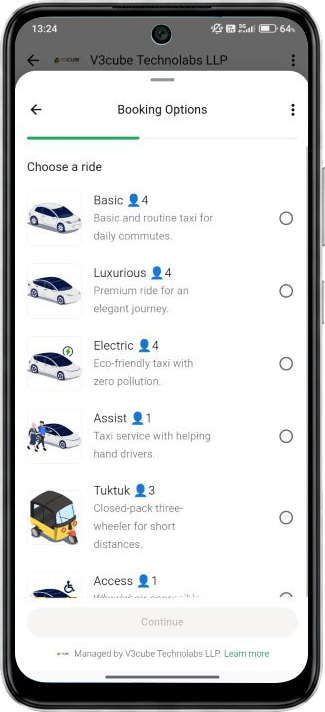
Enter Promo Code
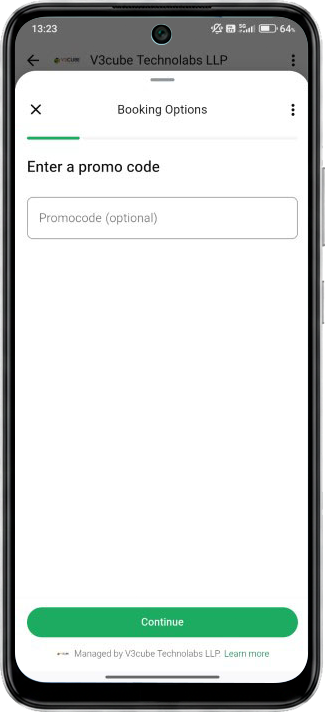
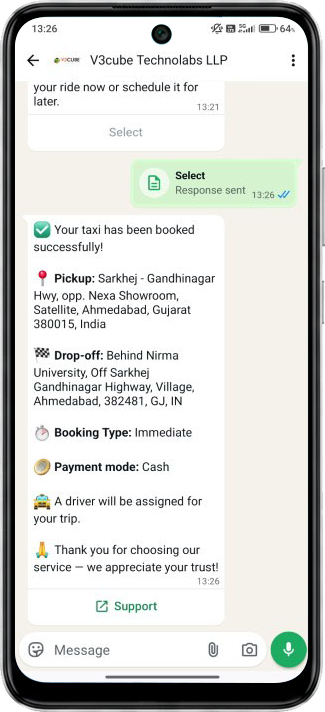
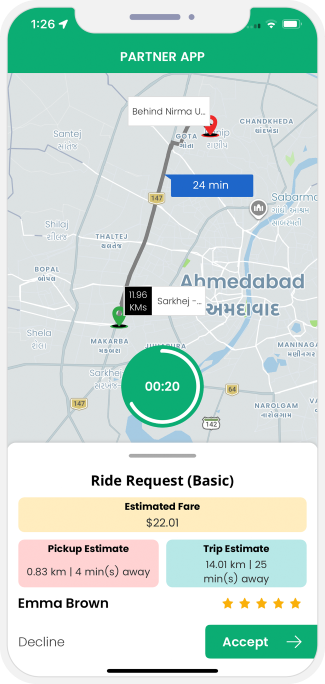
Driver Arriving
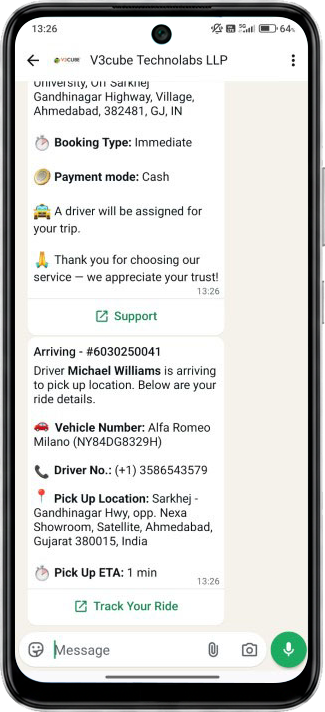
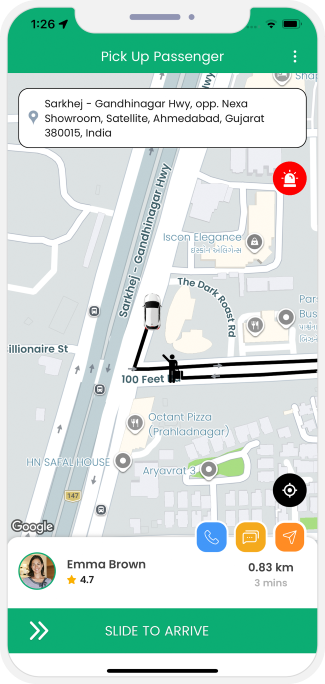
trip Started
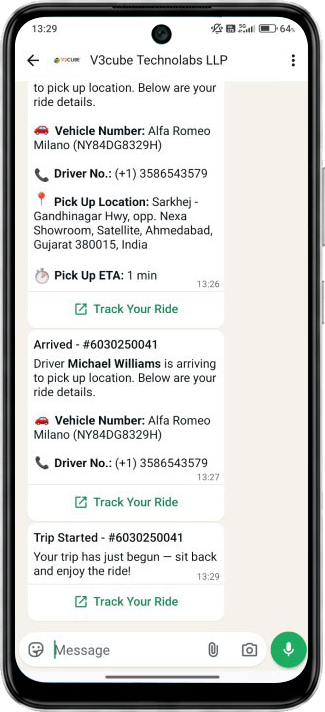
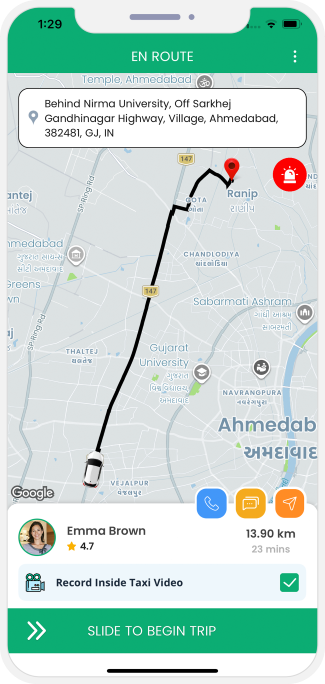
Trip Completed

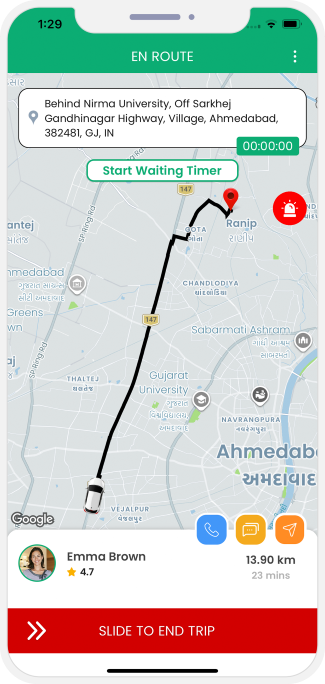
Invoice Summary

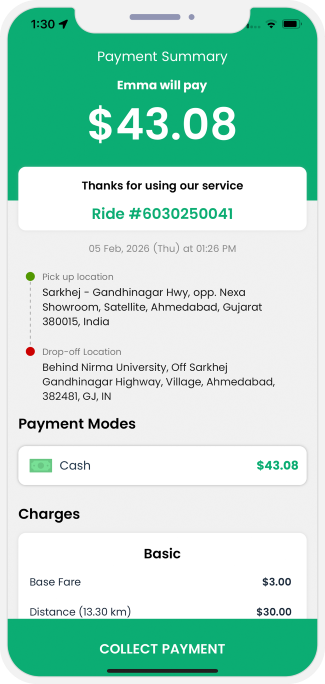
Taxi Booking - Other Features
Lost and Found
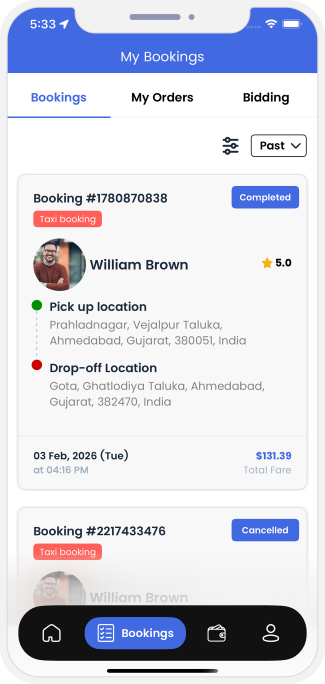
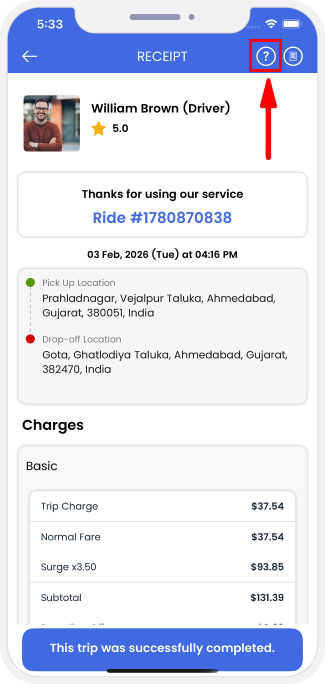
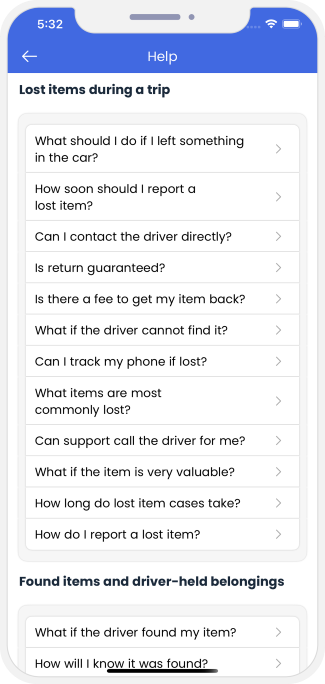
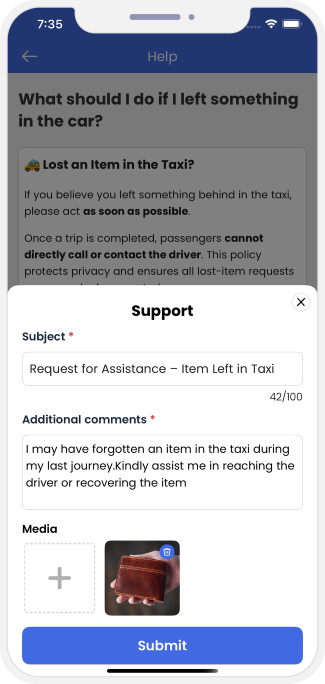
corporate rides
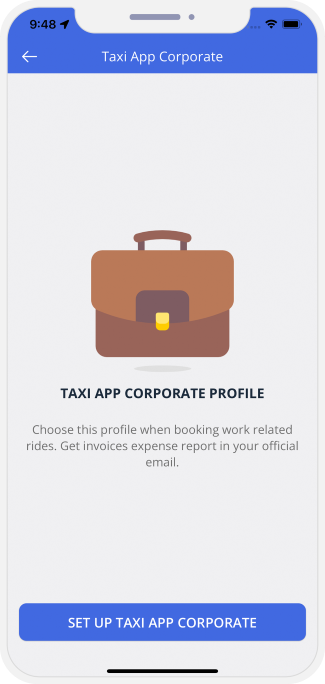
 Create your Business Profile.
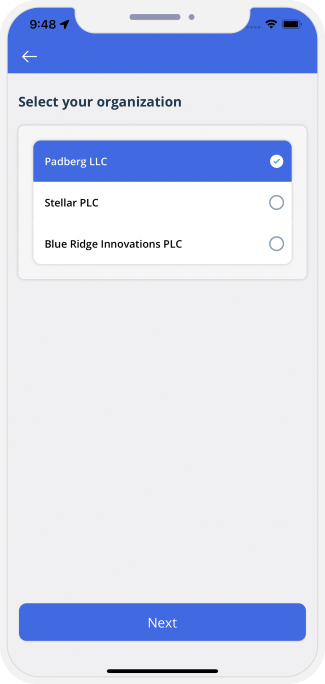
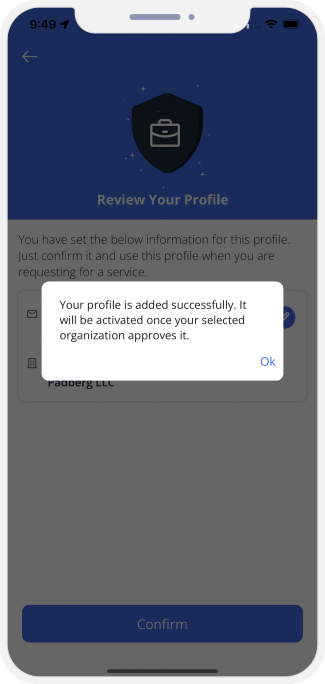
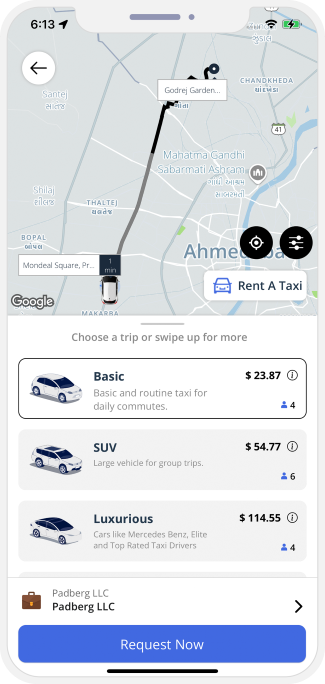
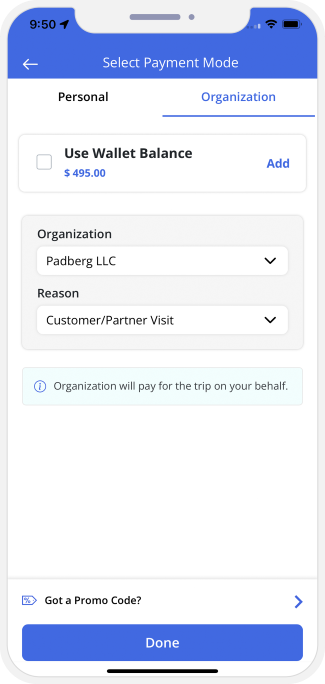
Taxi POOL
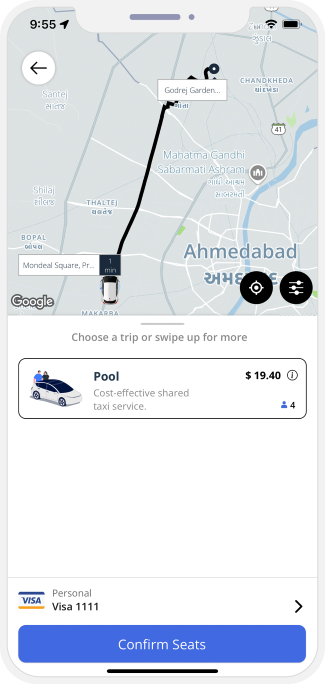
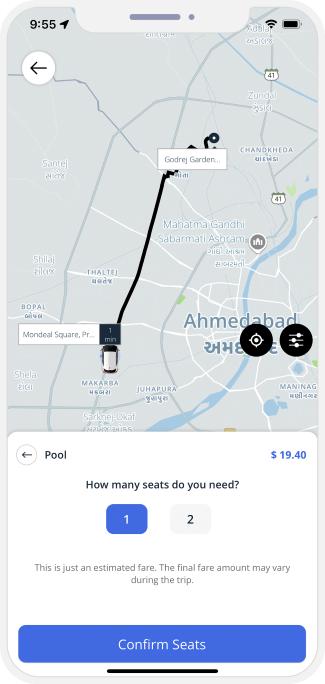 Taxi Pooling
BOOK FOR SOMEONE ELSE
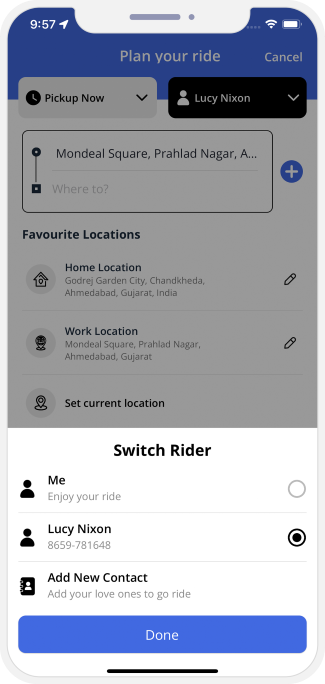 Book A Ride for your family or friends!
Back to Back Trip Requests - Driver Application
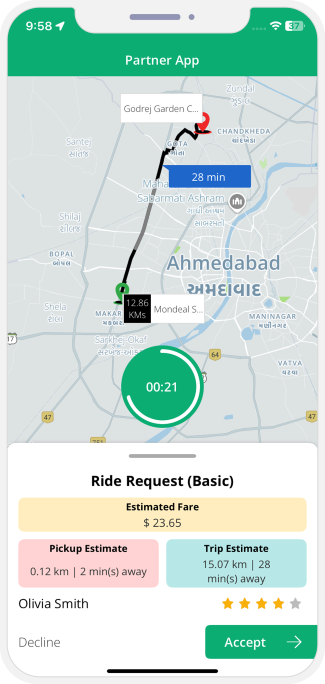
Taxi Rentals
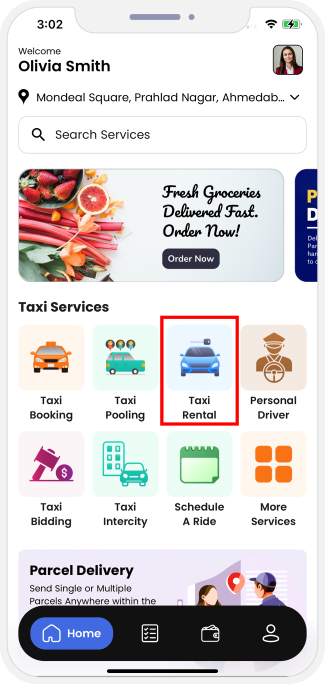
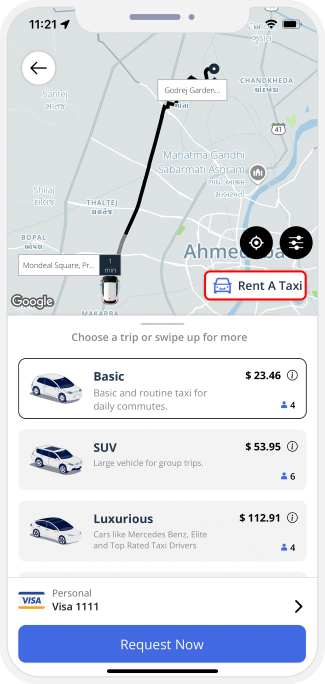 This feature allows your customers to book completely chauffeured Rides for a particular duration of time for a stipulated distance.
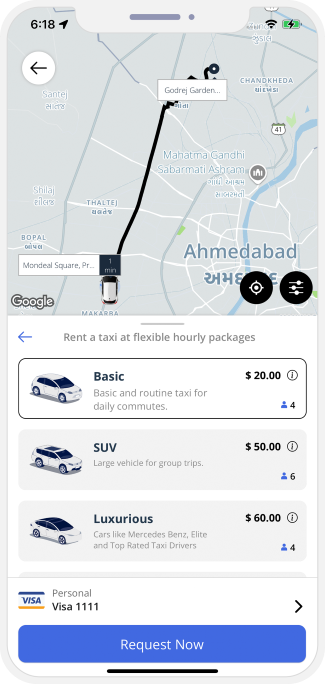
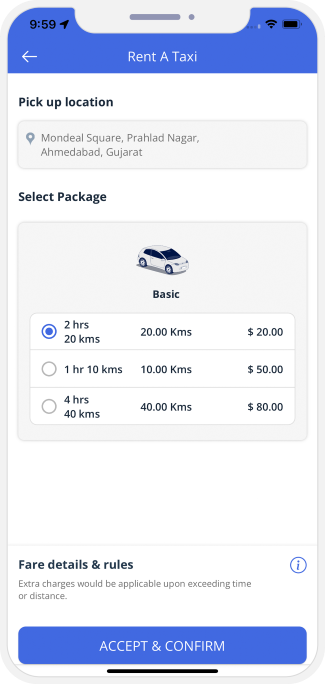

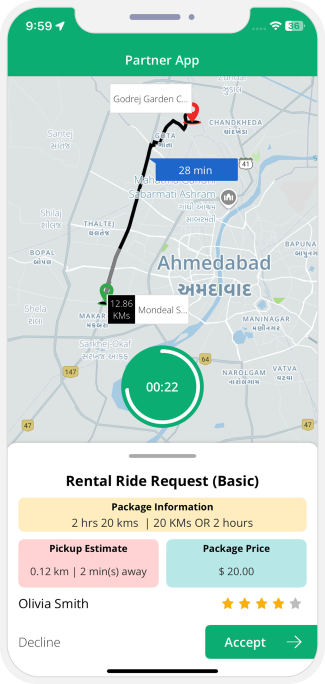
Surcharges
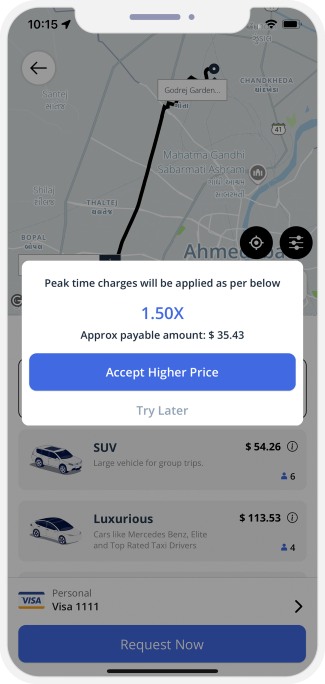
Ride Later Feature

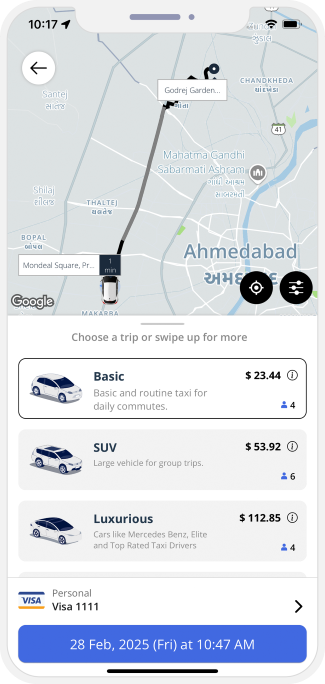
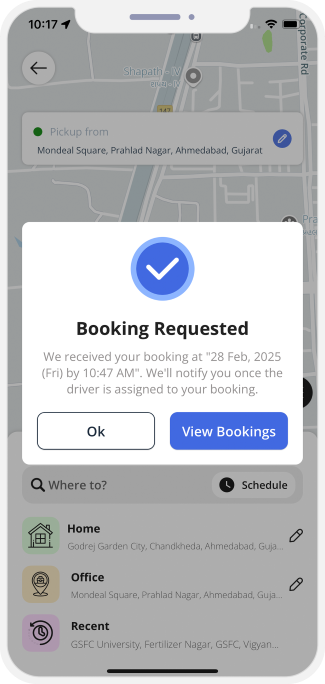
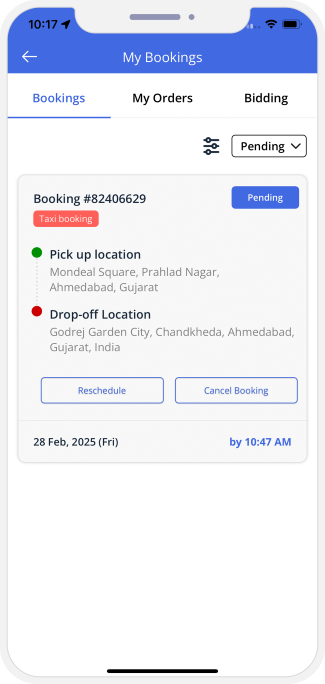
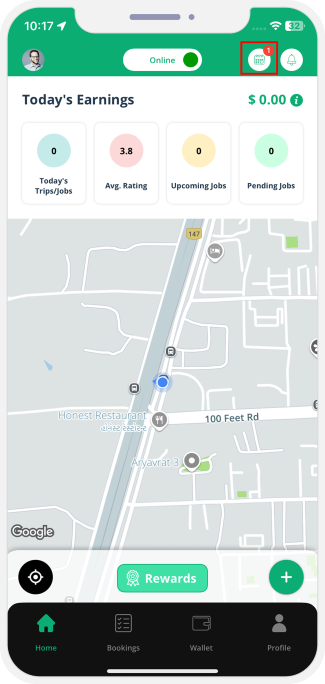
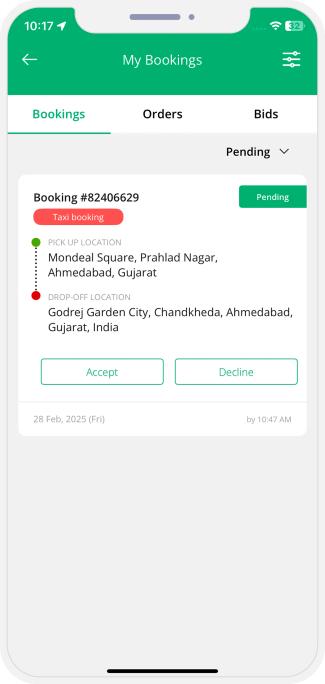
Reschedule the Ride

Driver Starting the Ride


Ride Started by the Driver
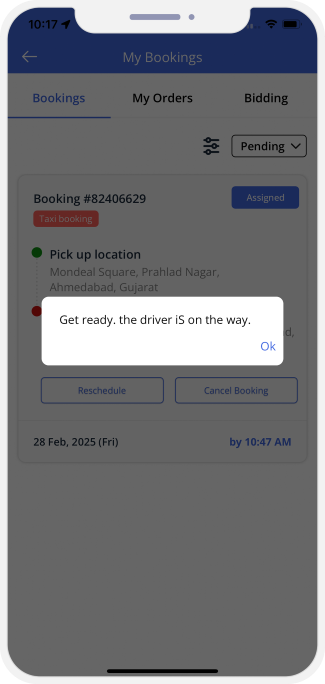
SOS - Emergency Option - Taxi Booking
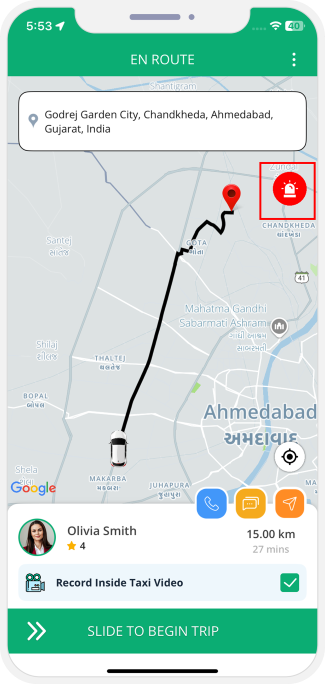
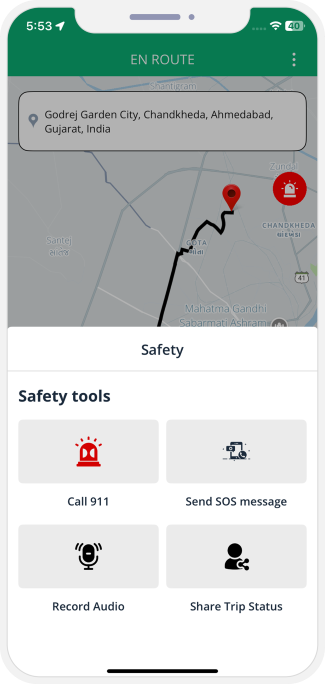
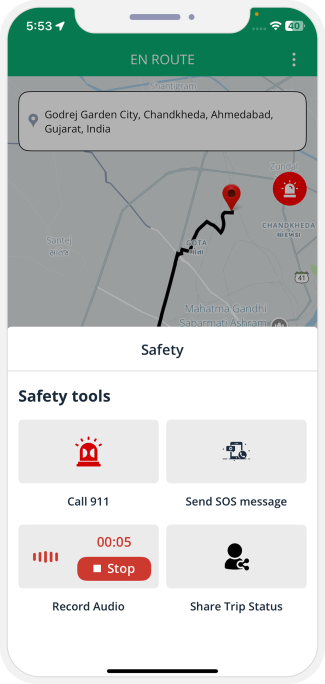 Tapping on Emergency icon, different option will be displayed like
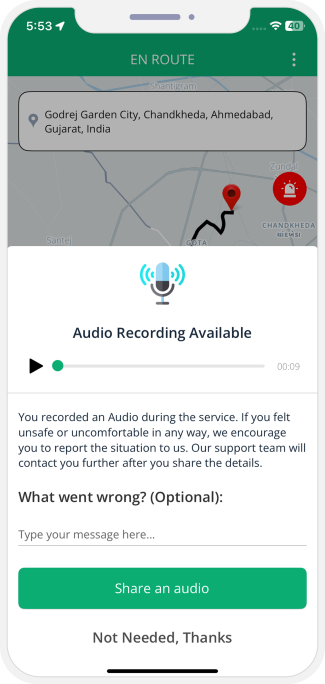
taxi hailing / hail ride
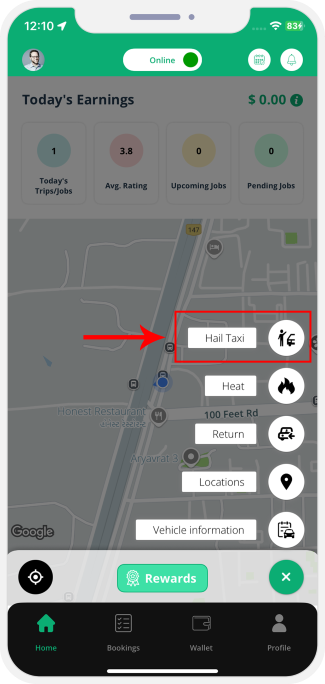
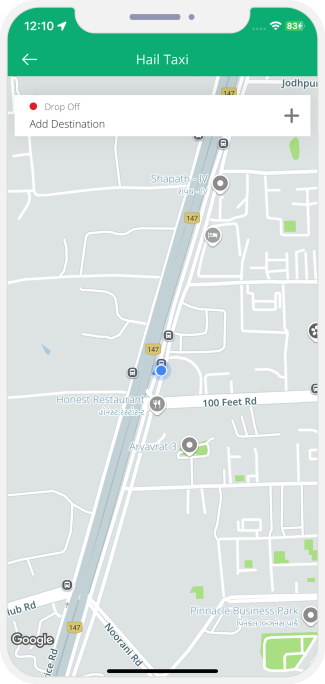
Multiple Stopover Points
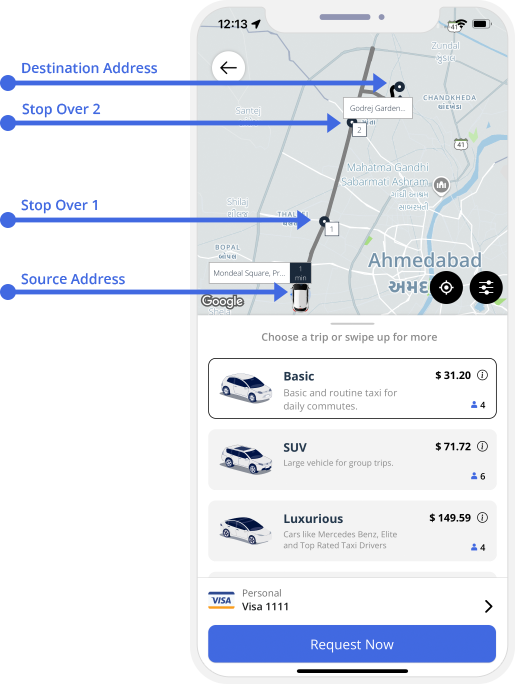
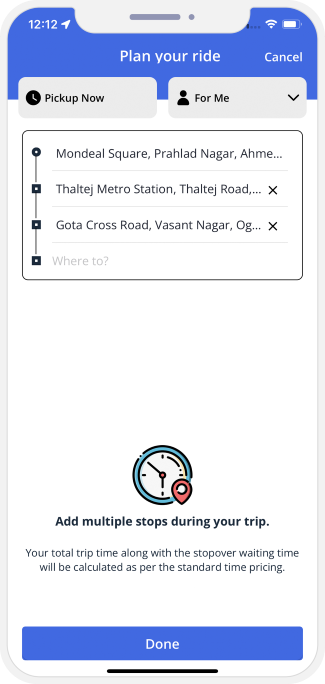
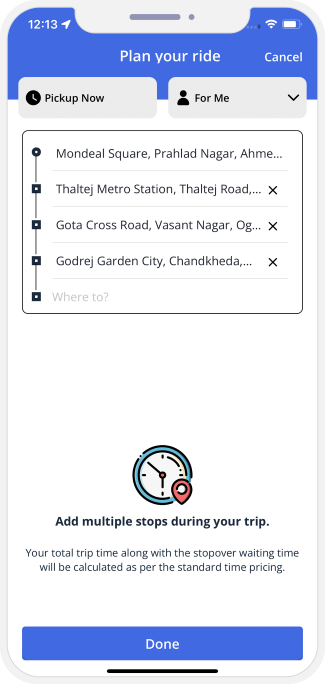
Shop/Stop/Eat while Riding

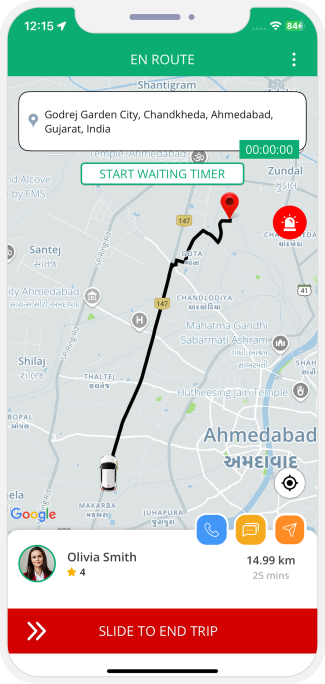

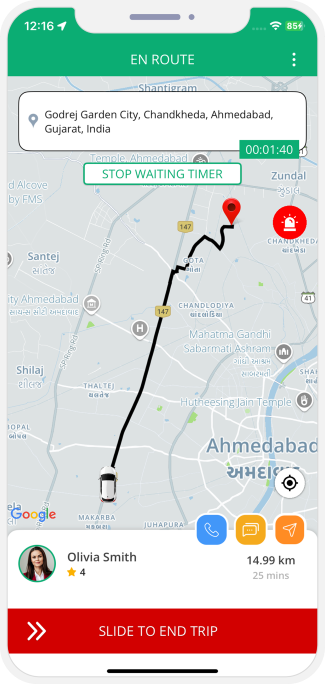
How to cancel a Trip
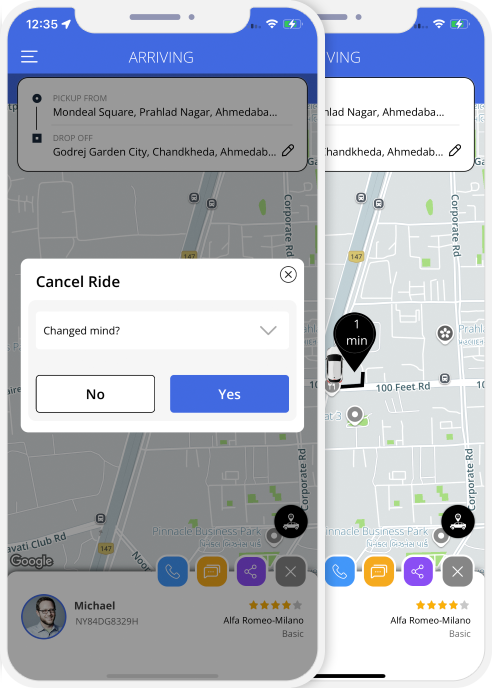
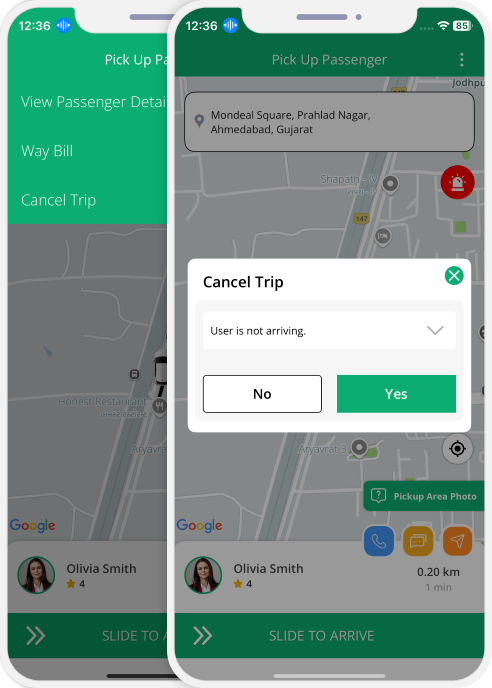
Airport Rides/Surcharge
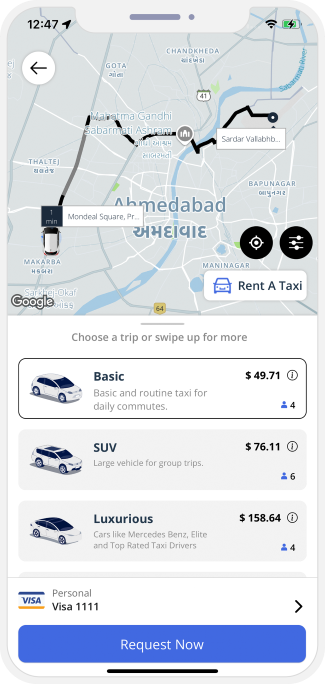
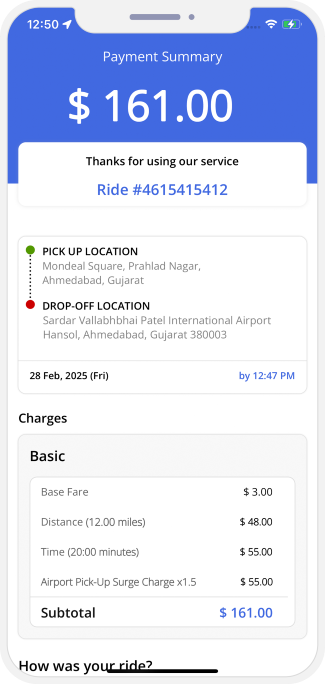
X to Y Location
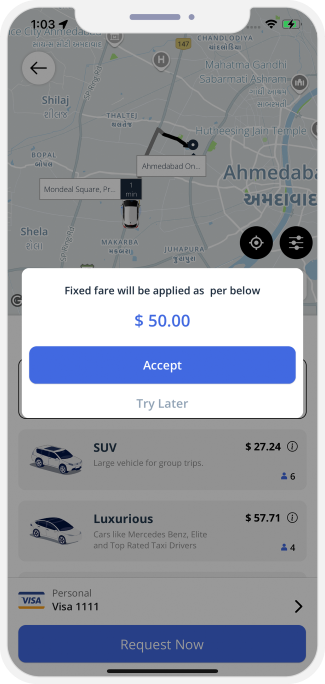
End of the day trip - Driver App
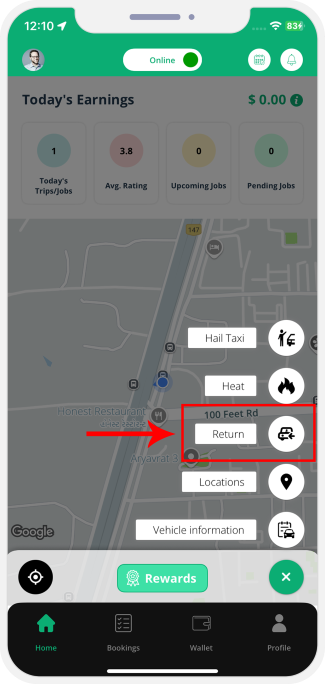
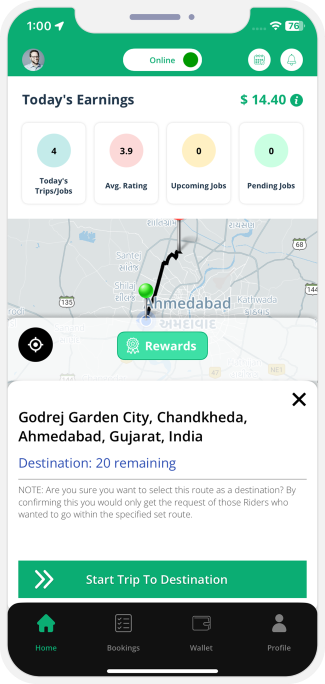
Toll Calculation for USA (Using 3rd party Toll API)
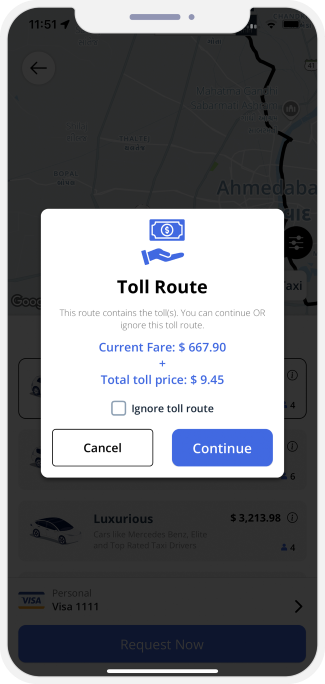
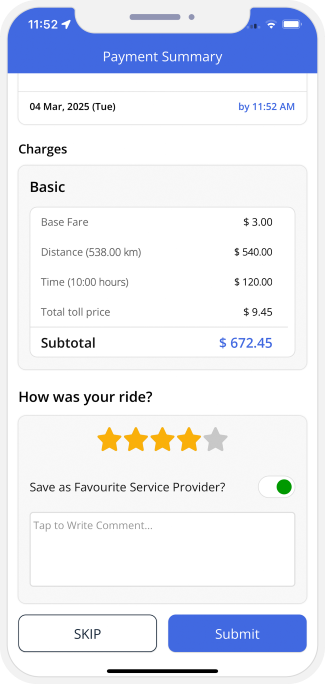
OTP Verification to Start the Ride
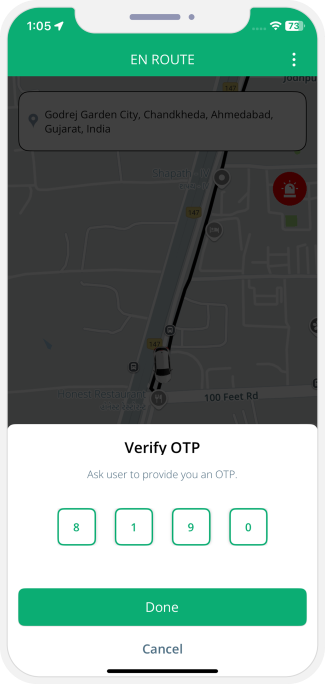
User Preferences
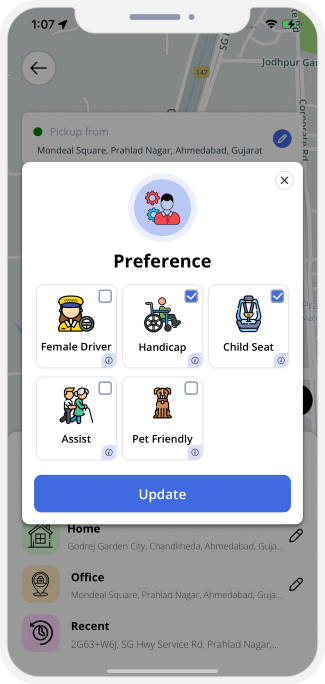
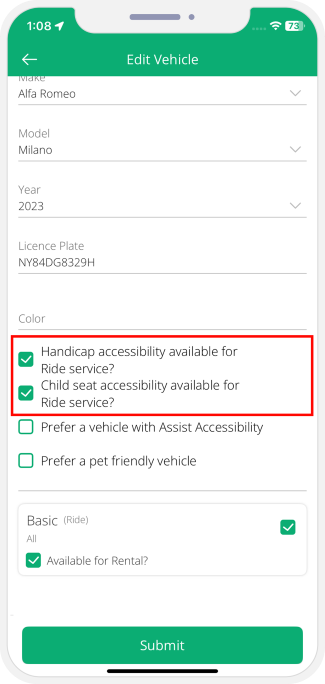
Set Destination Later Feature
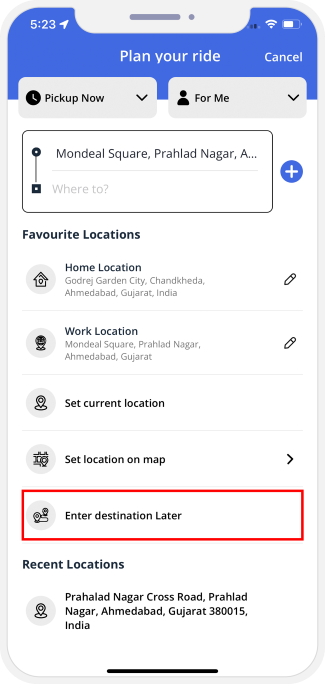
Moto Booking
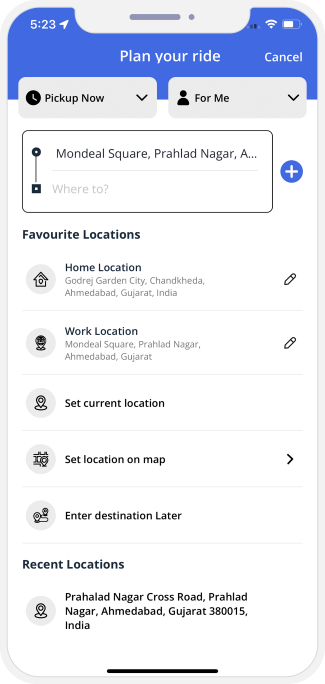
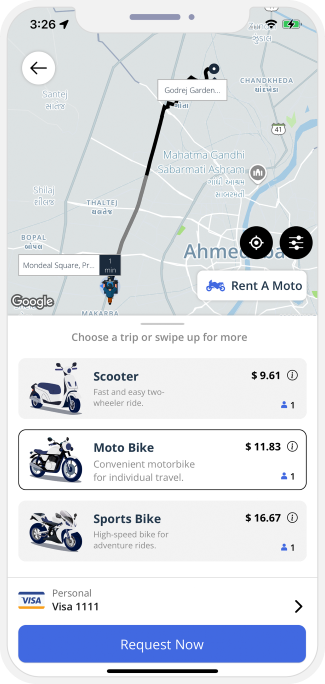 Book a Moto/Two Wheeler
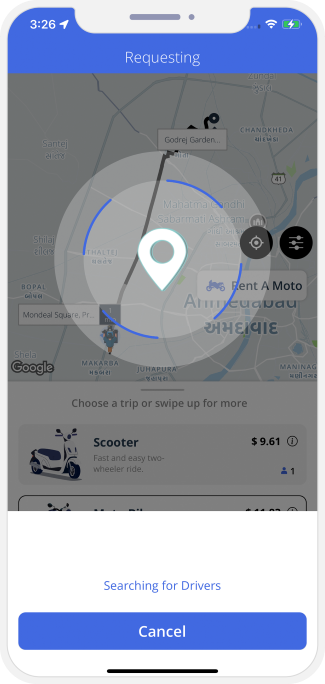
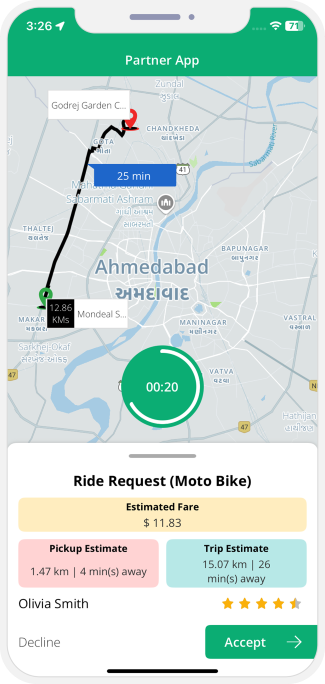
Personal Driver Workflow
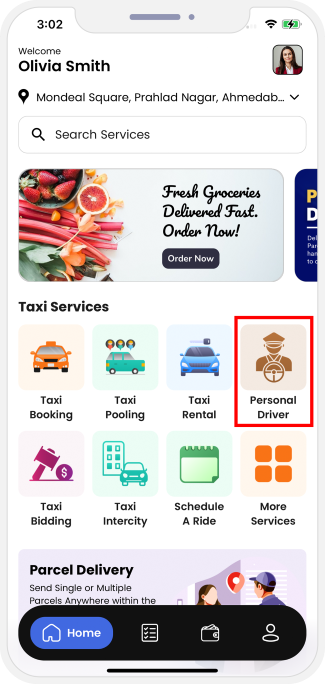
Book a Personal Driver
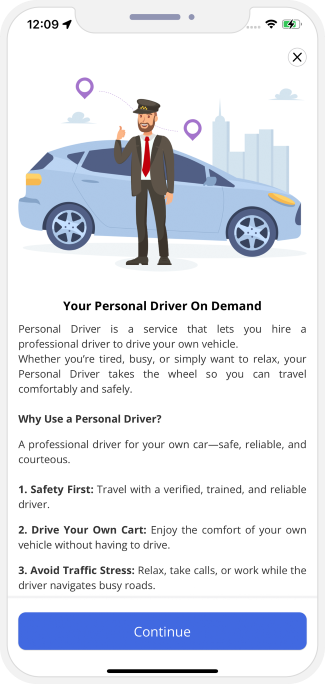

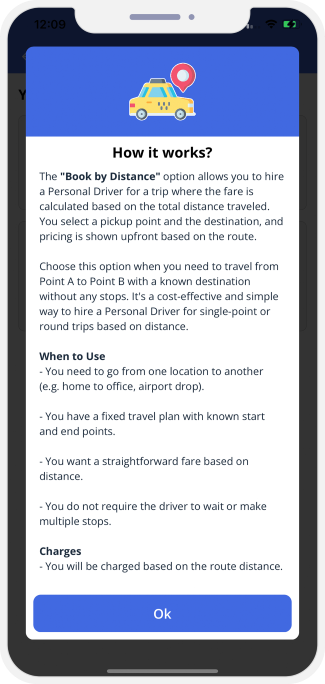

Personal Driver
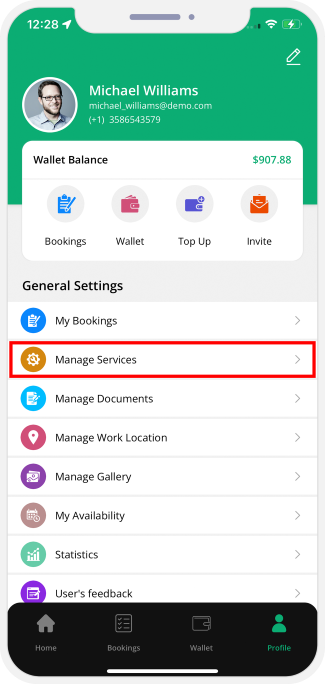
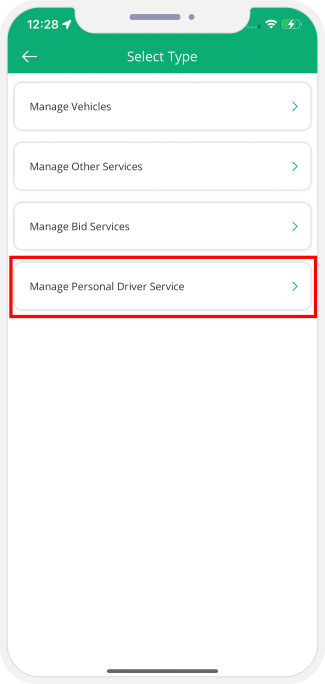
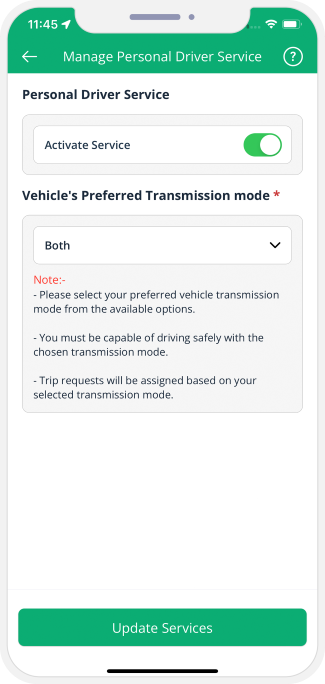
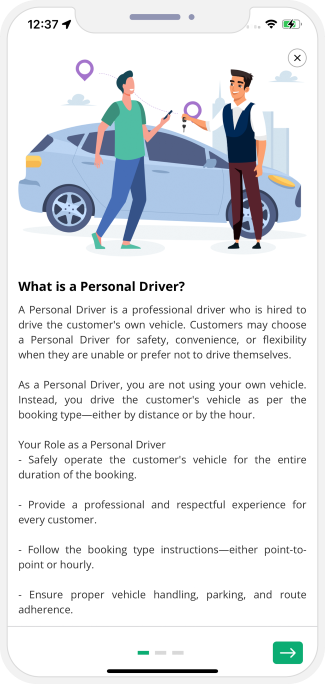
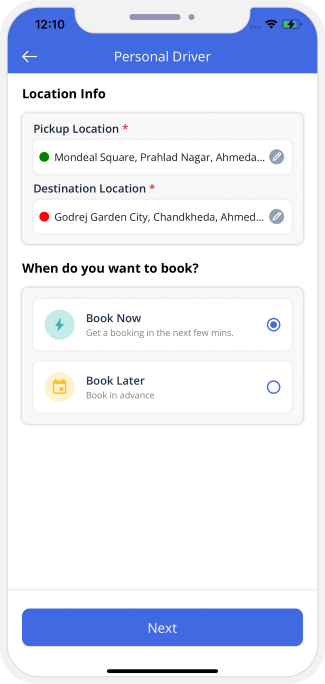
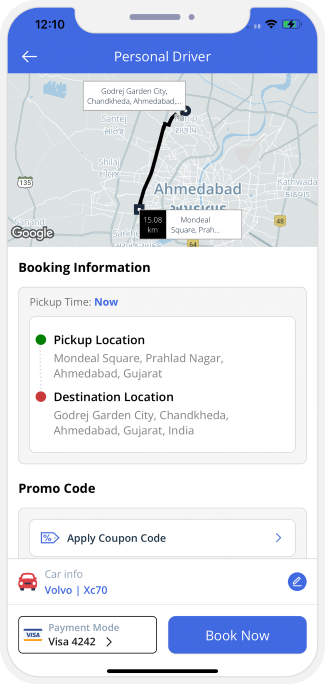
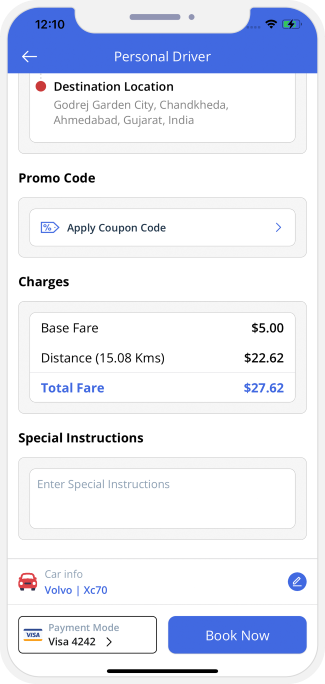

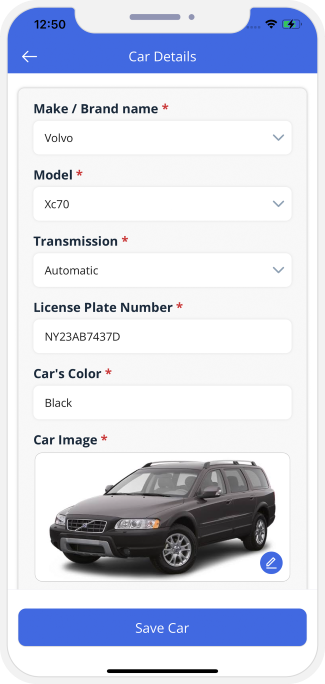
Sending the Ride Request
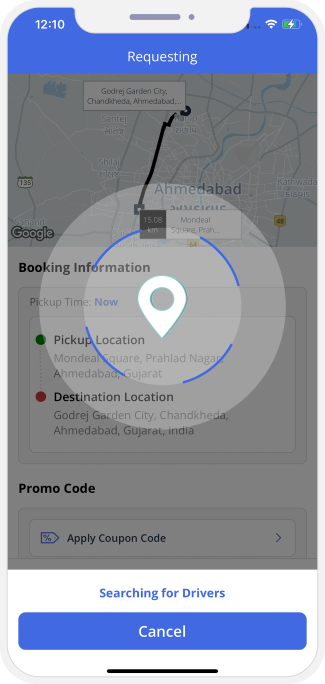
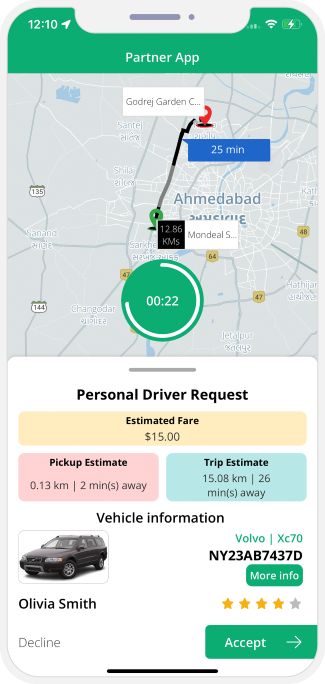
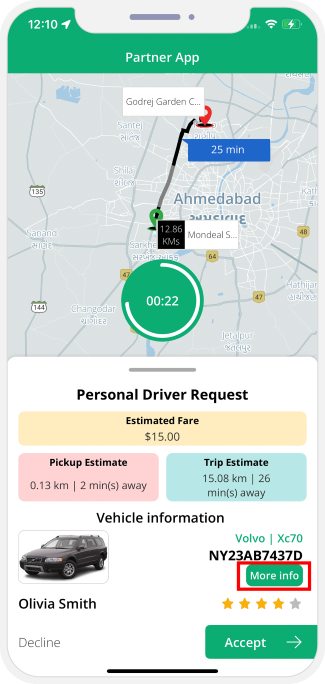
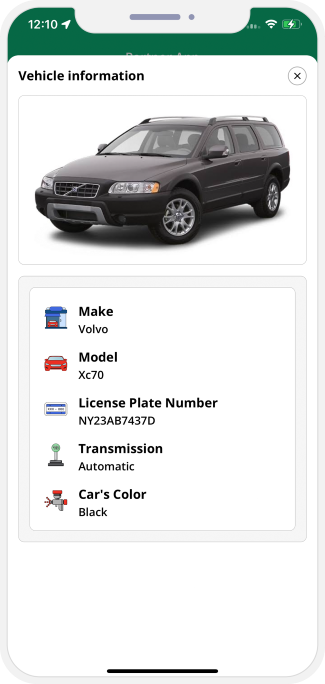
Driver Arrival
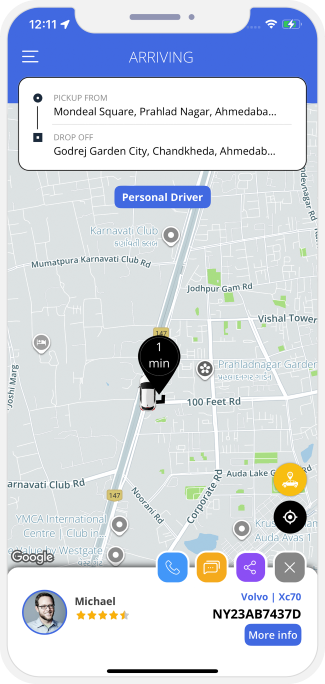
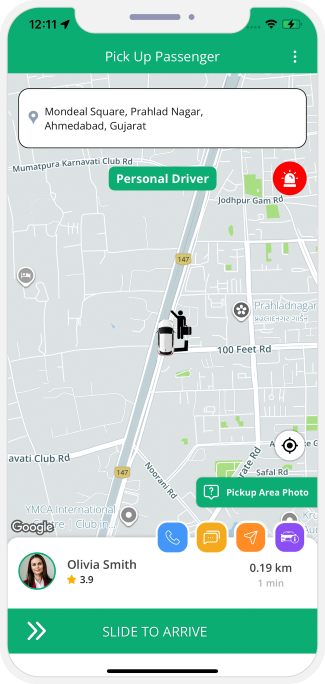
Driver Arrives at Location
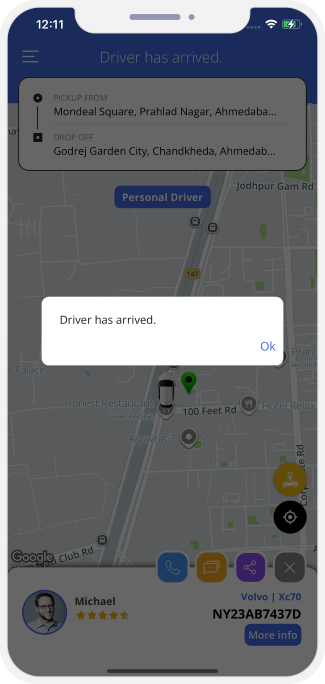

Ride Begins
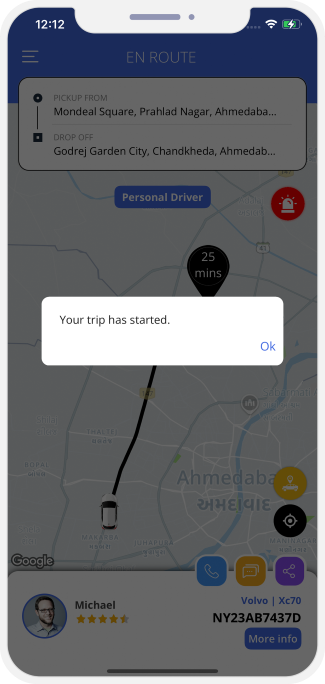
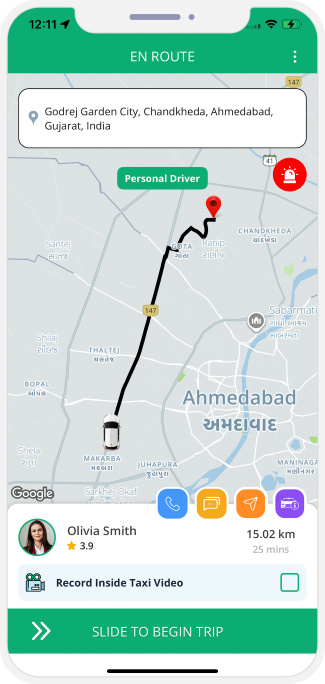
Ongoing Trip
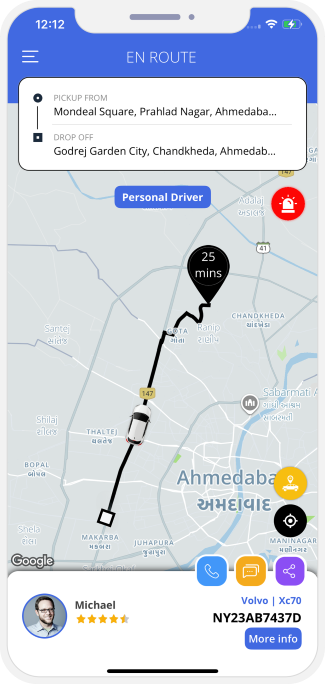
Trip Completed
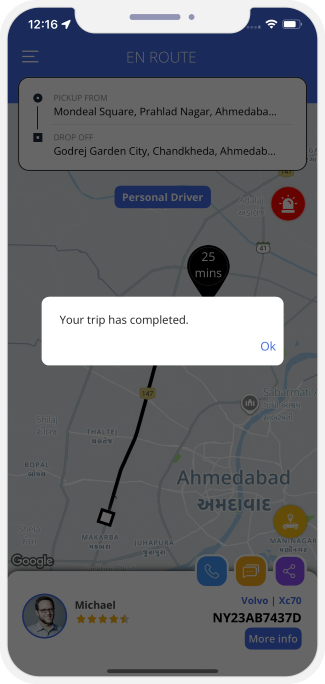

Summary of the Invoice And Rate
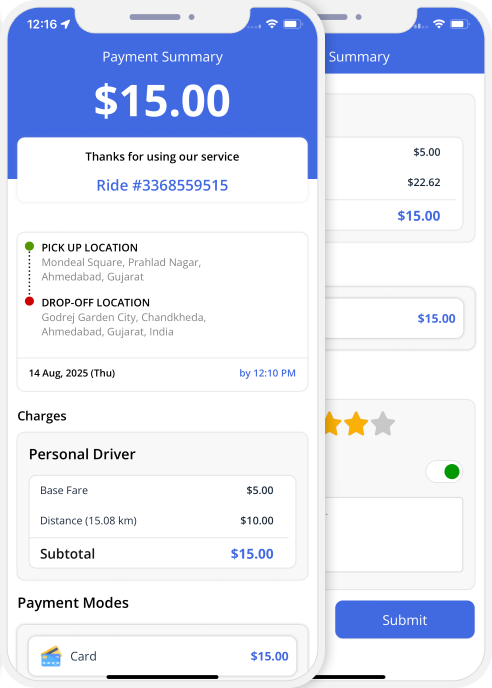
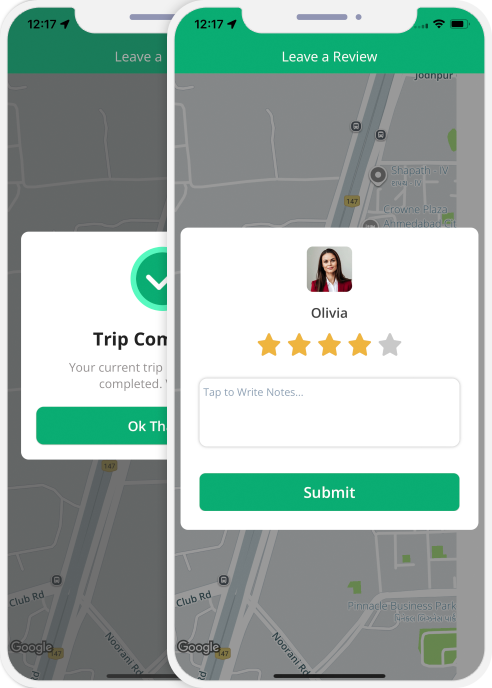
Payment
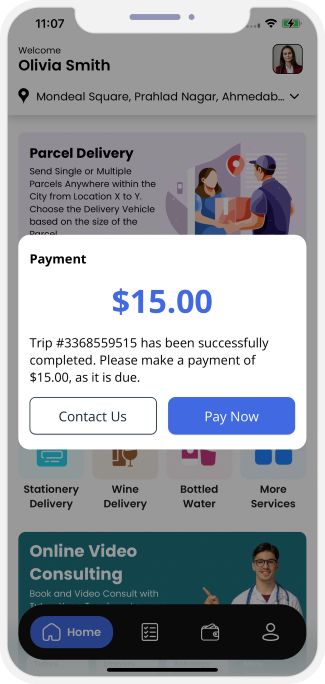
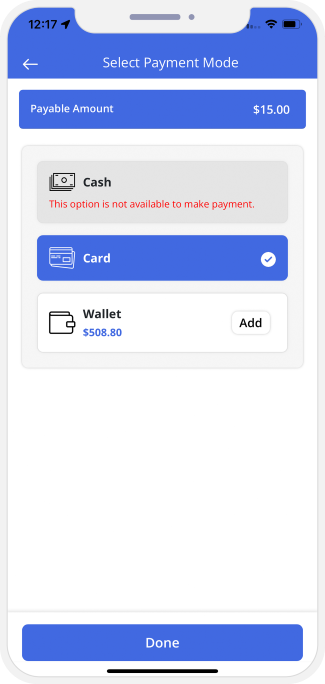
Booking a Personal Driver for Later
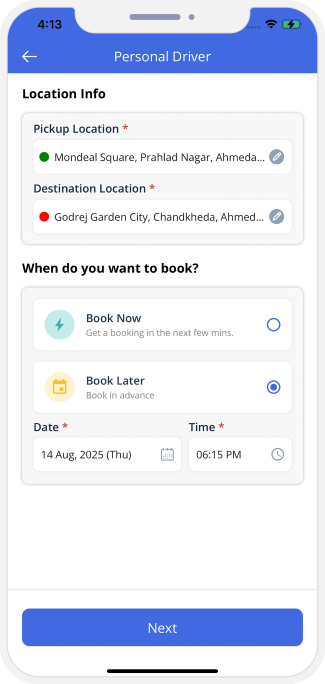
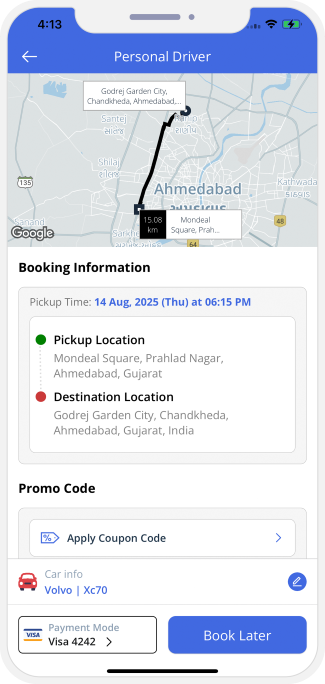
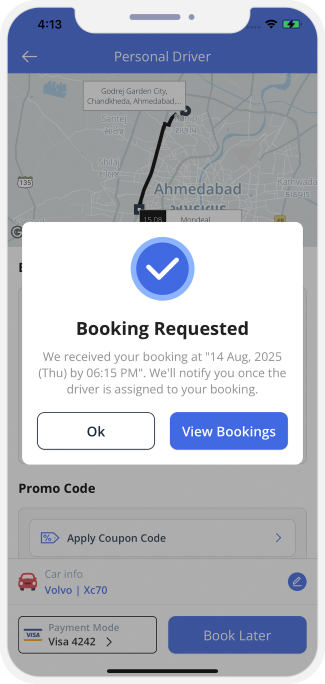

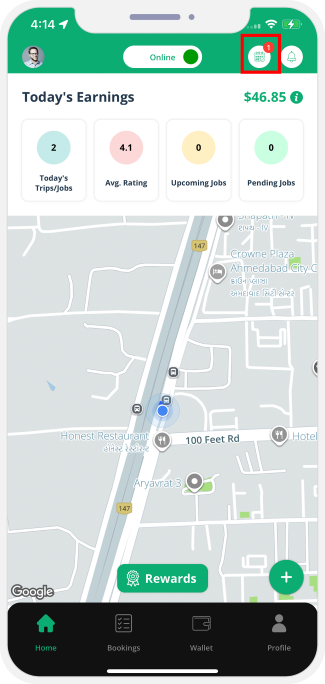
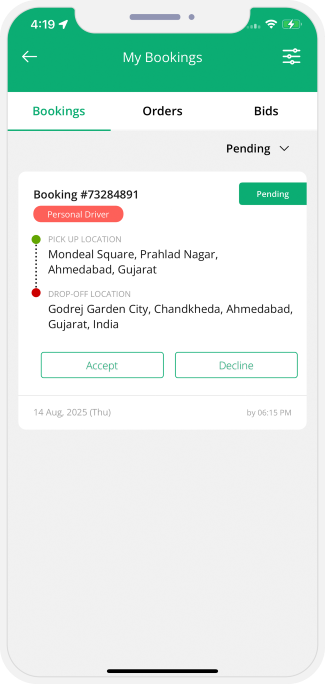
Accepting the Ride
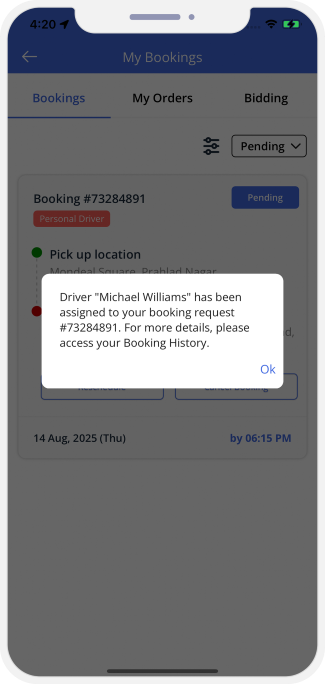
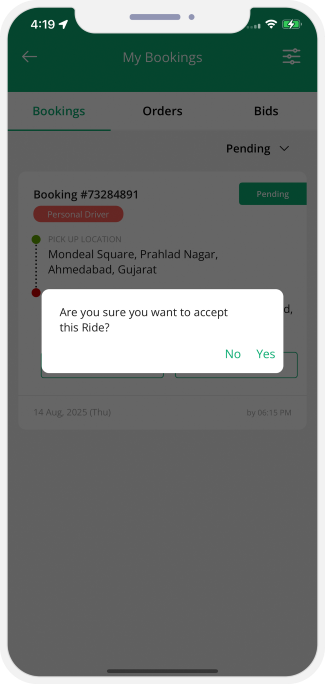
Rescheduling the Ride
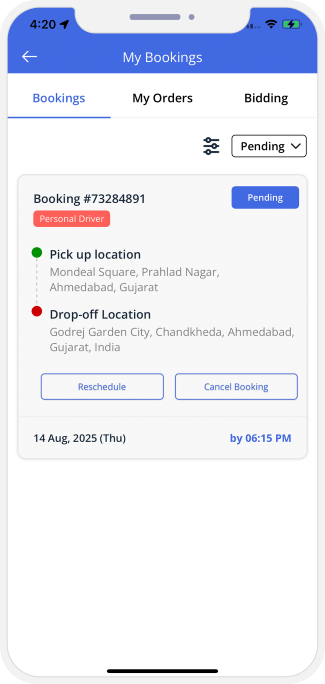
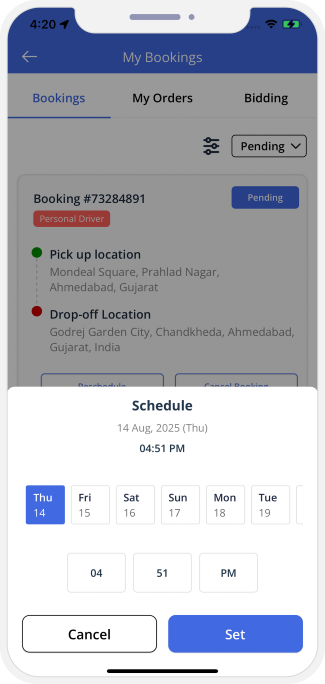
Starting the Trip

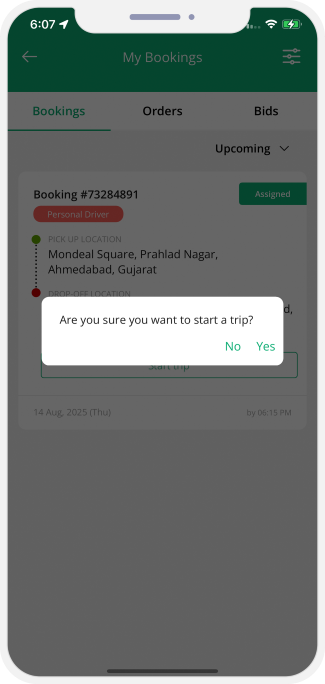
Booking a Personal Driver by Hour
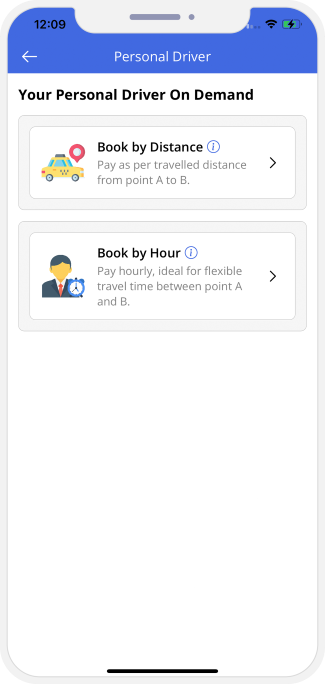
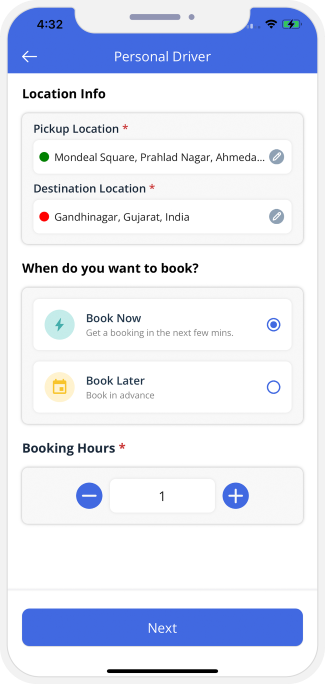
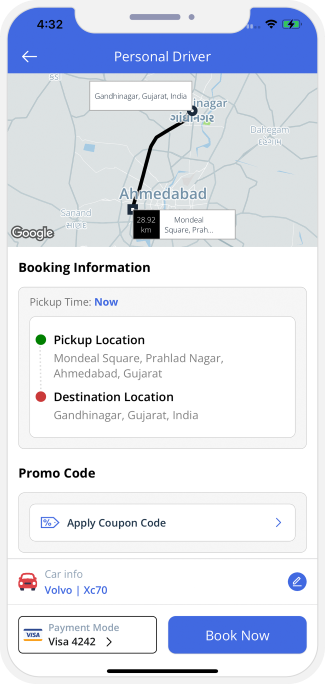
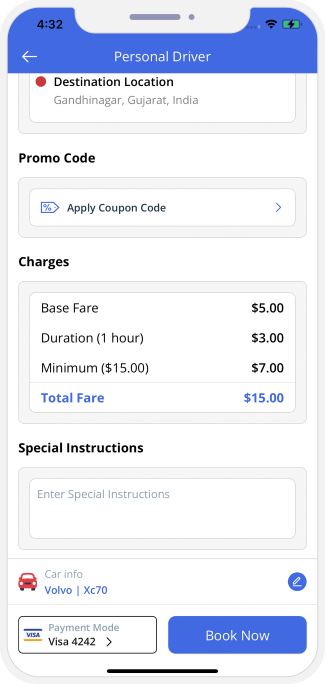
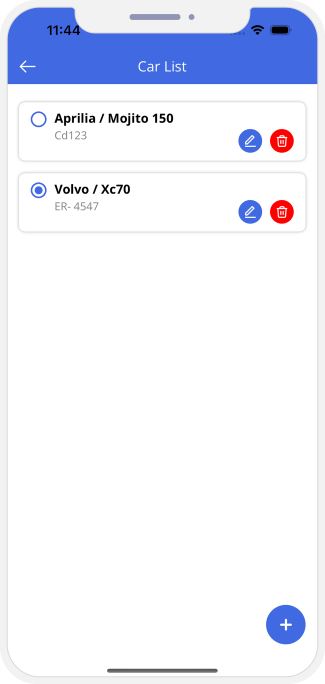

Sending the Ride Request
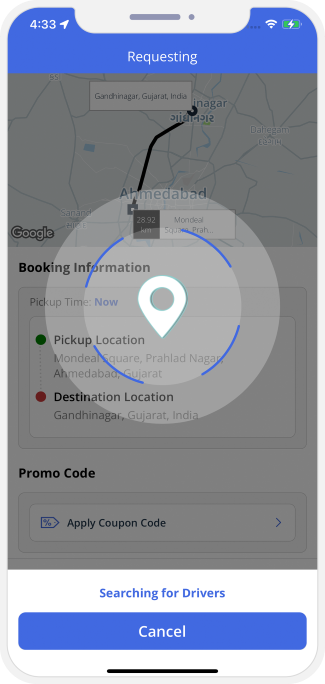
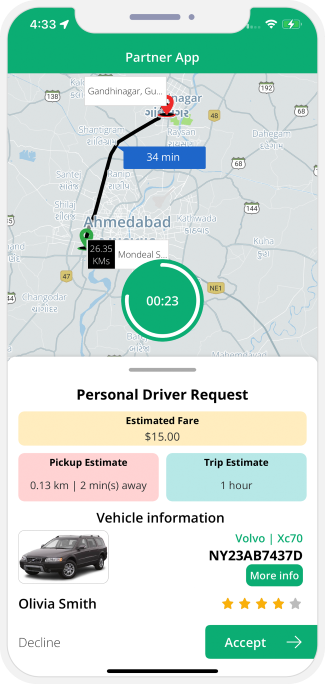
Driver Arrival
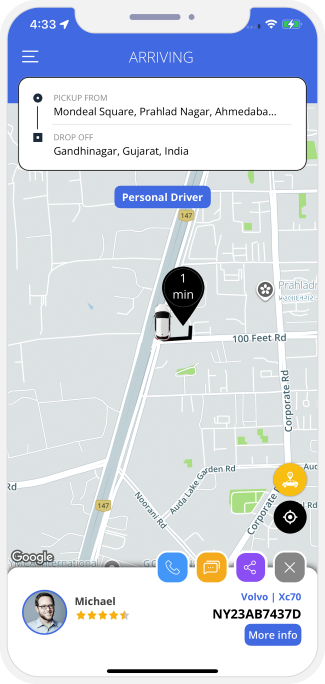

Driver Arrives at Location

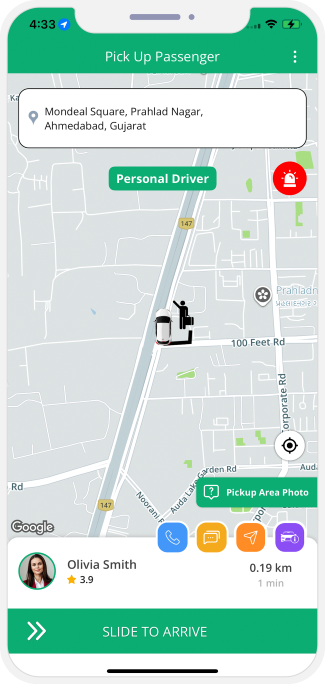
Trip Begins
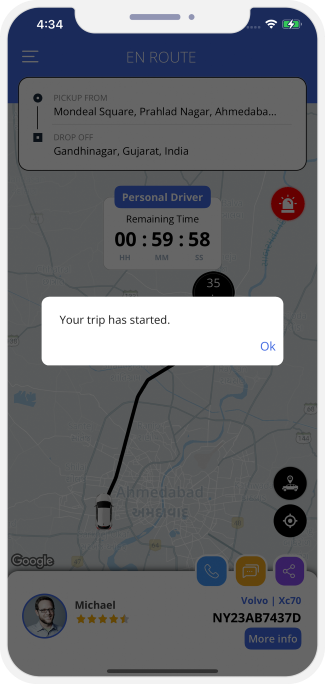
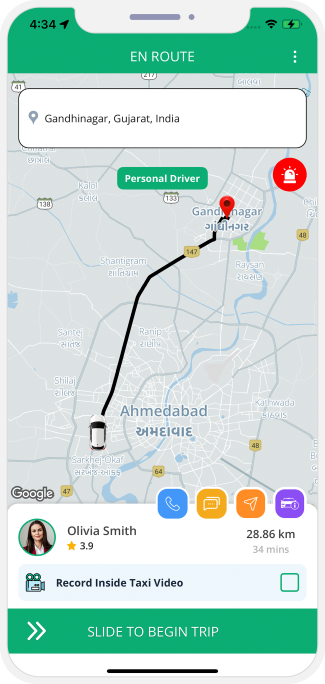
Enroute - Ongoing Trip

Trip Completed
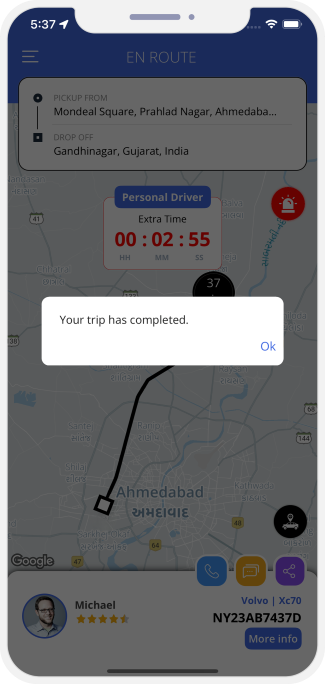
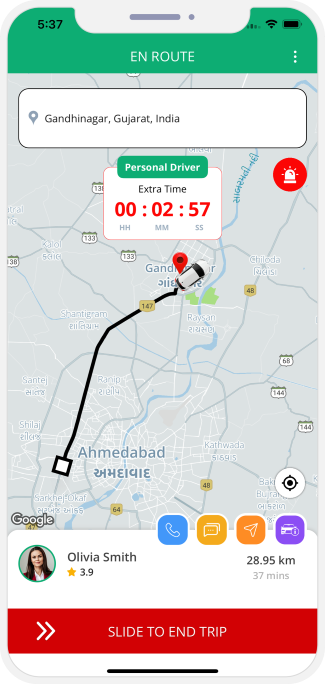
Invoice Summary
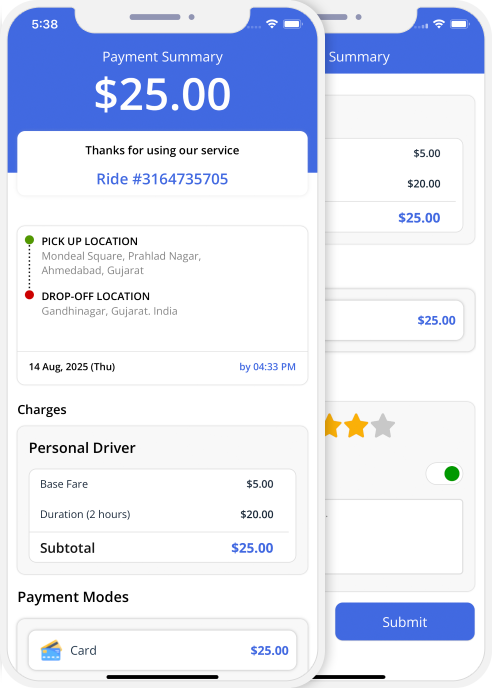

Payment
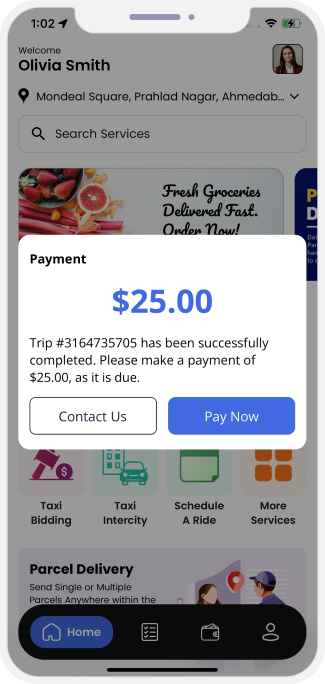

Component 2: Send Anything (Parcel Delivery)
 Landing Screen
Users can enjoy sending any kind of Parcel using this app. Whether it is sending one item form one place to the other or getting multiple items delivered at Multiple Locations, this app has got it all!

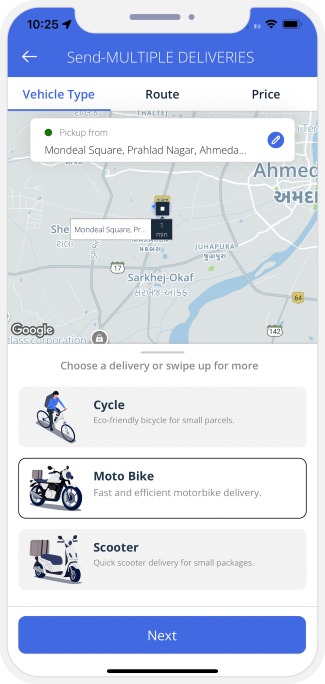 Single Delivery (Send)
This option can be used by the User when they are willing to send across a relatively smaller item such as an envelope, some files etc. from point A to point B.
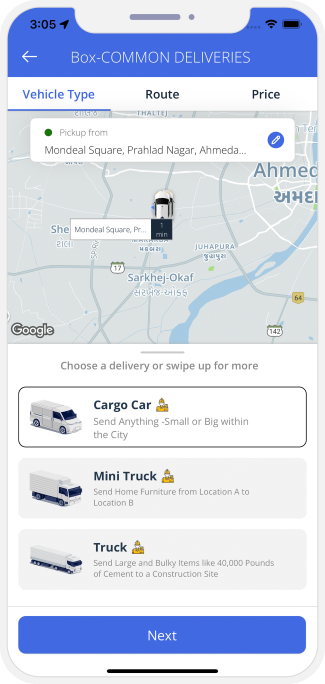 Single Delivery (Box)
This option is best for the User when the items to be sent across are bigger in size. For example, the User can use the Box option to send Bags of cement, home furniture etc. from point A to point B.
 Multiple Deliveries (Send)
User can send across multiple files, multiple letters, and multiple items of smaller sizes in a single booking from one pick up location to multiple places.
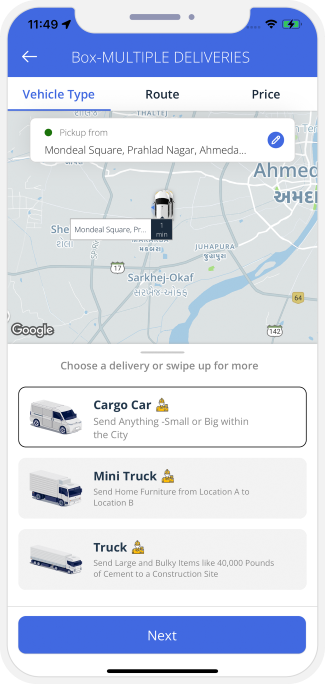 Multiple Deliveries (Box)
This is a great option for the Users who wish to send large and bulky items from one place to Multiple places for example, sending across Multiple Cement bags from the factory to Multiple construction sites.
Single Delivery
 Provide Parcel Pickup location, choose Delivery Vehicle (Single Delivery)
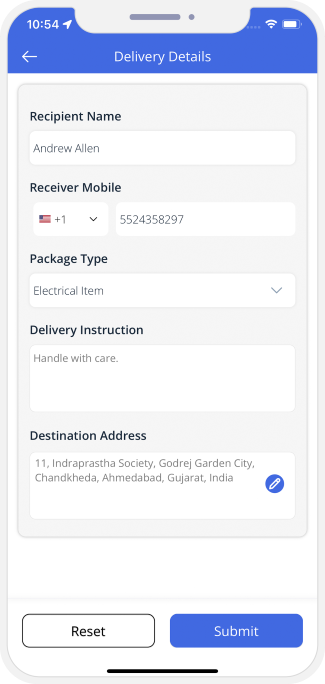 Add Parcel Details
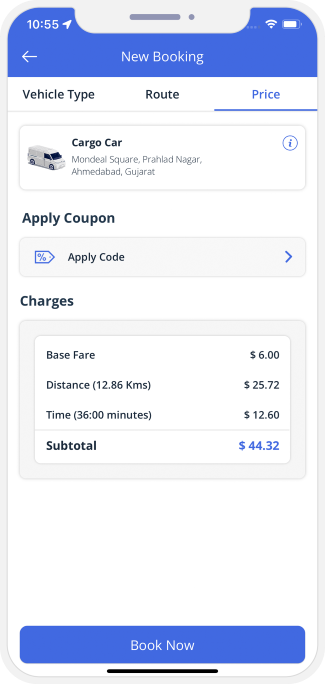

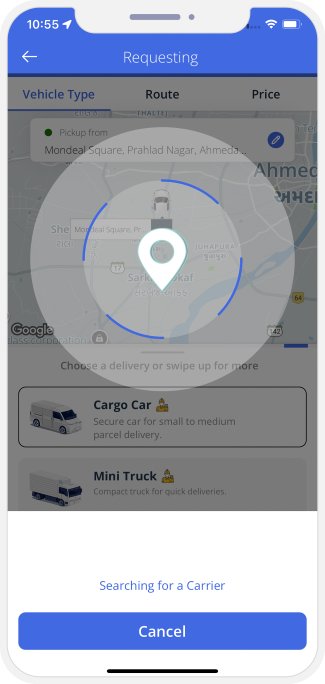
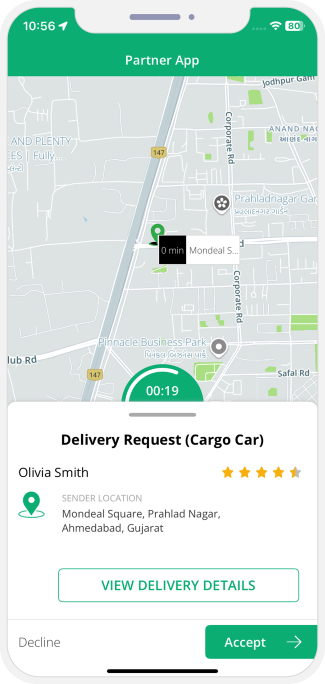
Delivery Driver arriving
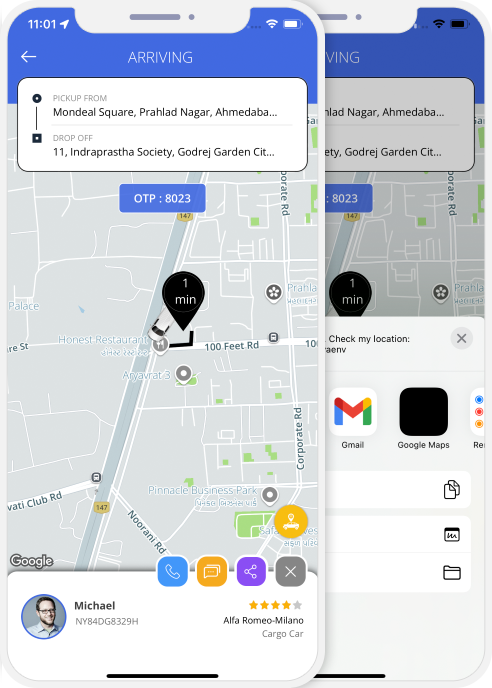
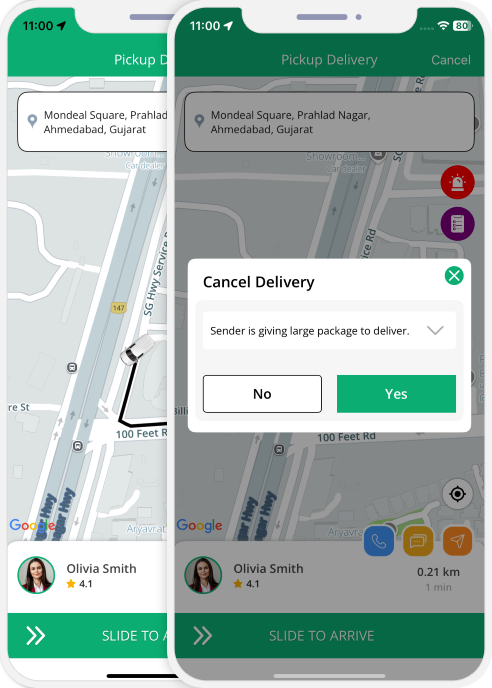
Delivery Driver Arrived
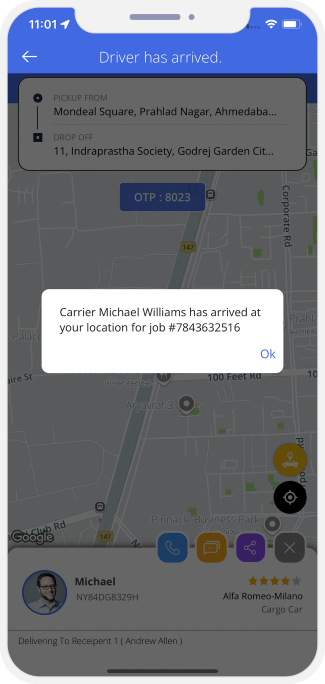
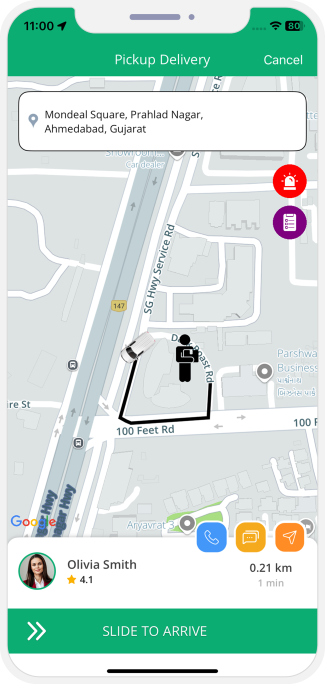
Delivery Verification
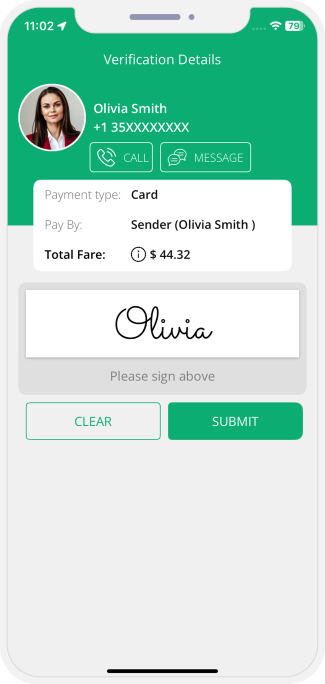
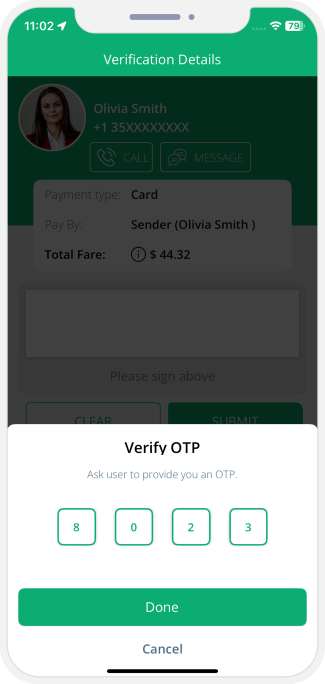
Parcel Delivery Started
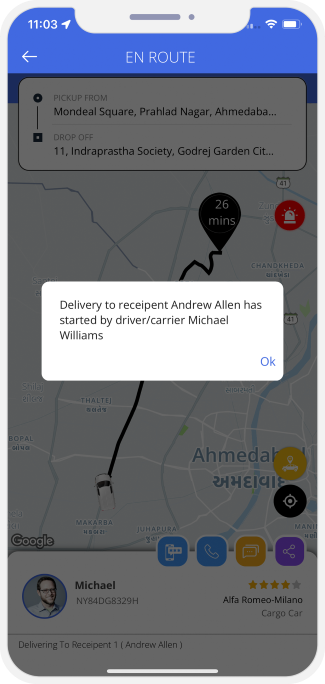
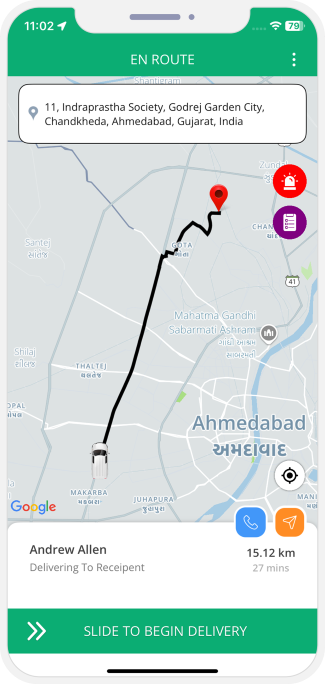
Parcel Delivered Successfully
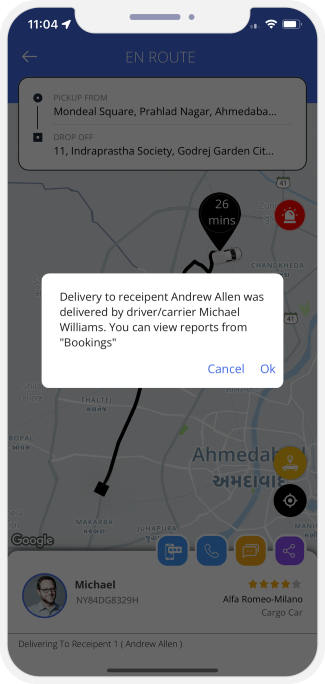
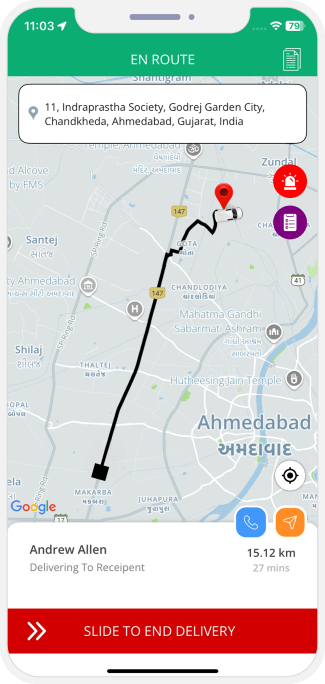
Delivery Confirmation
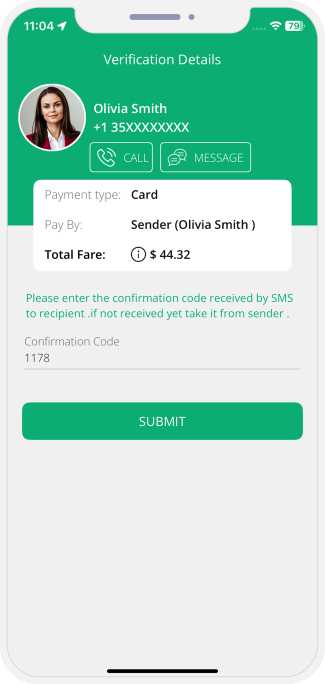
Invoice Summary
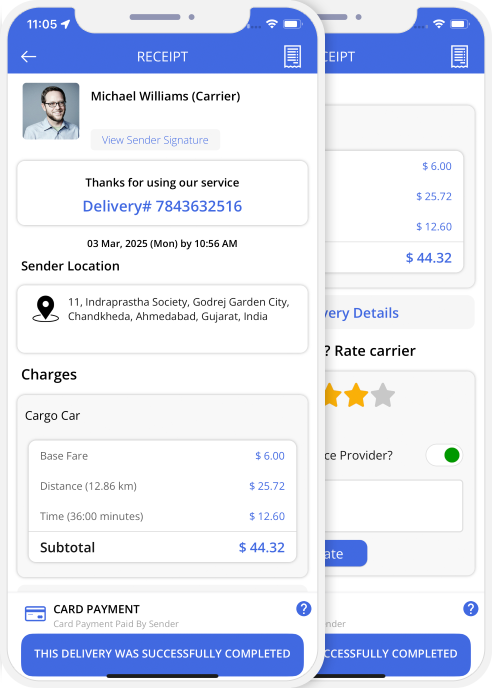
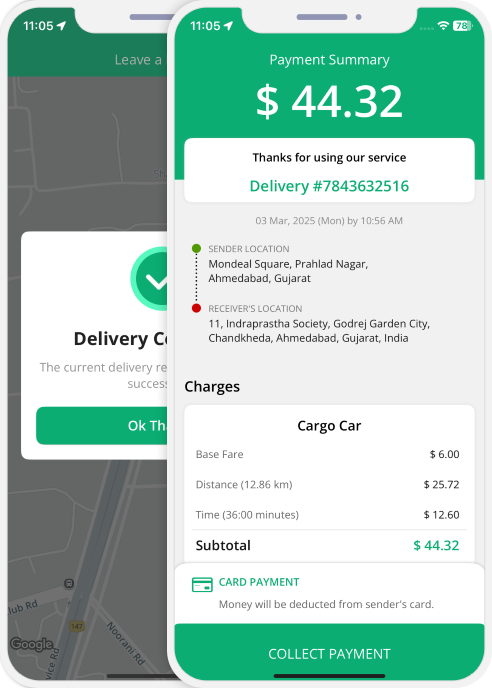
multi delivery

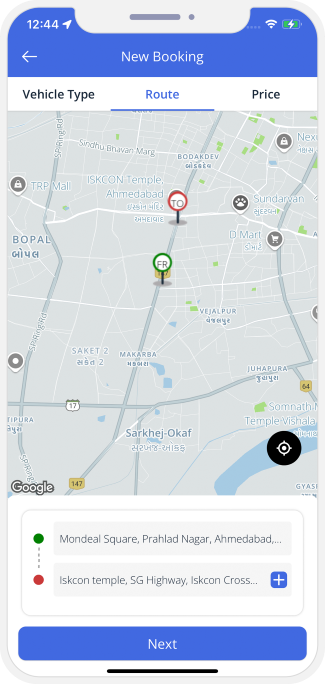

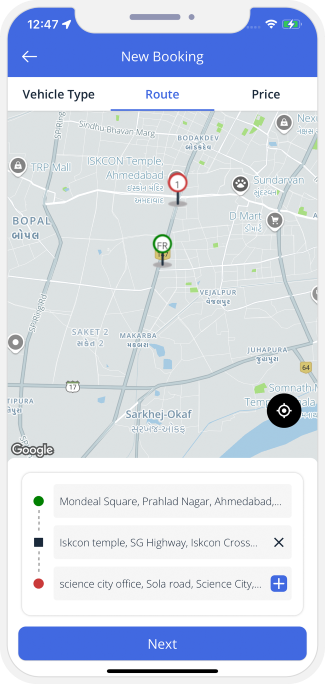
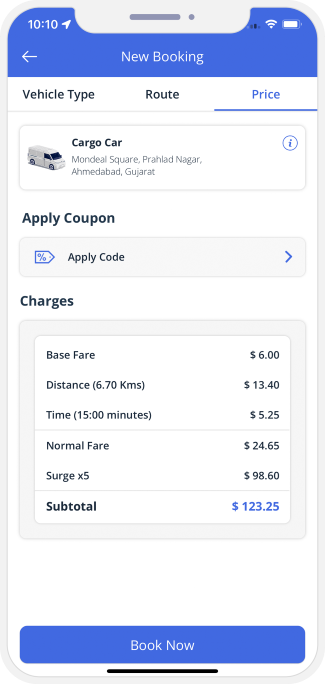
Component 3: Order Food, Grocery & More

Discover Restaurants Nearby
Placing Order for Meal
Steps Users Follow to Order Meals from User App
After User Places Order
Tracking the Order
Order Assignment to Delivery Driver
Order Processing
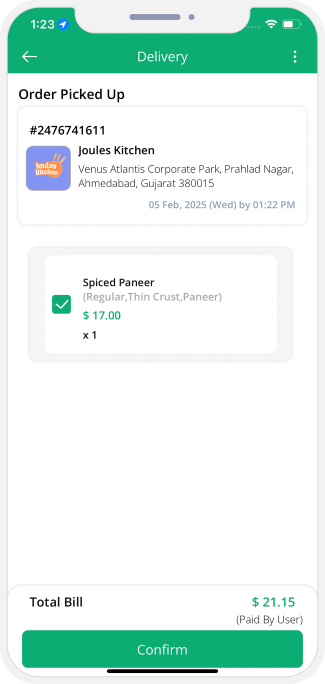
Status of Delivery Driver
The Delivery Driver reaches the restaurant and thereafter picks the order up. The delivery driver will get a glimpse into the order details so that they can pick the same without any kind of confusion. Thereafter they would take a picture of the order and update on their app as ‘Order Picked Up.’
Last Leg of Delivery
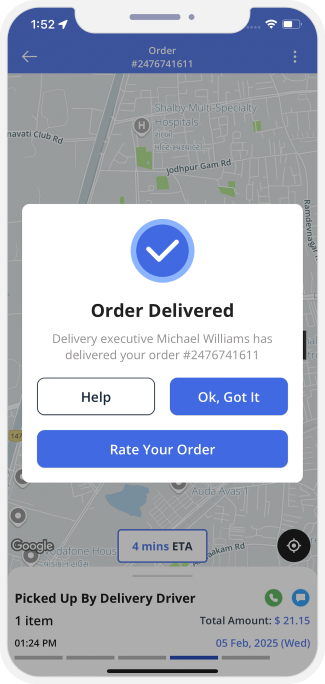
Order Delivered Successfully
As soon as the order gets successfully delivered to the customer, it gets updated on the app. The order delivered icon thereafter turns green along with a timestamp for the same and contains the message that the order has been delivered.
Apart from this, there are two other toggles, namely, Not Delivered and Ok, Got It.

Rating and Review
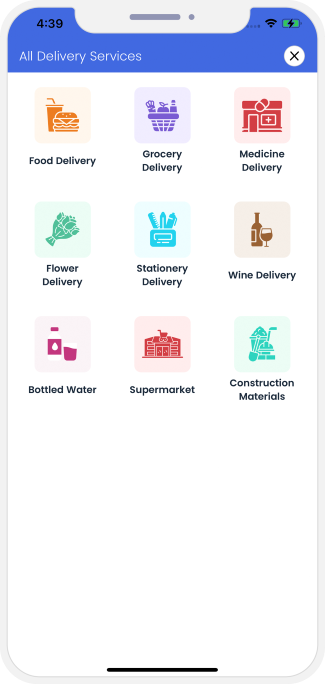
Other Delivery Services
(Grocery Delivery, Medicine Delivery, Flower Delivery, Stationary Delivery, Wine Delivery, Bottled Water Delivery, Construction Materials Delivery and Supermarket.)User can also order other Items through Apps like Grocery, Wine, Stationary, Bottled Water etc. The Flow of ordering these Items would be same as Food Delivery mentioned above.
Component 4: On-Demand Services
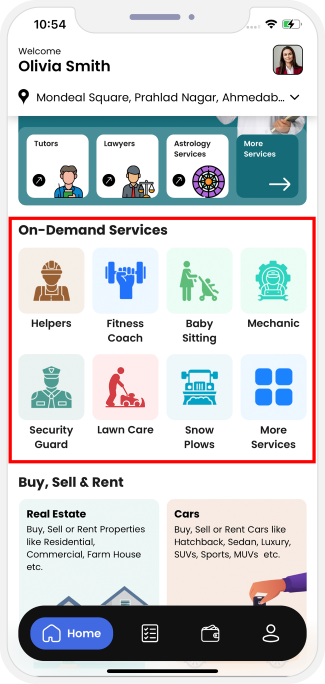 Service Provider On Demand
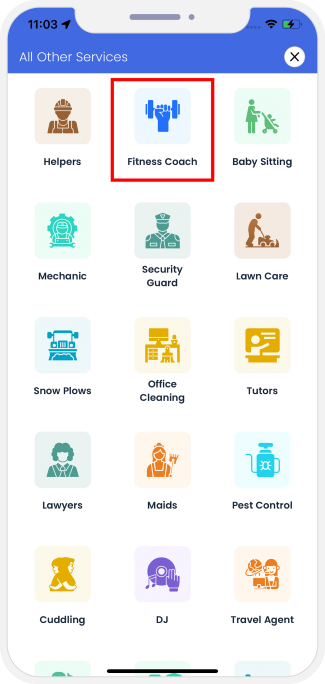
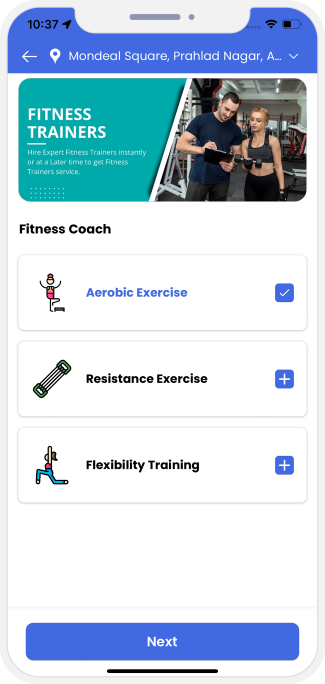 Choose the Service You Want (For Eg. Fitness Coach)
Book Service Provider
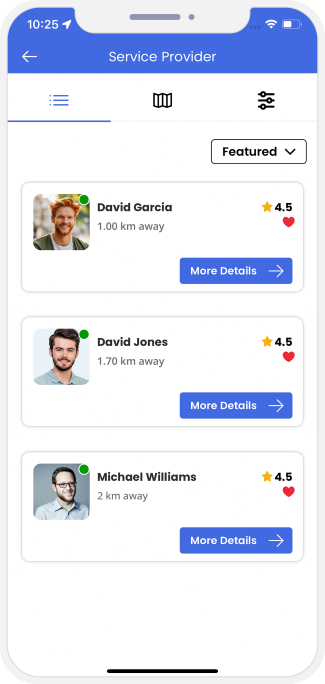
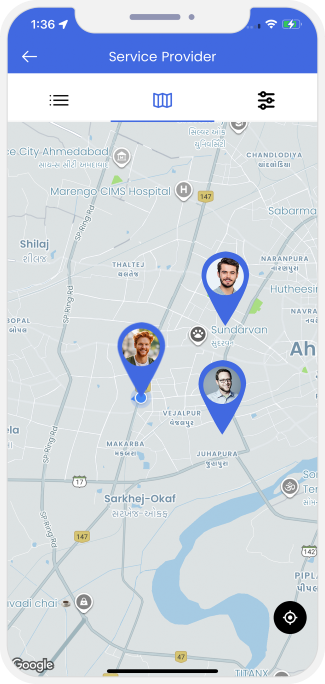
Manage Services
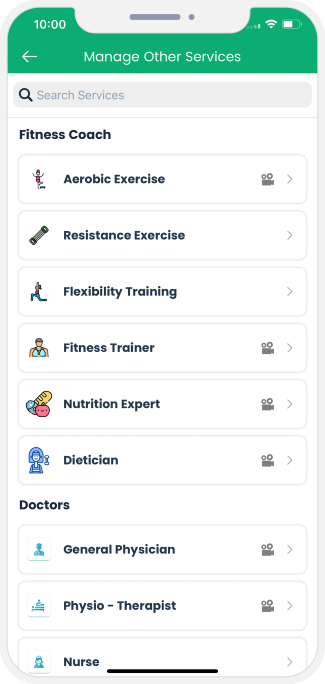
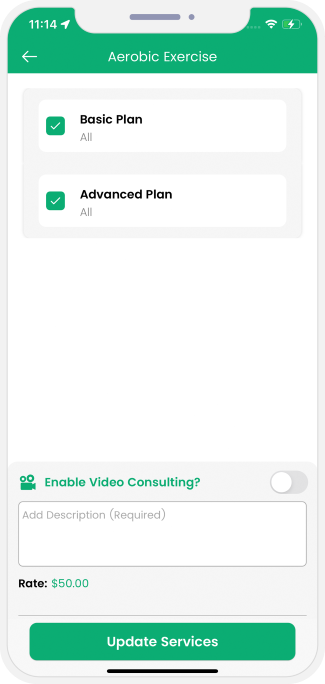
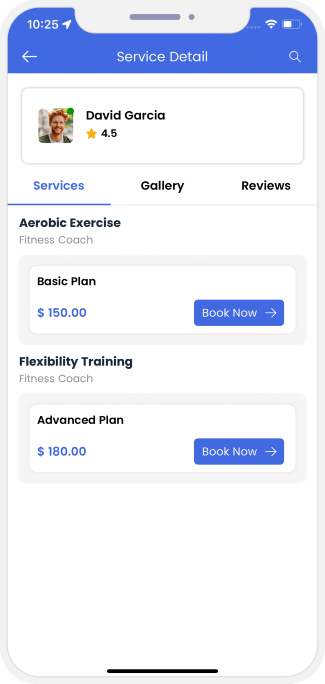
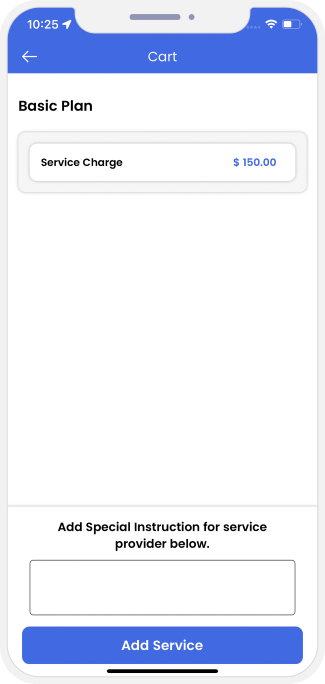 Profile and Booking Summary
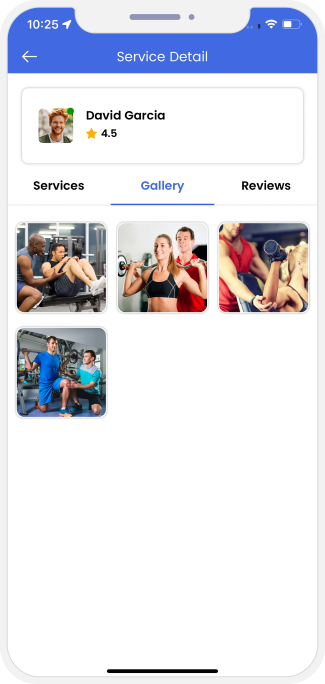
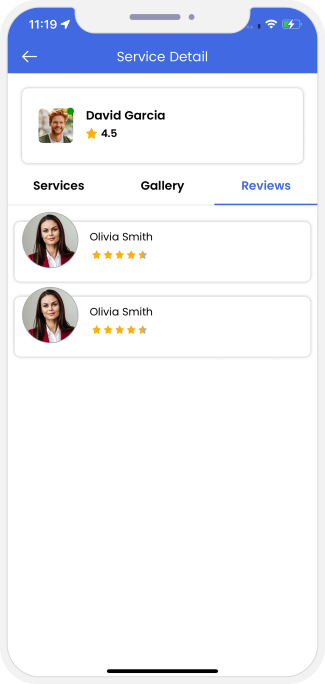 View Gallery and Reviews
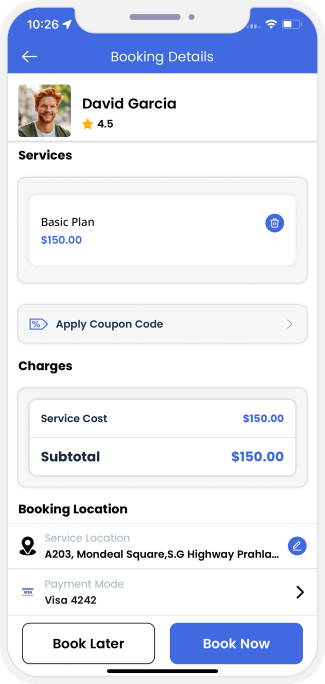
 View Booking Summary and Pay

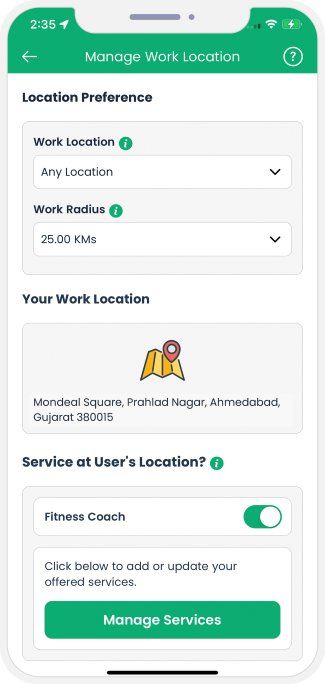
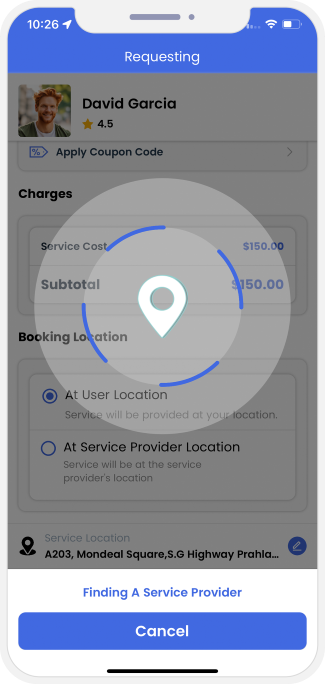
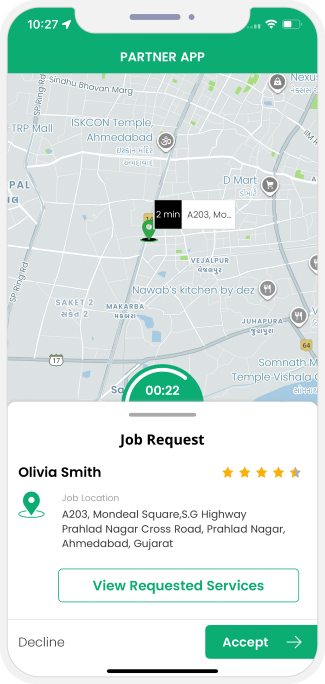
Job Request Accepted


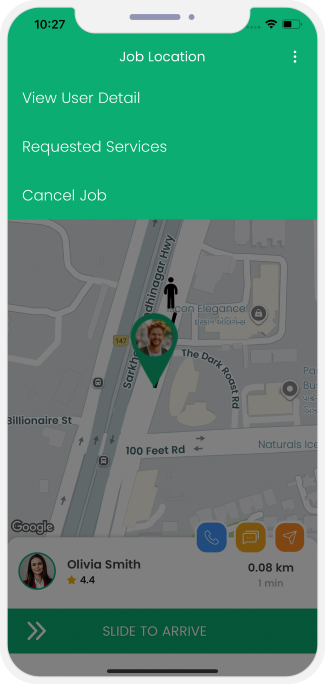
Service Provider Arrives at Job Location
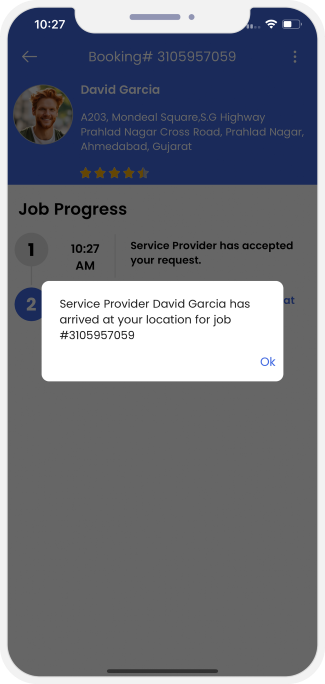
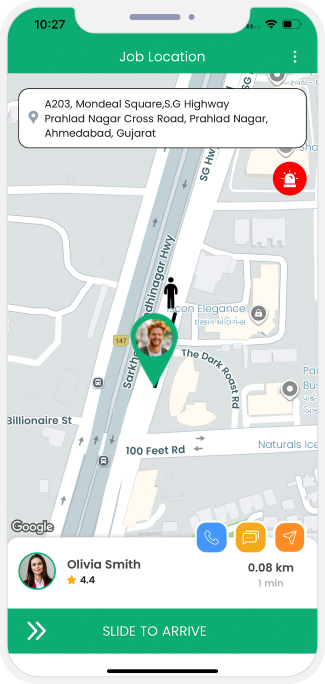
Job started

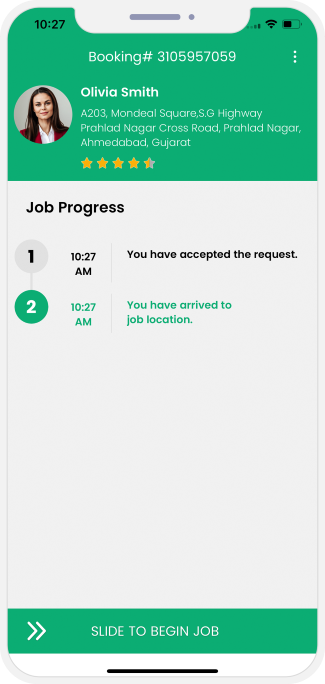
Job completed
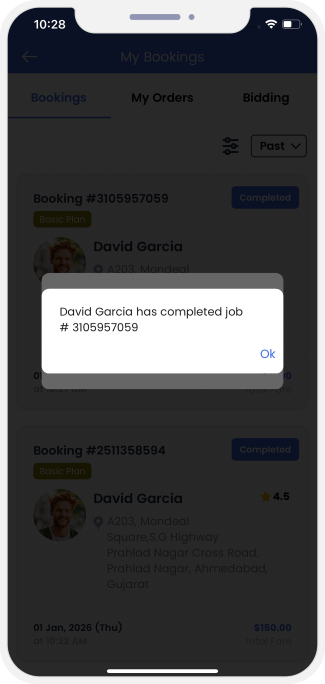
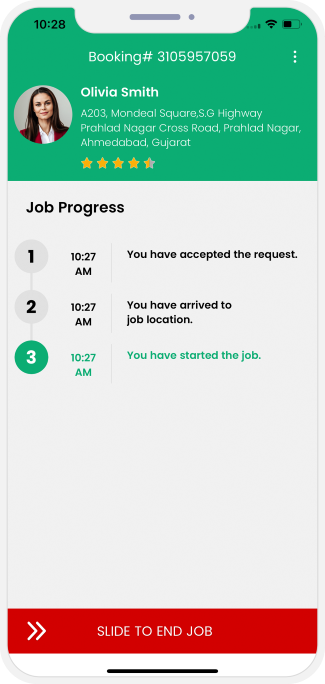
Reviews and Ratings
The Review and Rating section present on the app of the user and service provider both help both provide reviews
to each other as well as provide rating to each other based on the experience of services.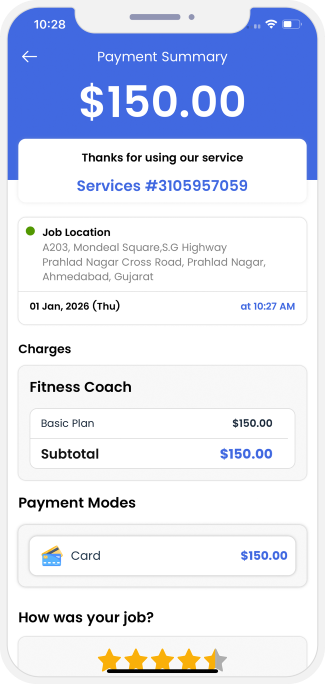
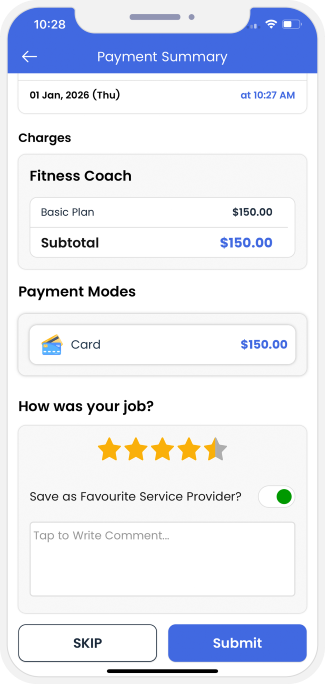
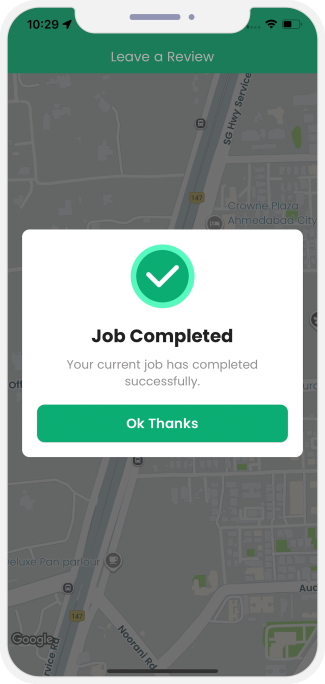
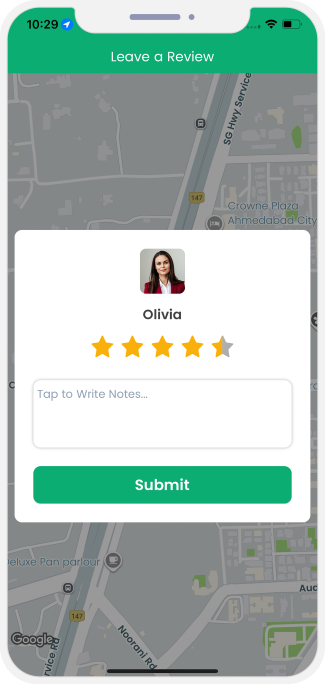
Manage Availability
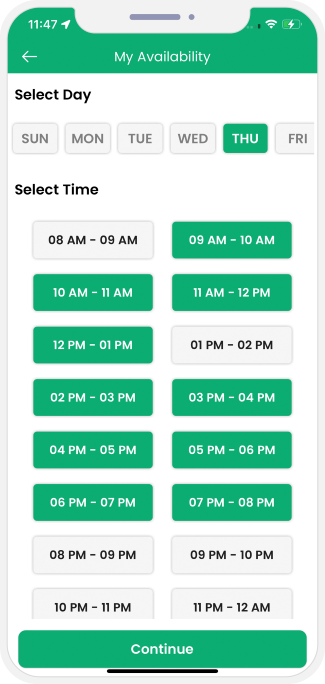 This section helps the service provider manage their availability
Payment
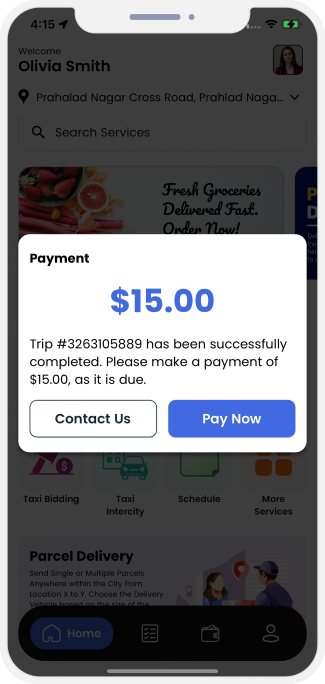

Component 5: Hire Genie or Runner
Delivery Genie
Select a Store

Driver App - Set Availability
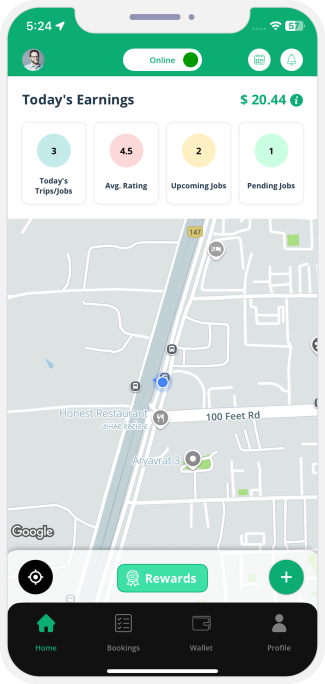
Add Items that you need
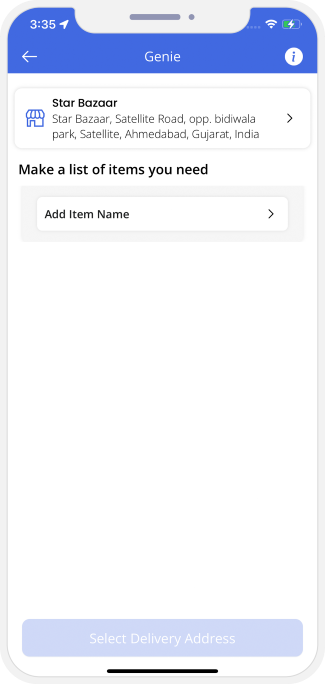
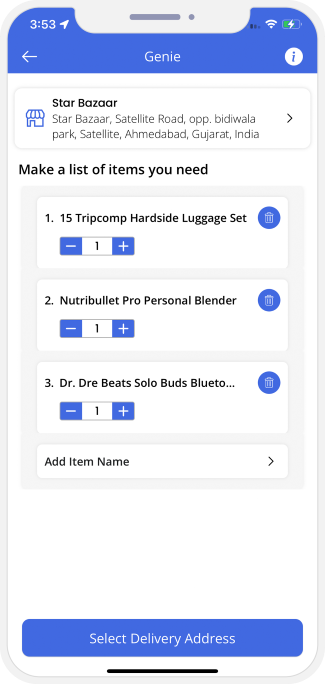
Enter your Delivery Address

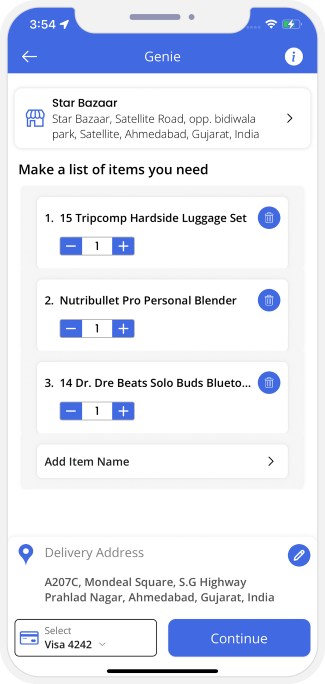
Sending Request to Driver
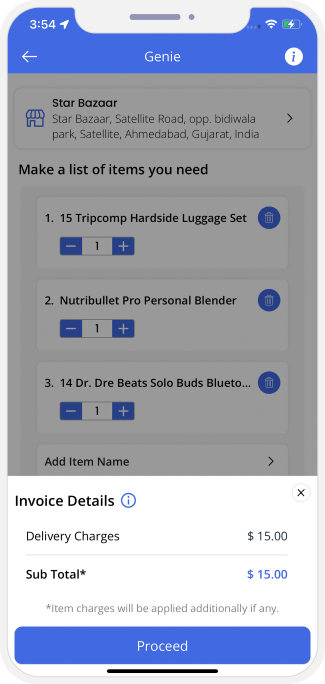
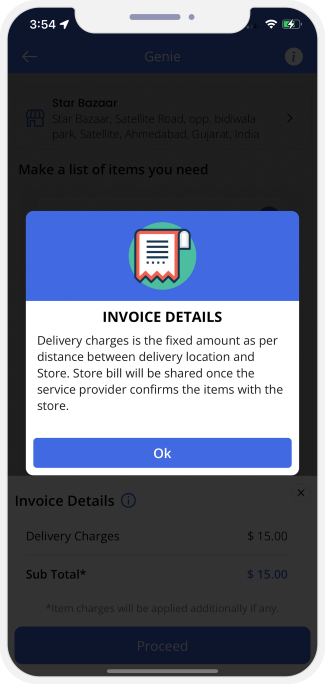
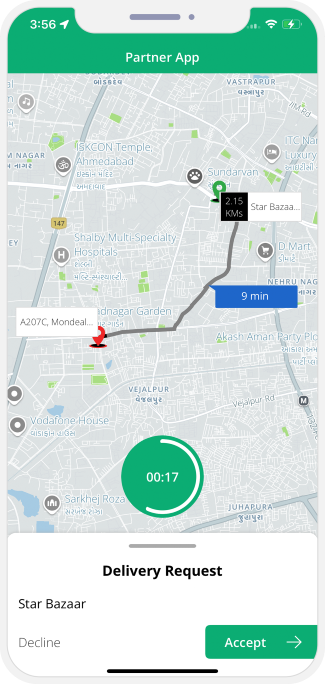
Booking Confirmation
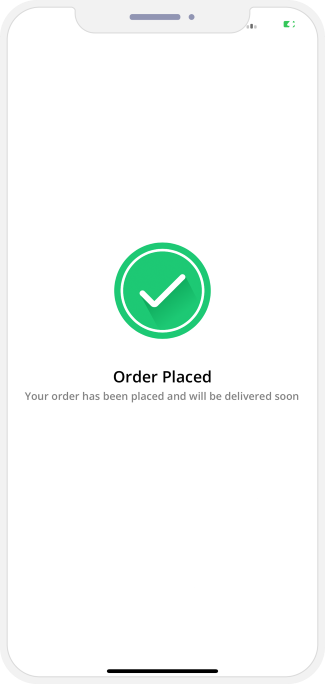
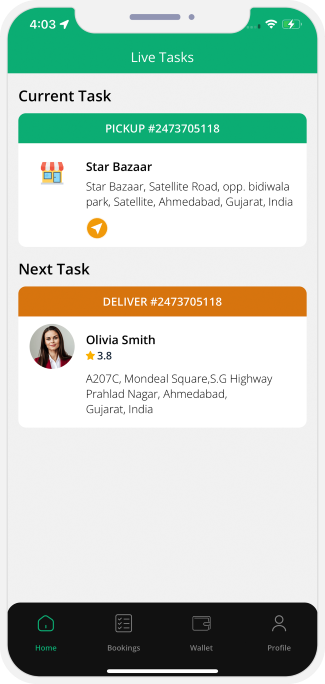
Track Delivery
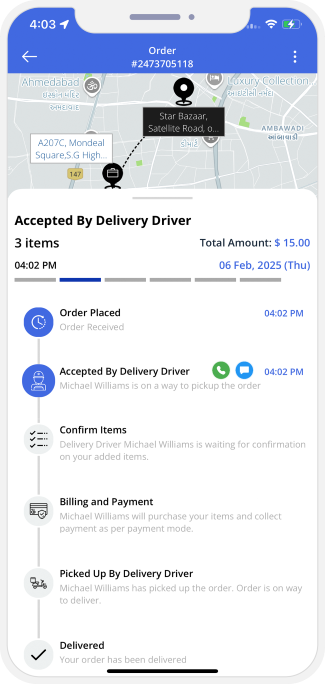
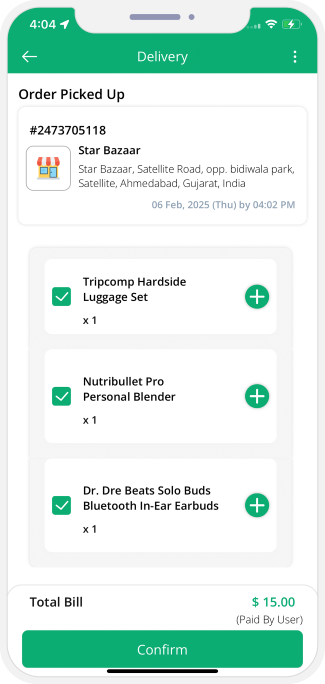
Upload Item Photos
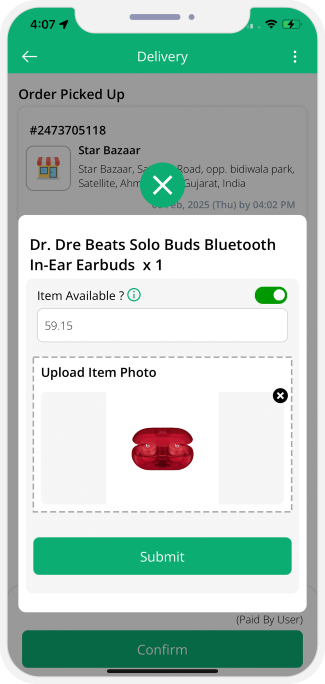
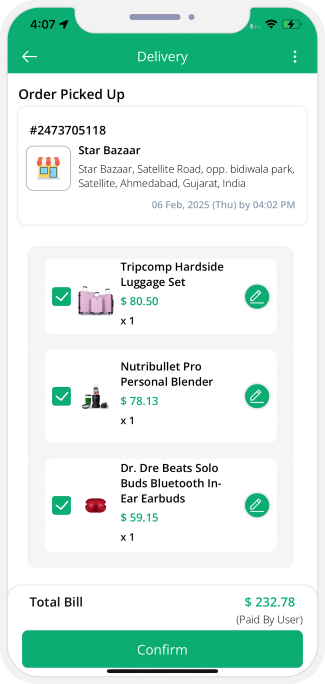
Review Items
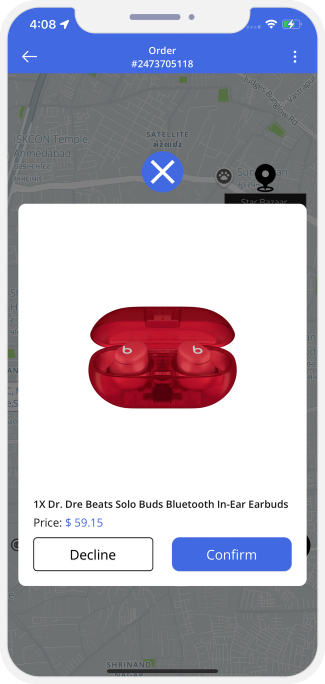
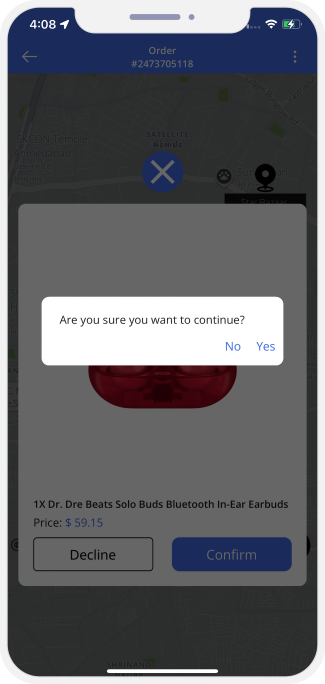
Items Picked Up
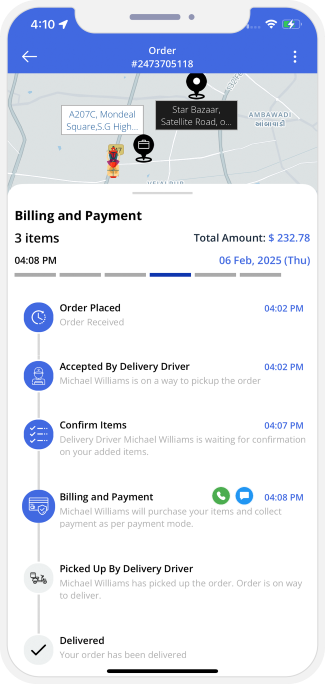
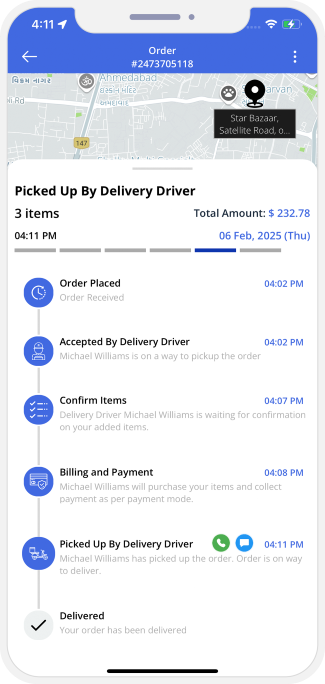
Delivered Successfully
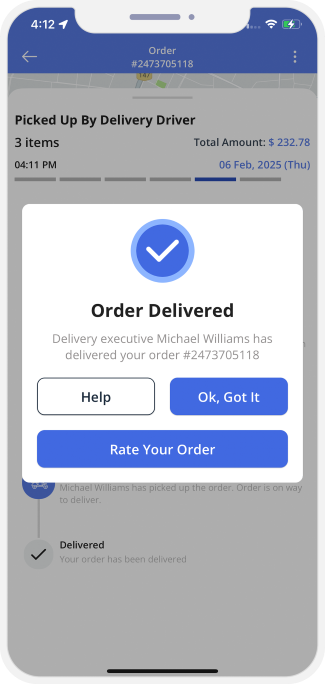
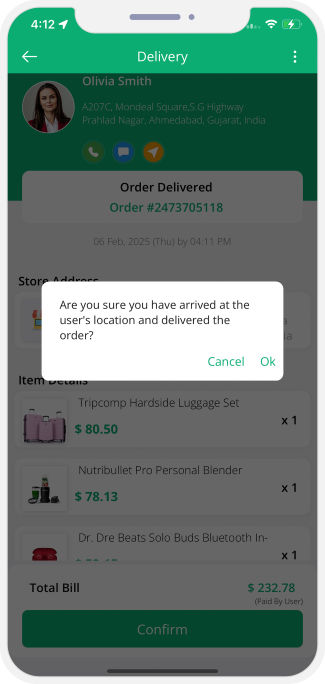
Reviews and Ratings
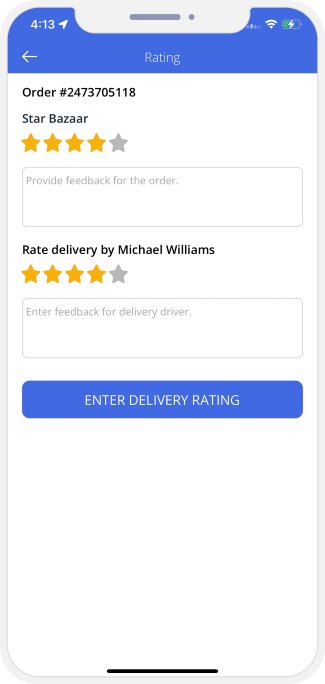
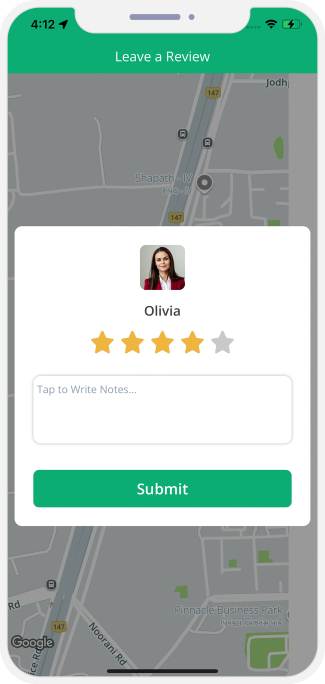
Delivery Runner
Add Pick Up Address
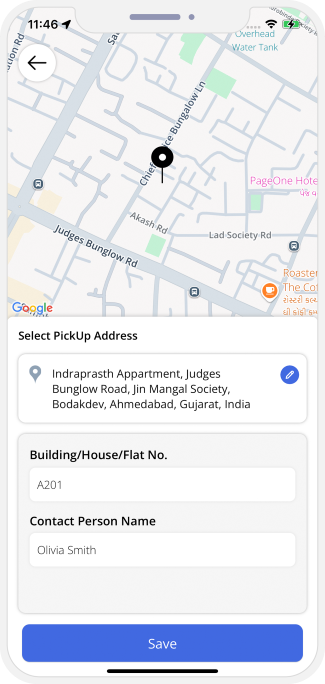
Driver App - Set Availability
Add Items that you need
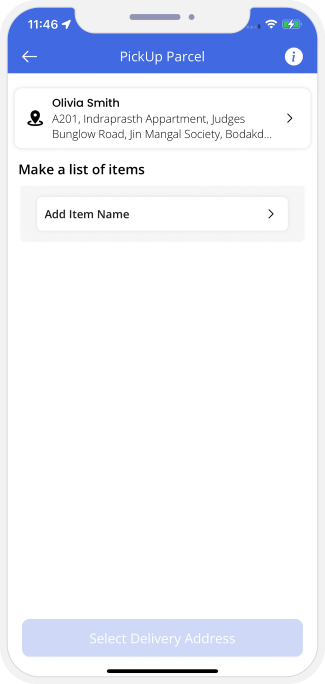
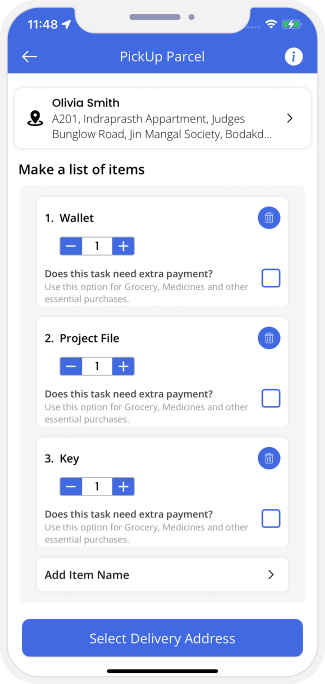
Enter your Delivery Address

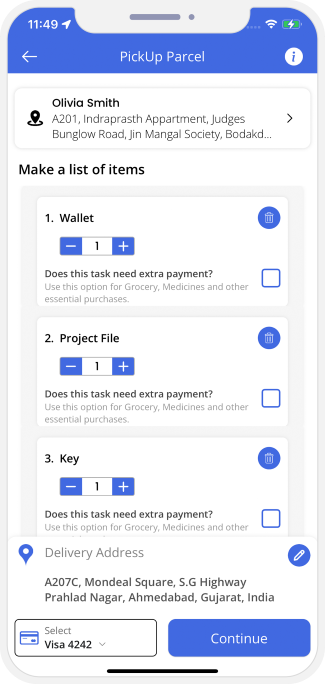
Sending Request to Driver
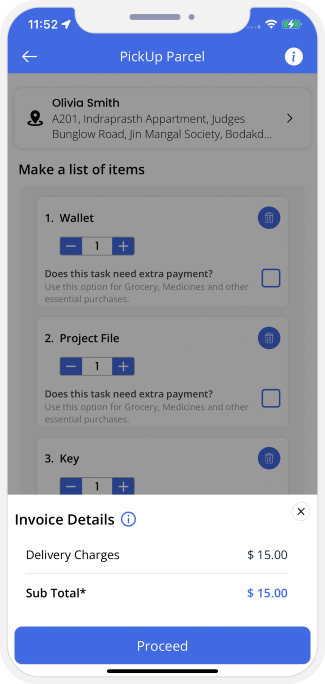
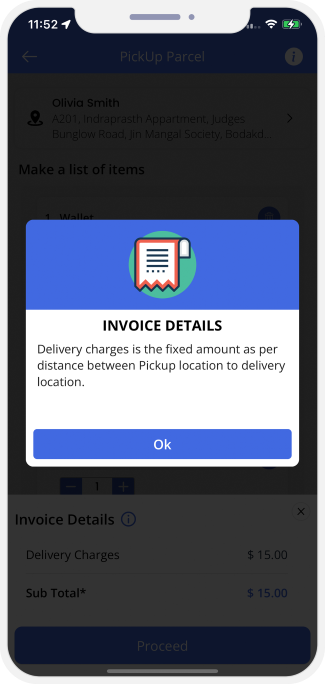
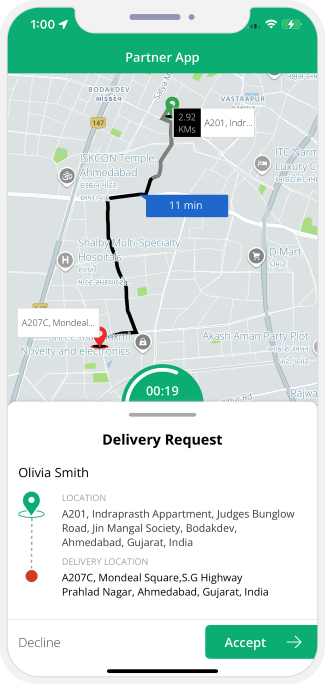
Booking Confirmation
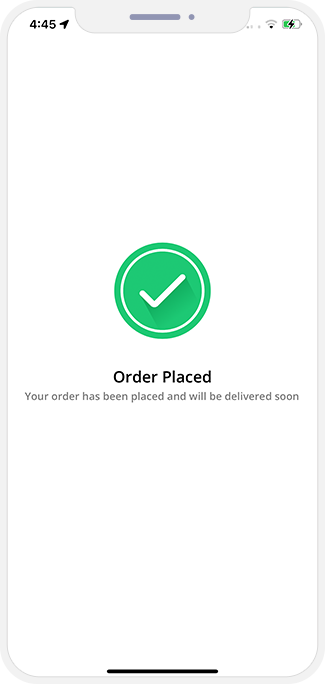
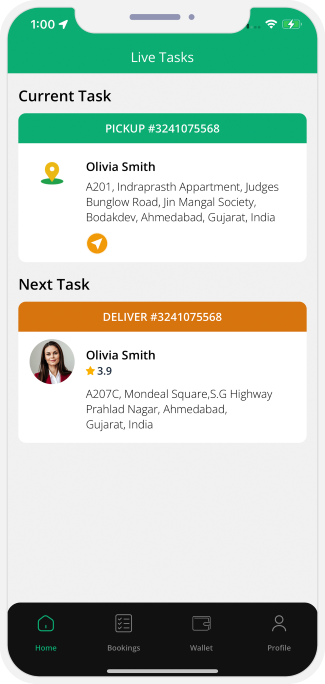
Track Delivery
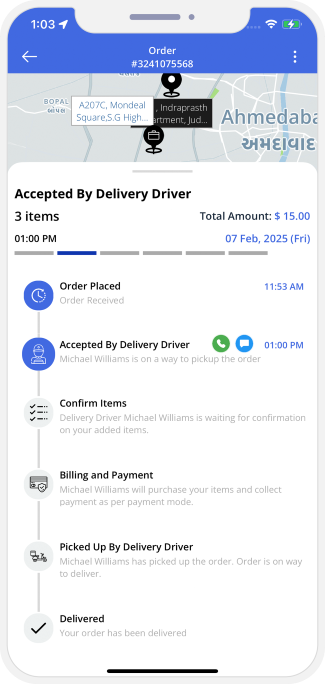
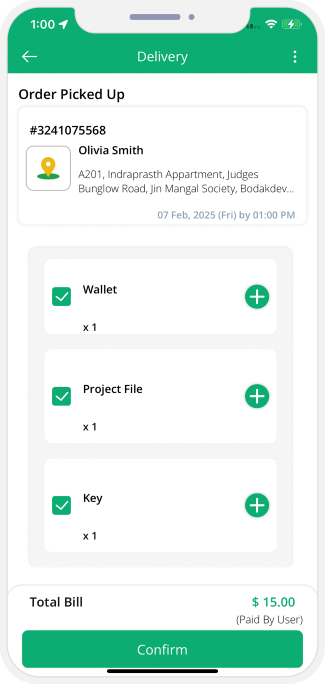
UPLOAD ITEM PHOTOS
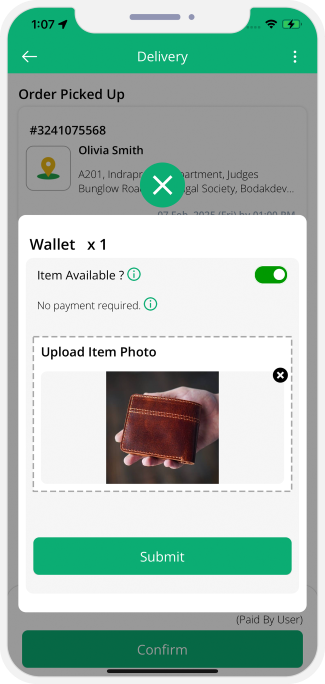

Review Items
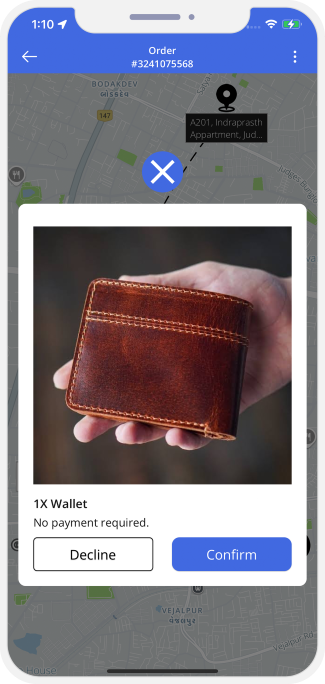
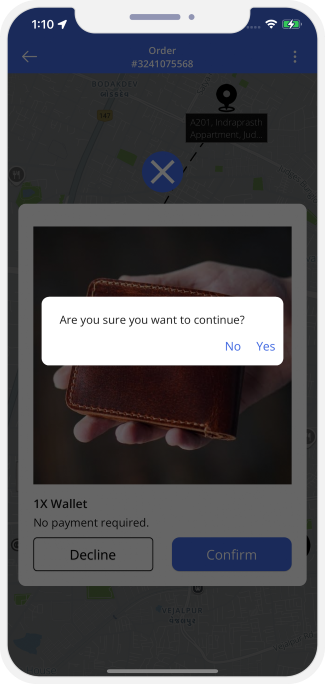
Items Picked Up
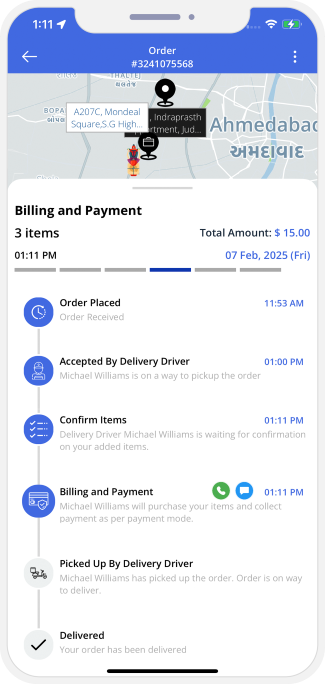
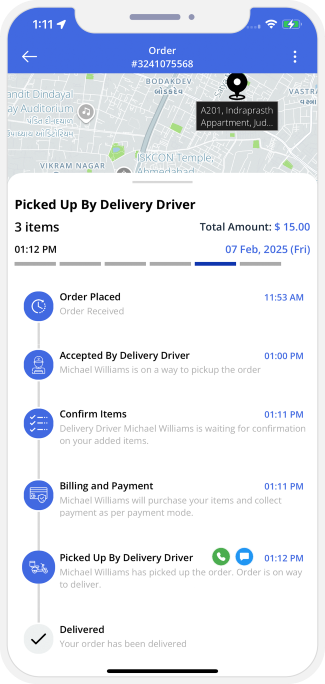
Delivered Successfully
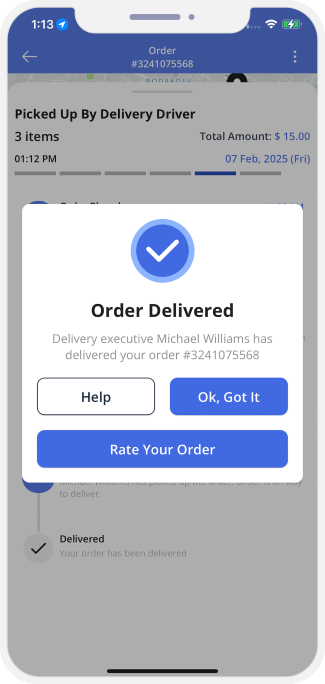
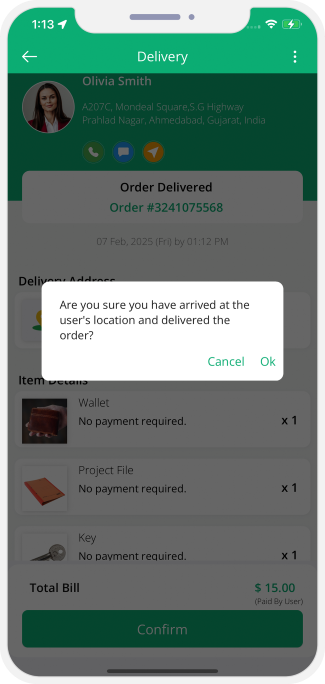
Reviews and Ratings
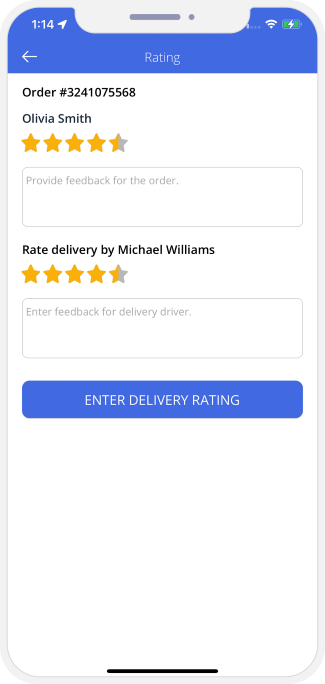
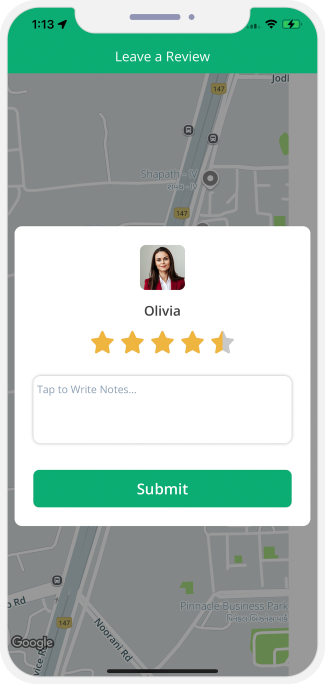
Component 6: Online Video Consulting
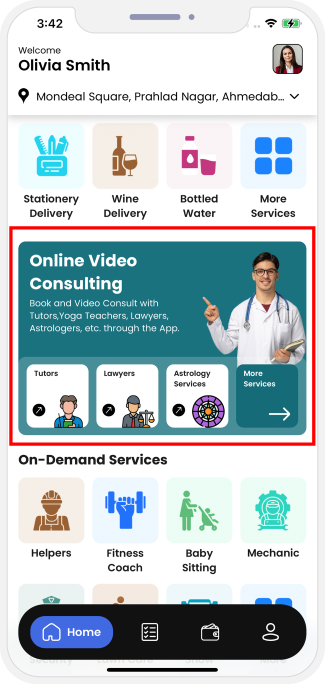
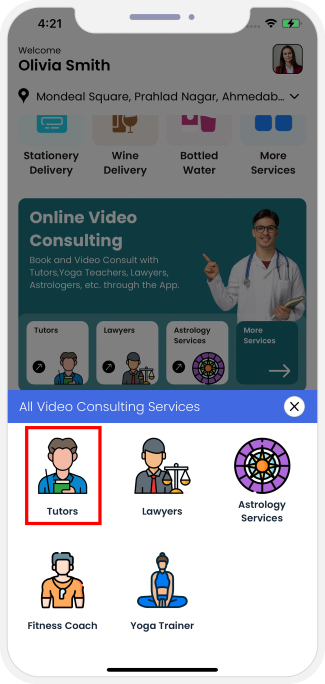 Online Video Consultation
Service Providers List
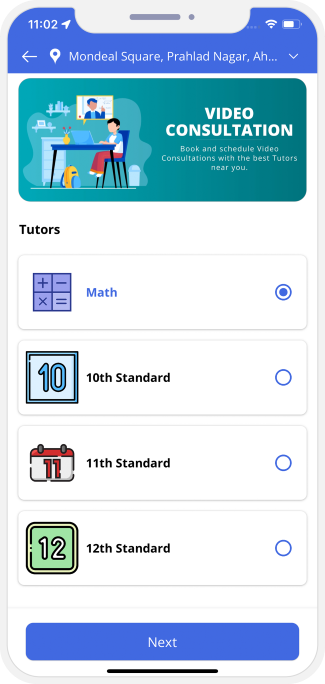
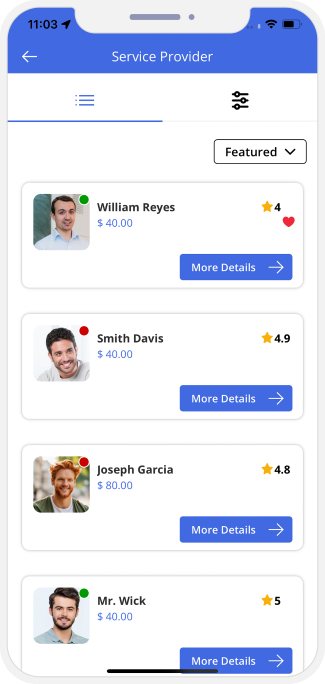
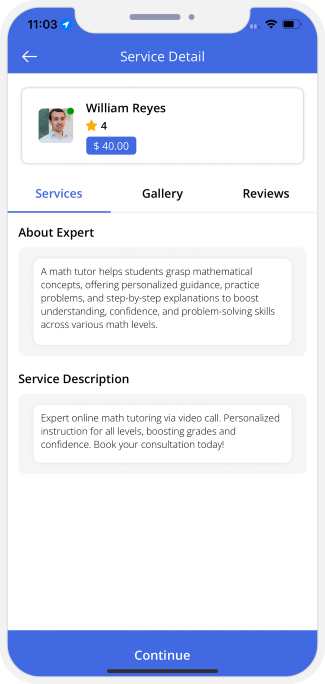
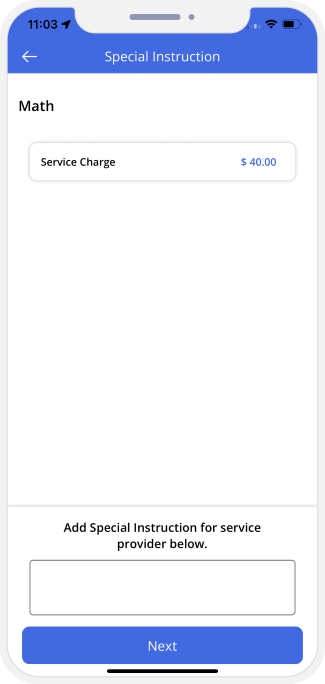 Service Provider Profile details
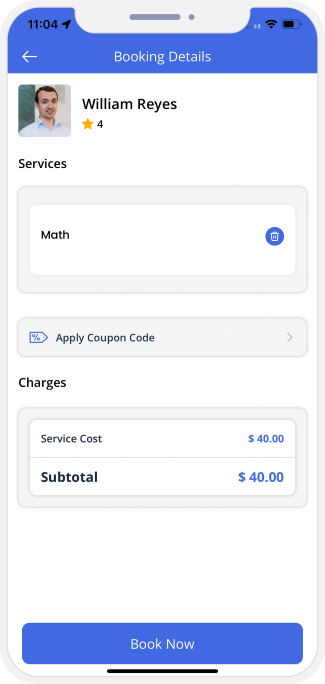
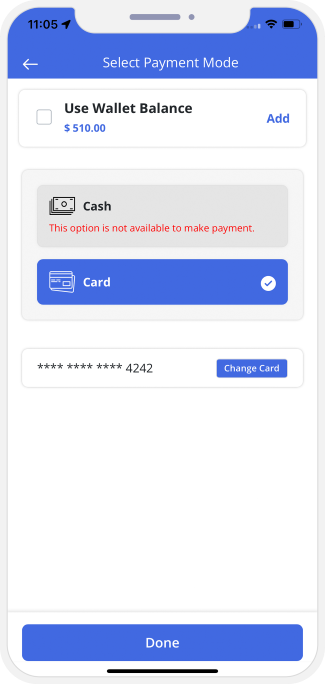 Booking and Payment
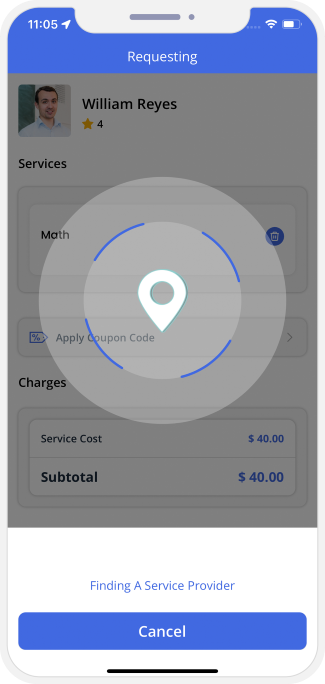
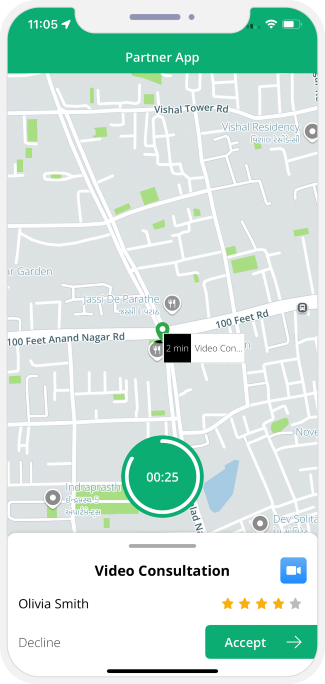
Job Request Accepted
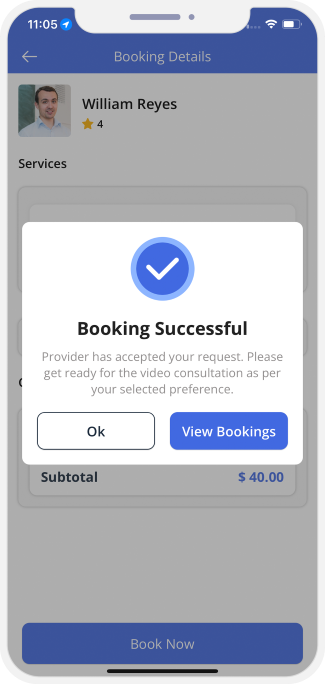
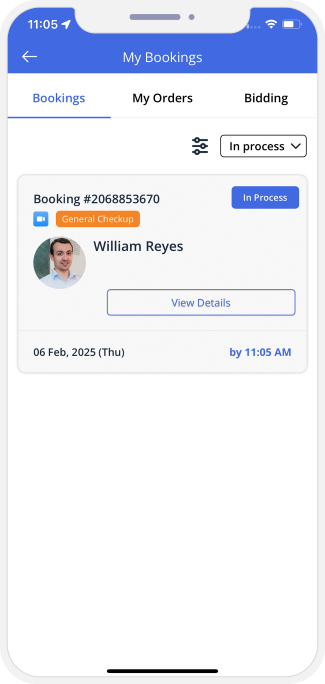
Start Service
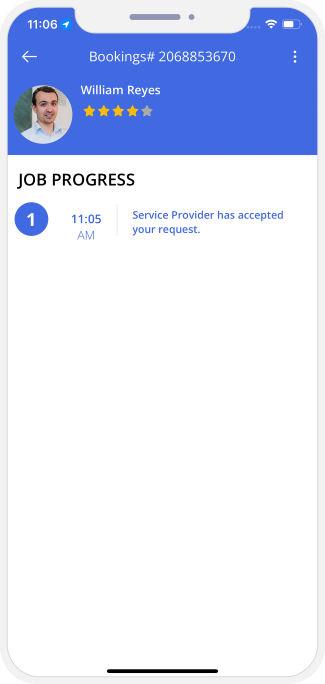
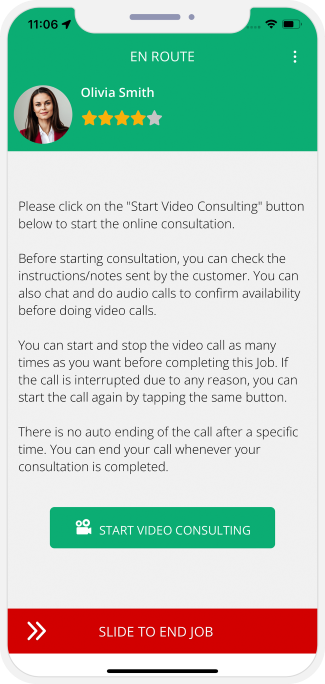
Video Call
User and Service Provider can connect to each other via Video call.
Invoice Summary
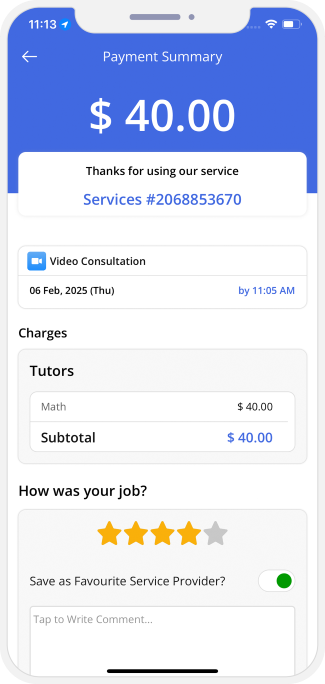
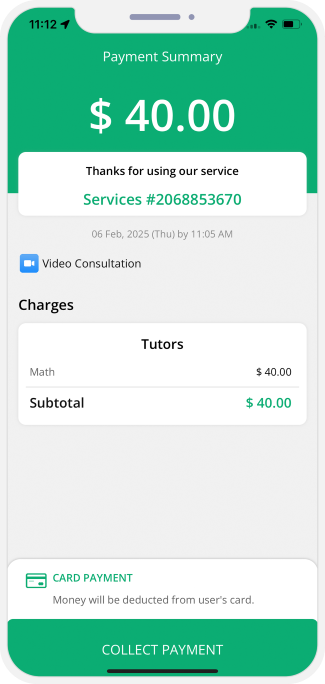
Component 7: Bid for Services
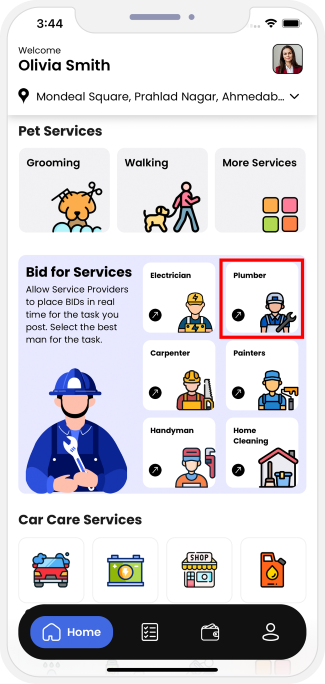
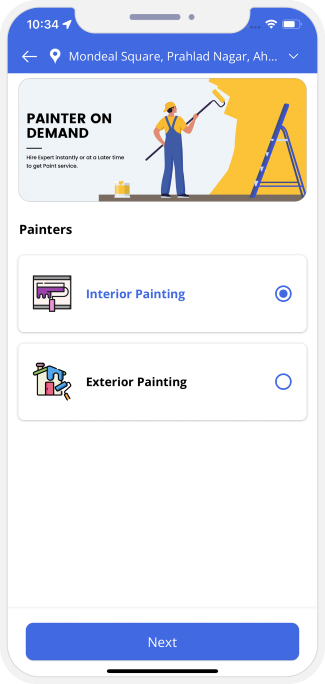 Bidding By Service Providers for the Jobs
Place Your Bid
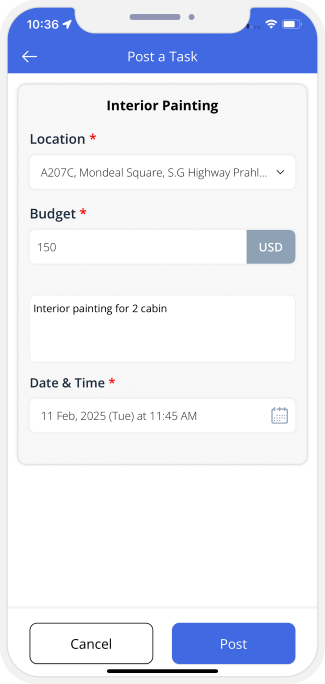
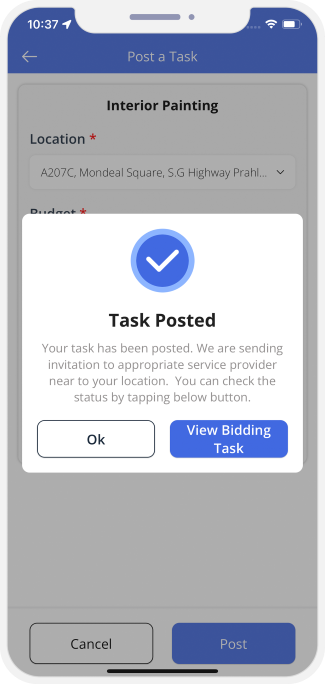 Provide Service details
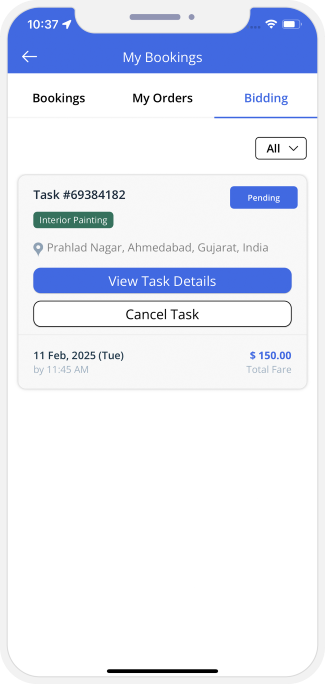
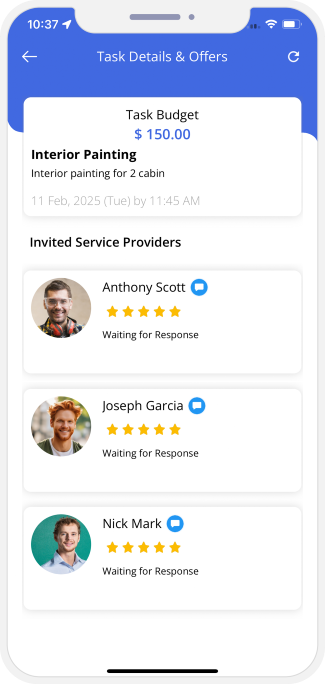
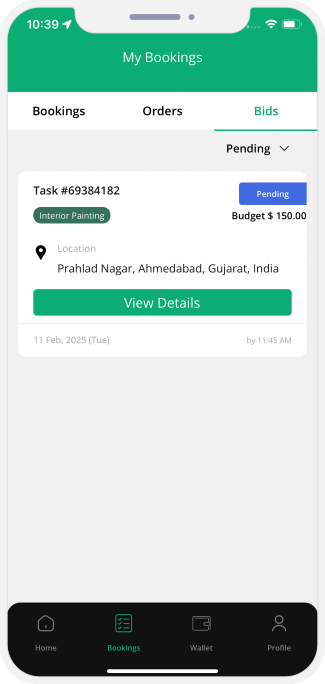
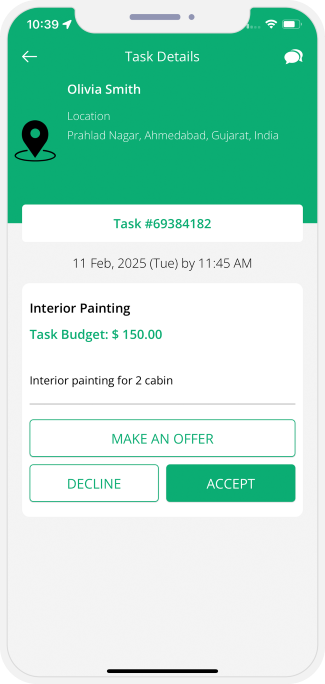
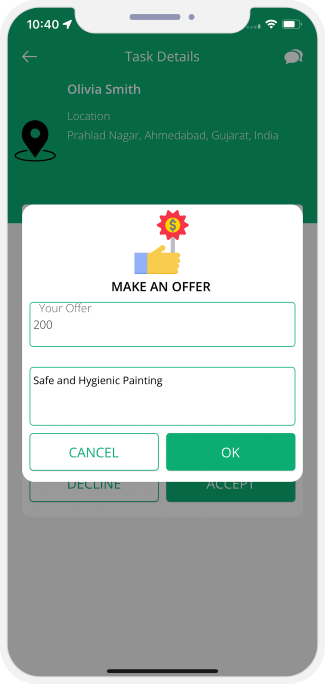
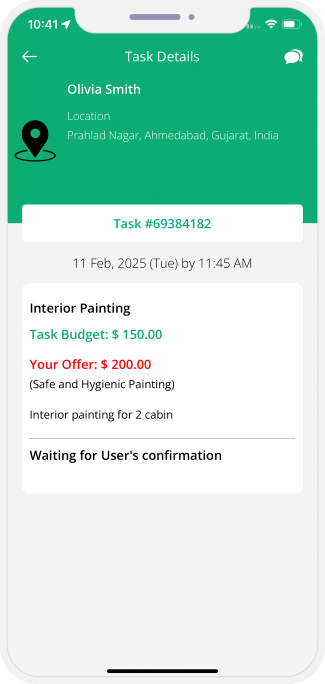
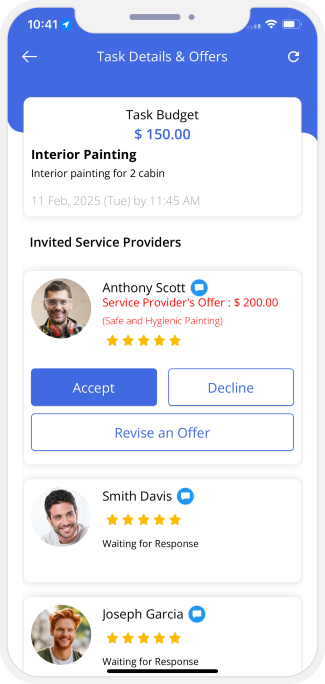
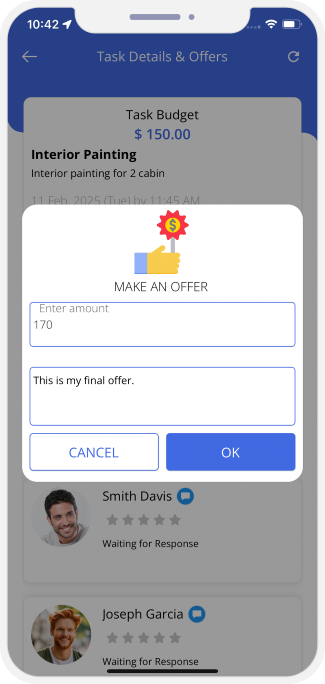
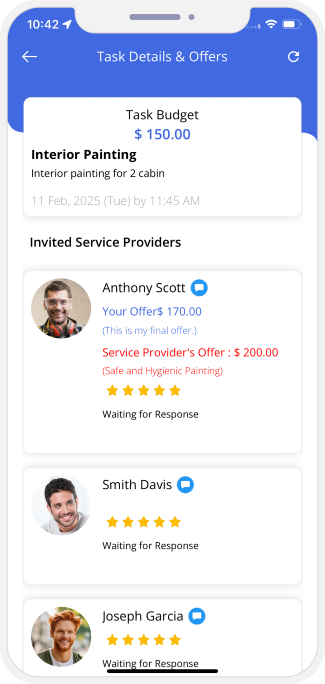
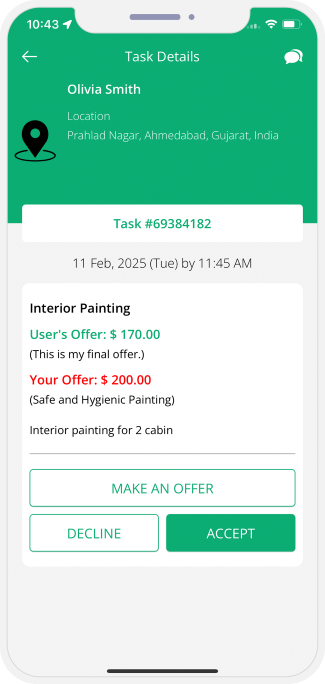
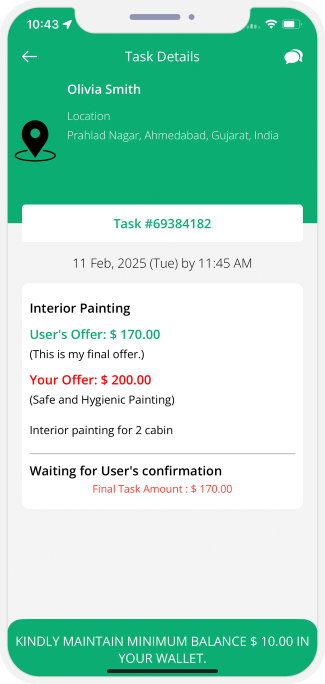
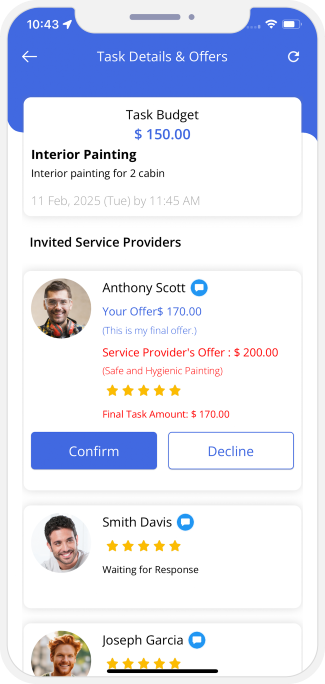

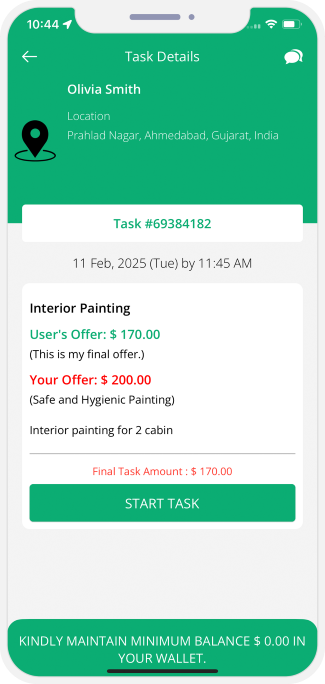
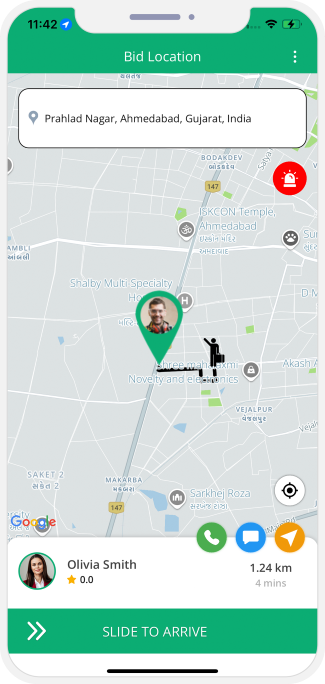
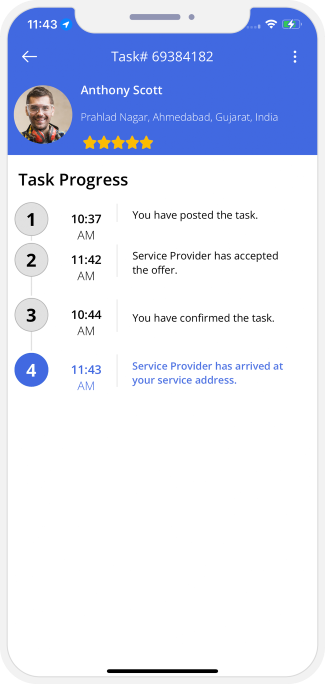
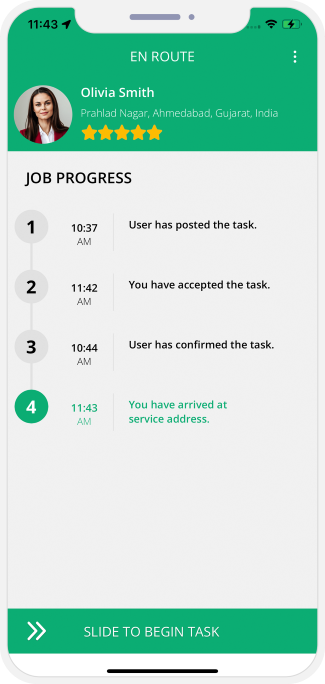

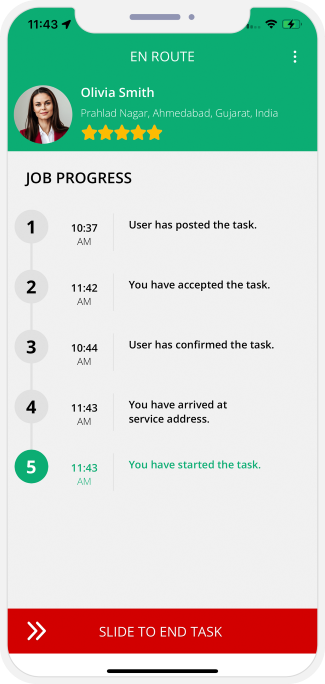
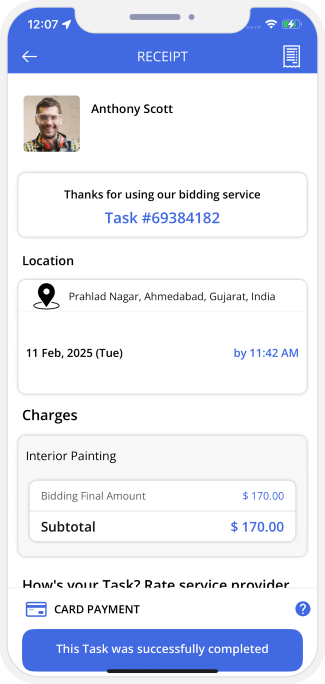
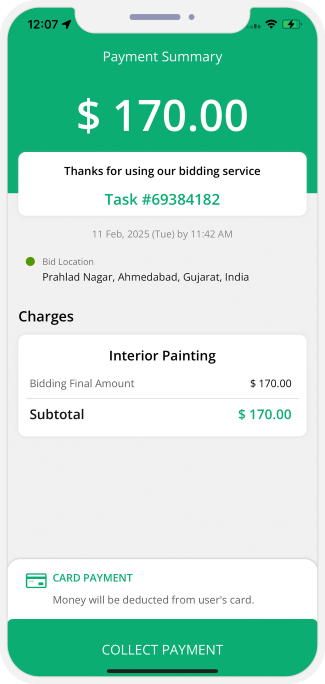
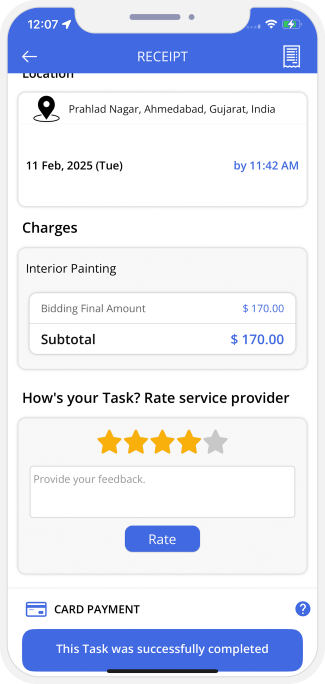
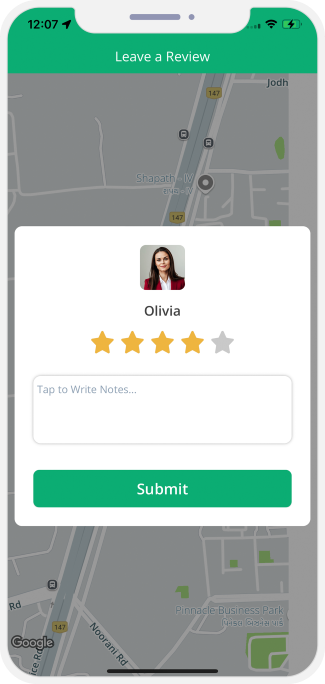
Component 8: Buy, Sell & Rent Real Estate
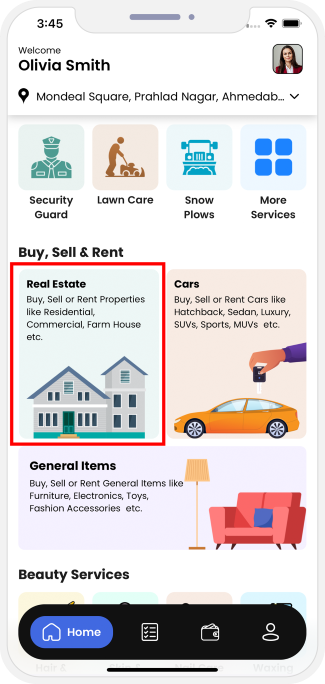
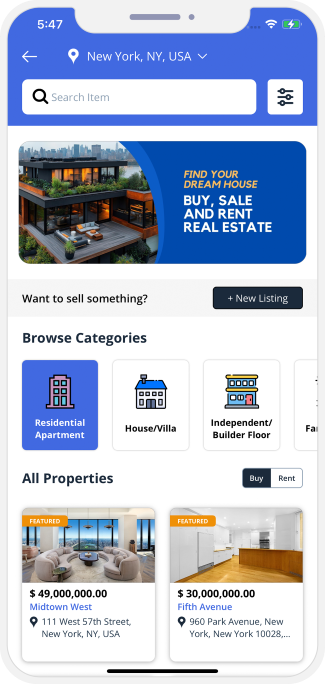
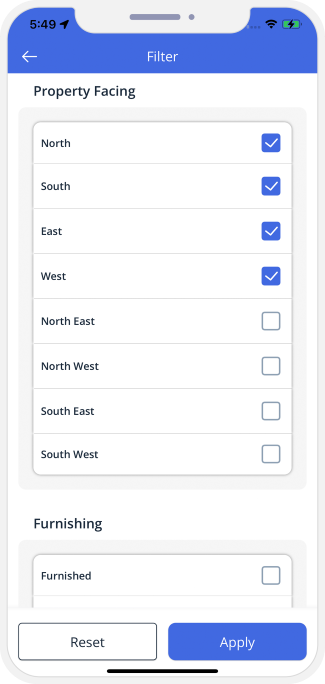
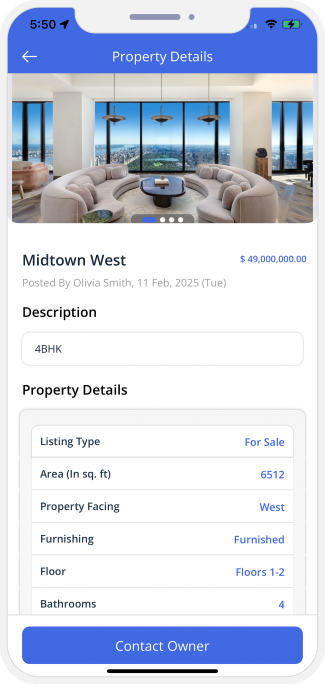
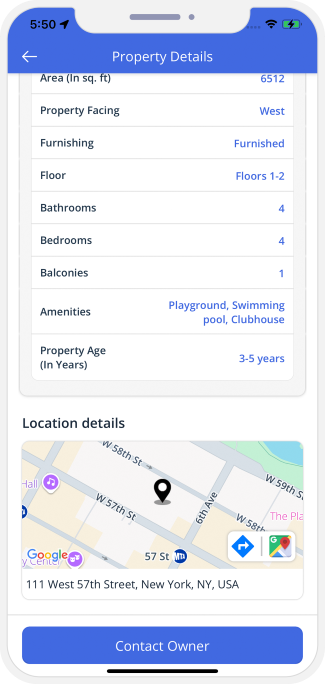
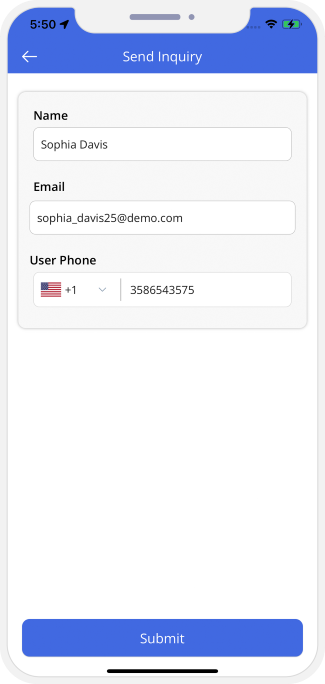
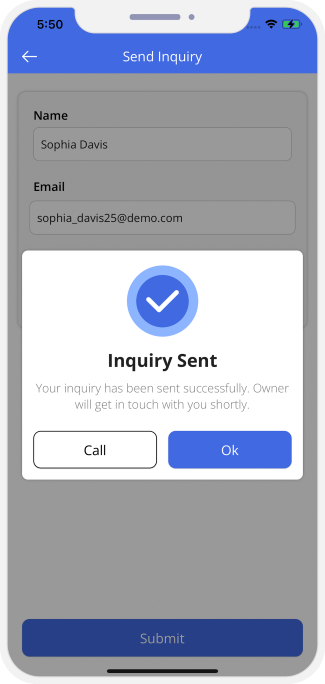
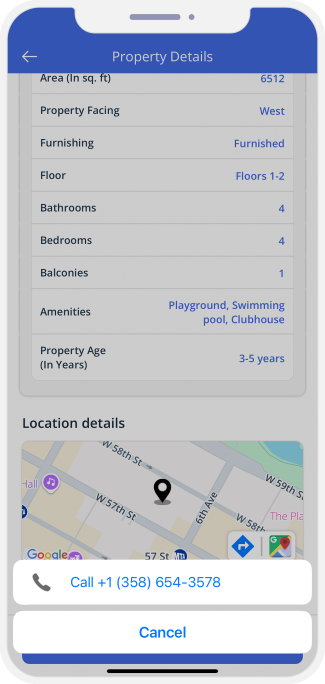
BUY, SELL & Rent REAL ESTATE - NEW LISTING


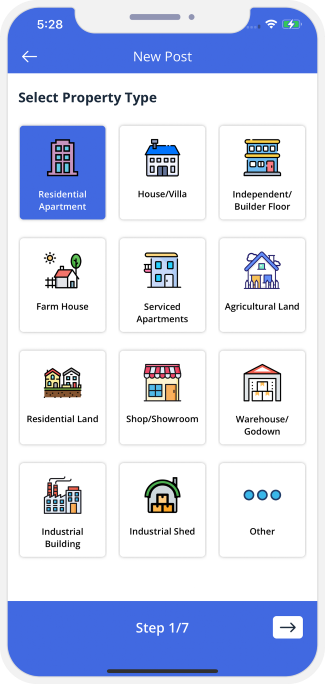
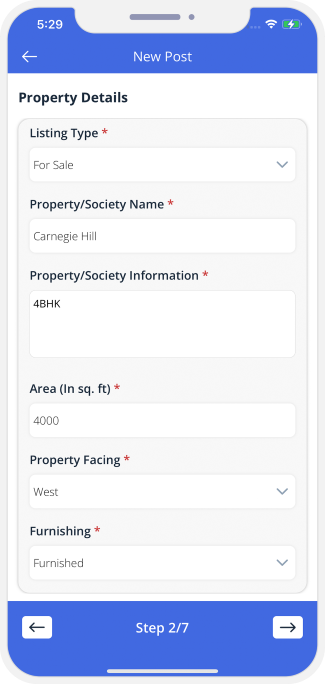
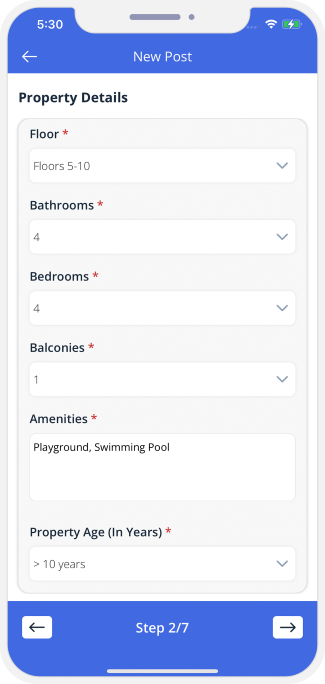

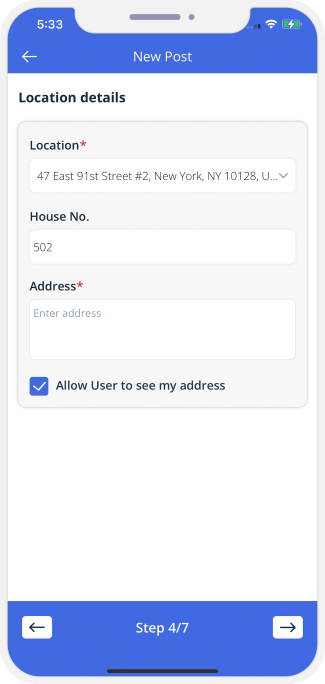
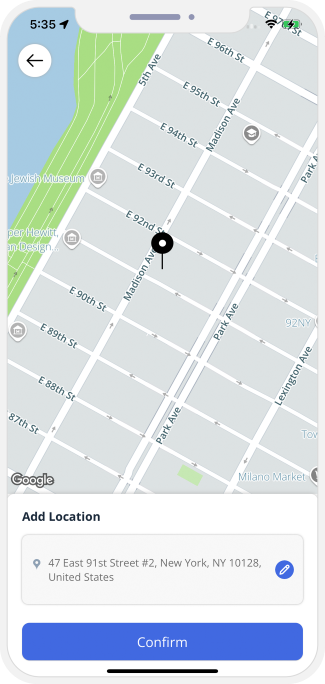
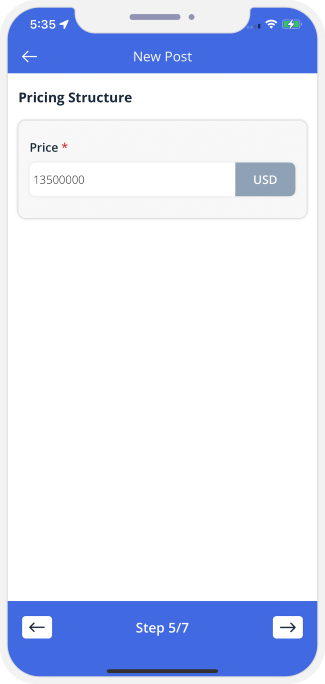
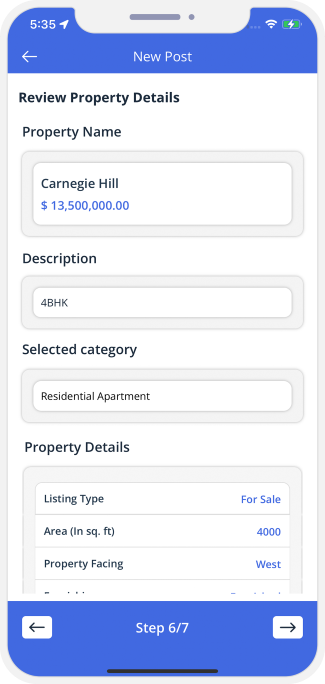
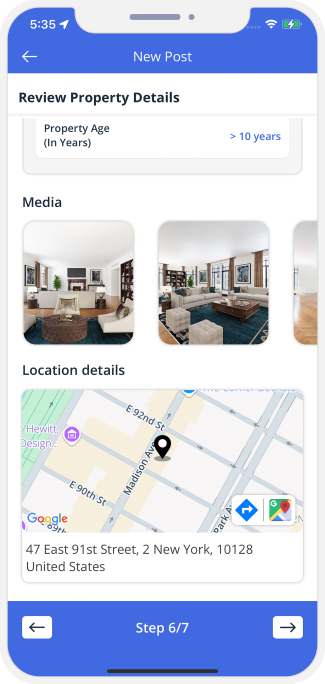
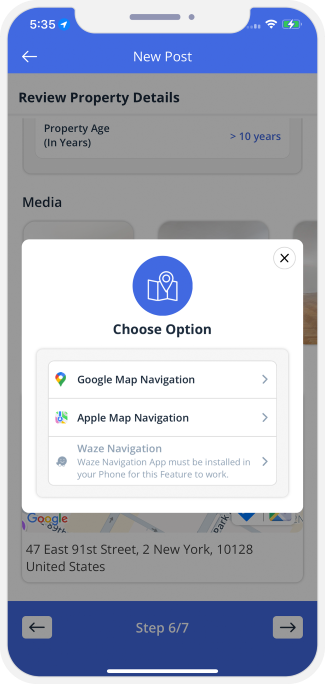
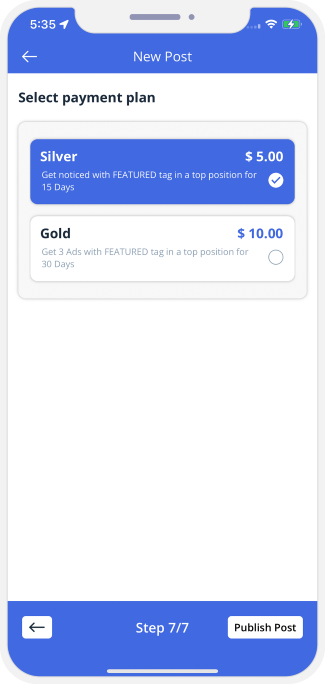

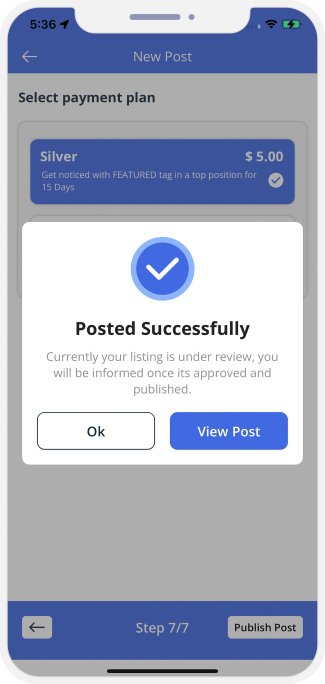
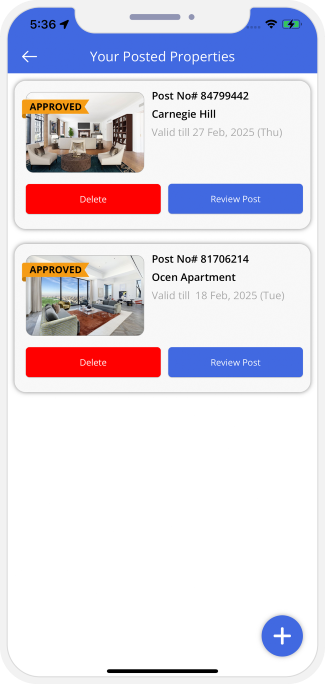
Component 9: Buy, Sell & Rent Cars

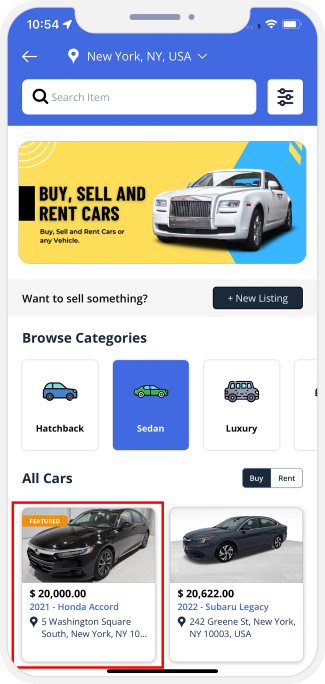
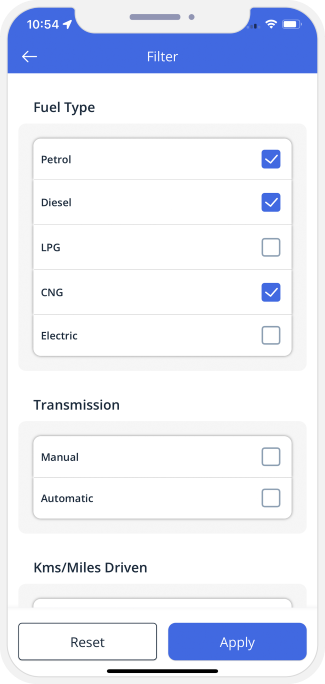
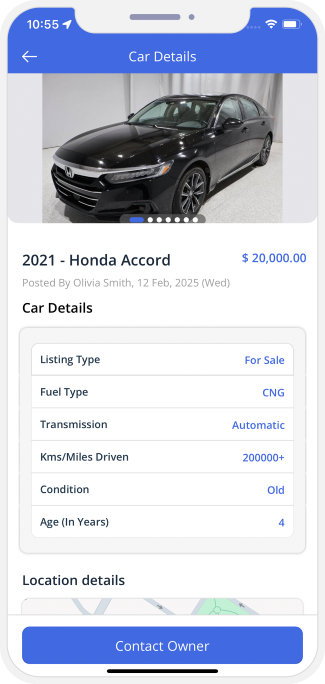
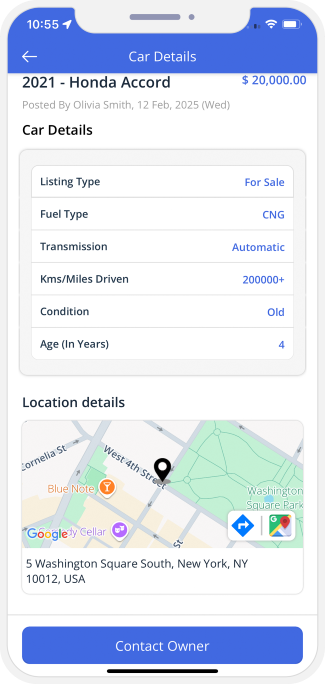
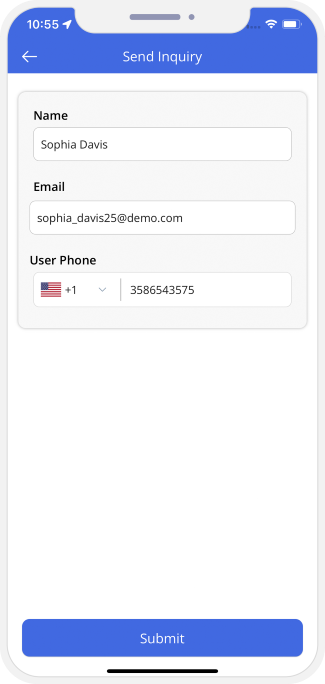
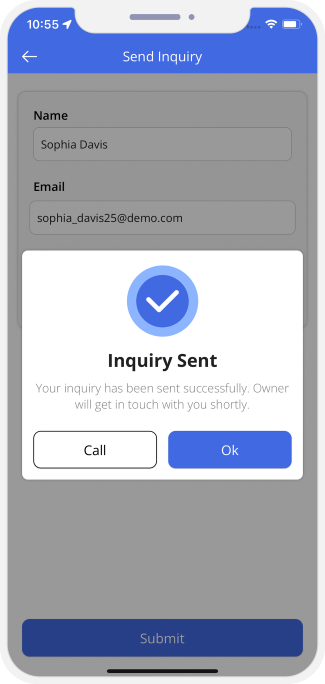
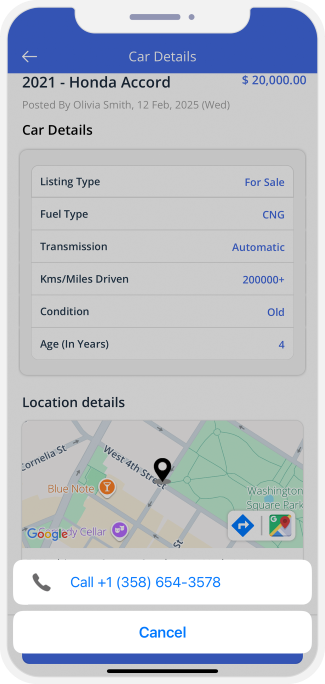
Post Car to Sell & Rent
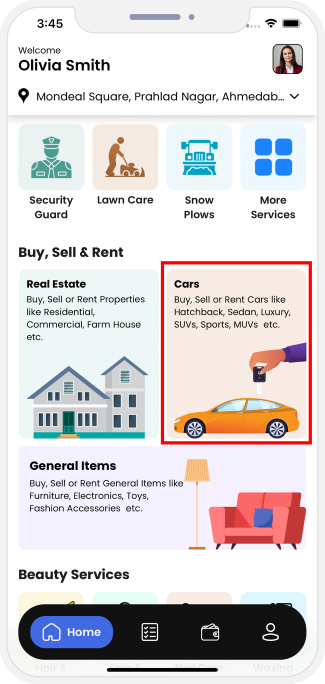
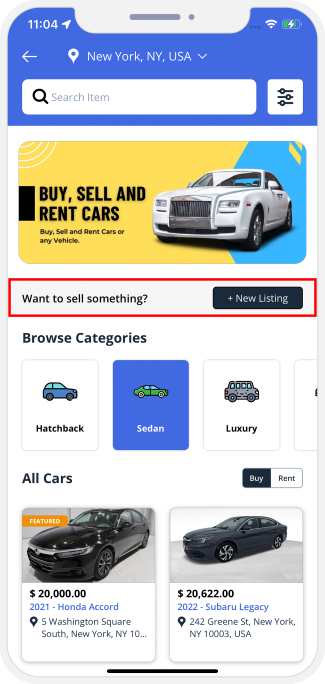
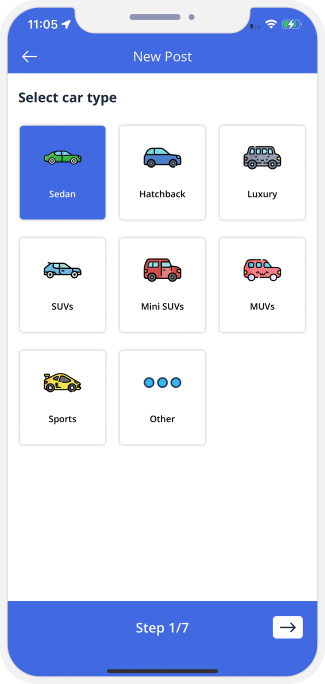
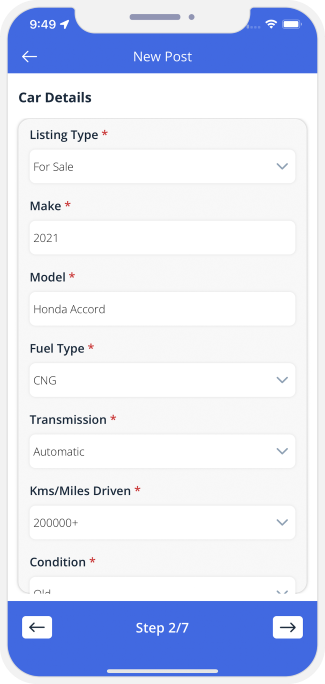
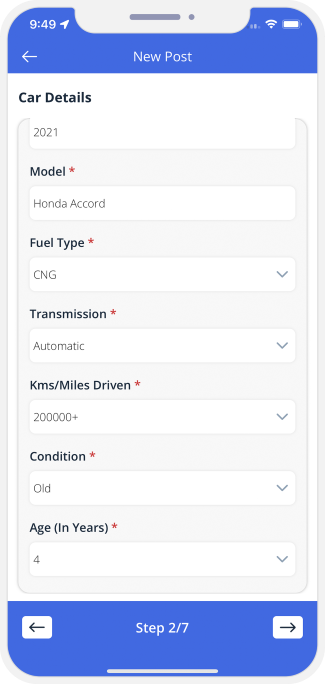


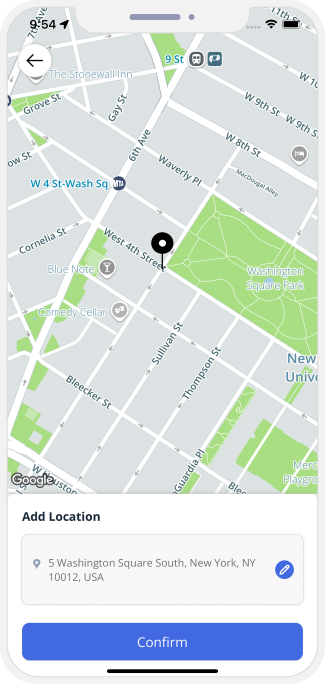
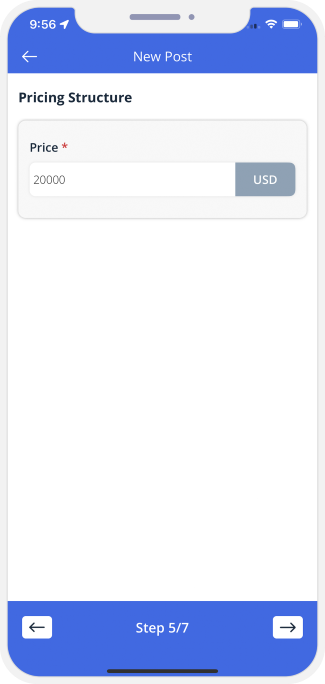
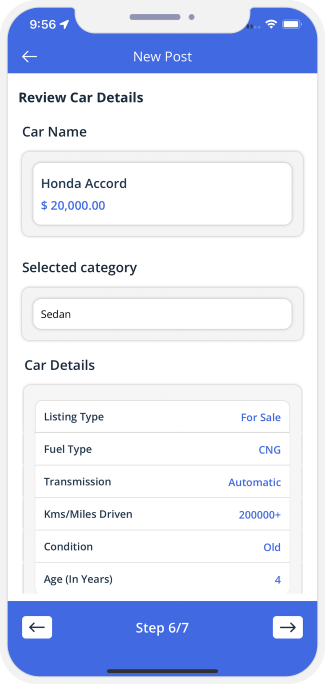
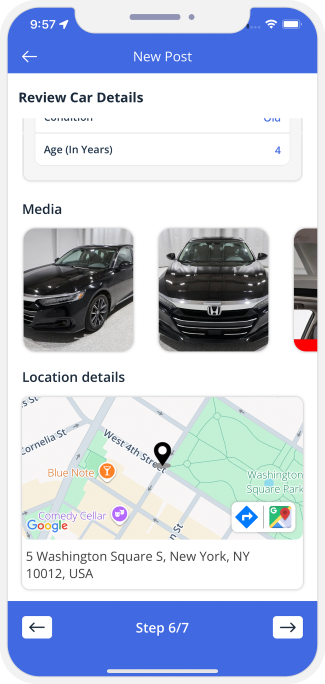
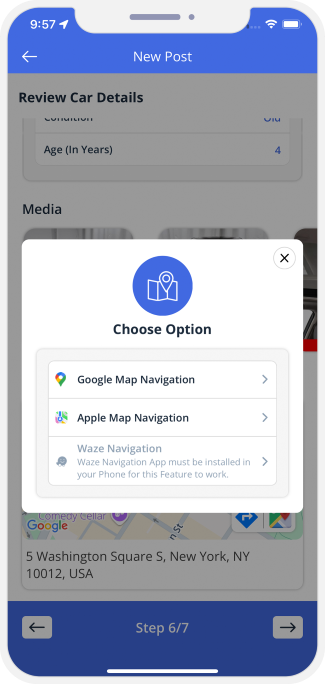
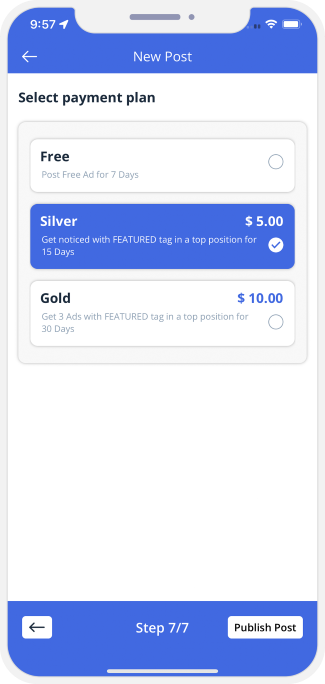
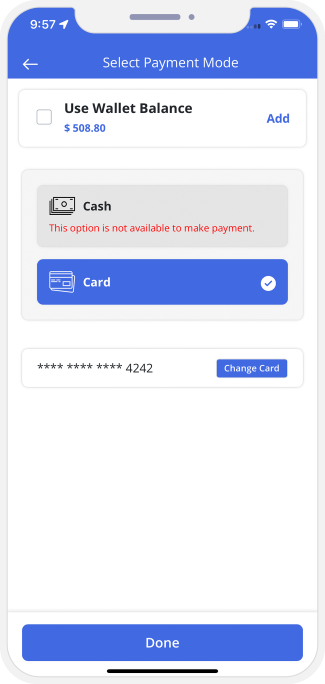
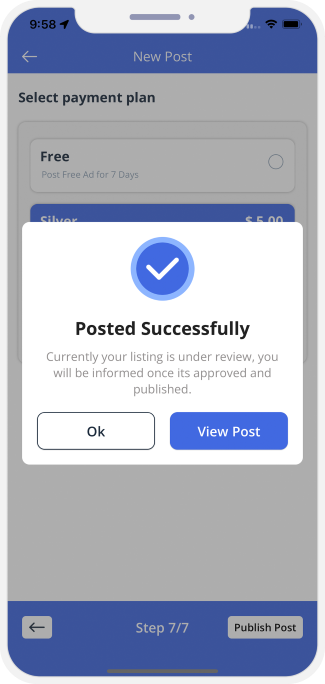
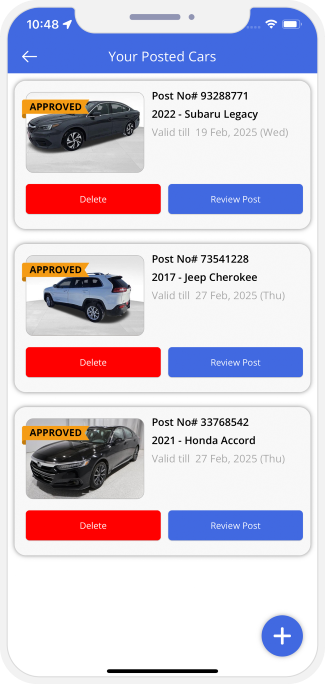
Component 10: Buy, Sell & Rent General Items


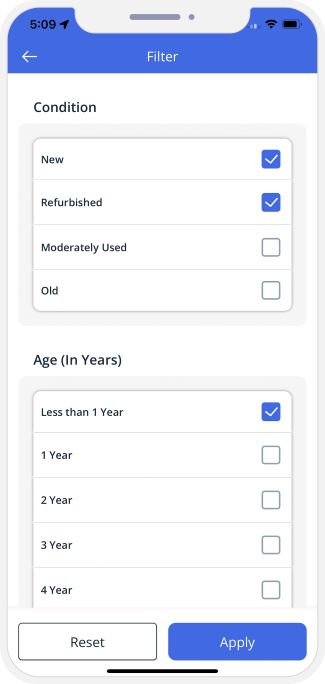
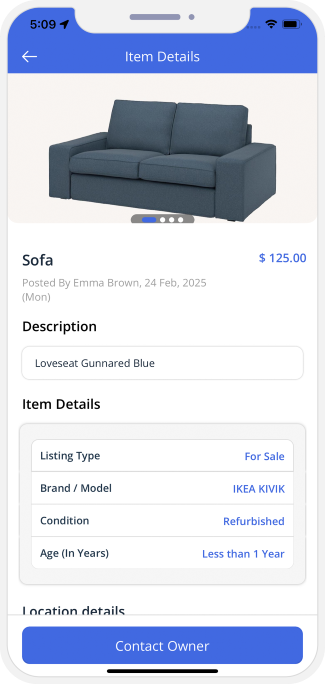
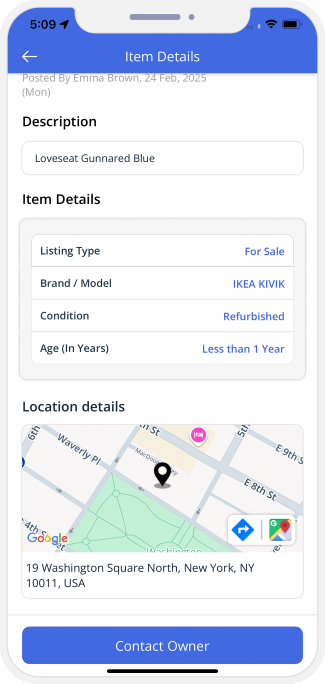
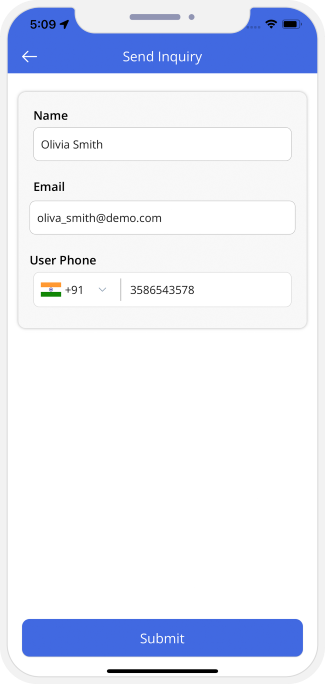

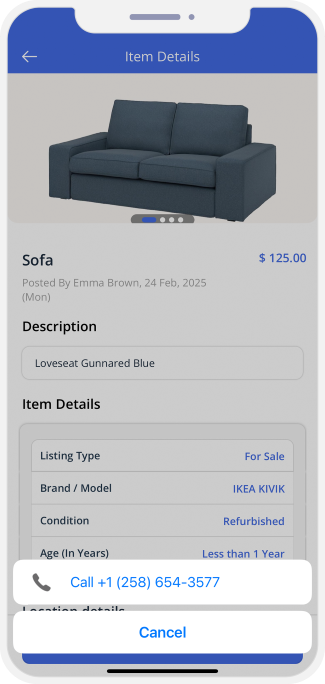
Buy, Sell & Rent General Items - New Listing
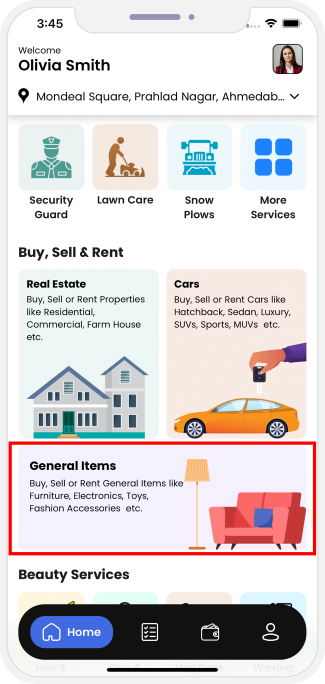
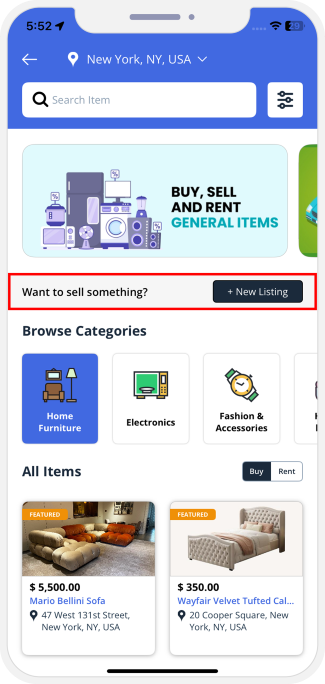
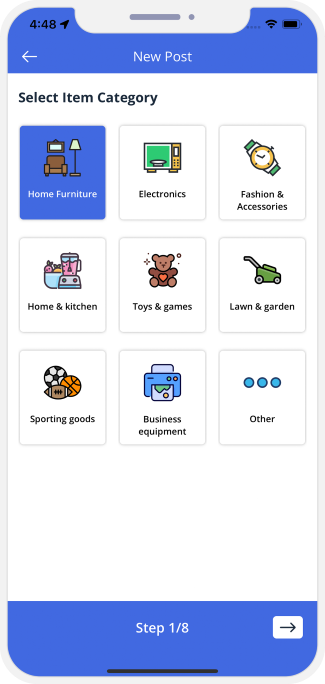
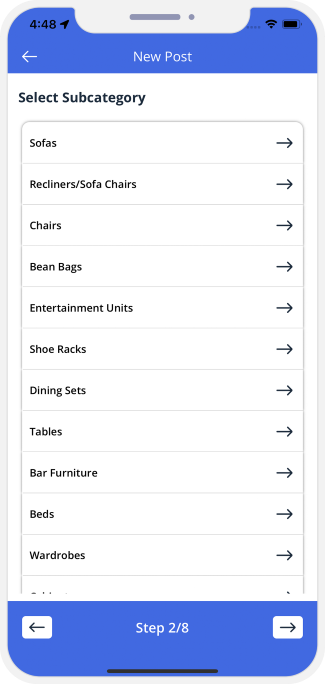
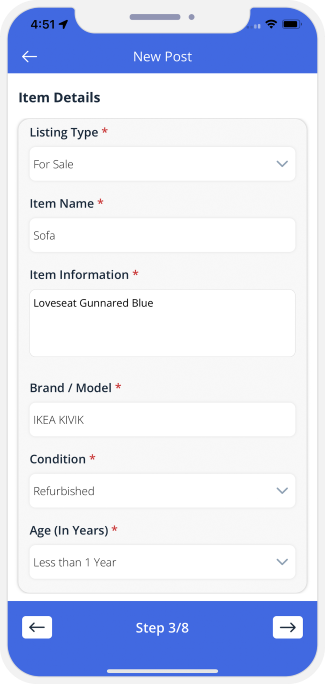
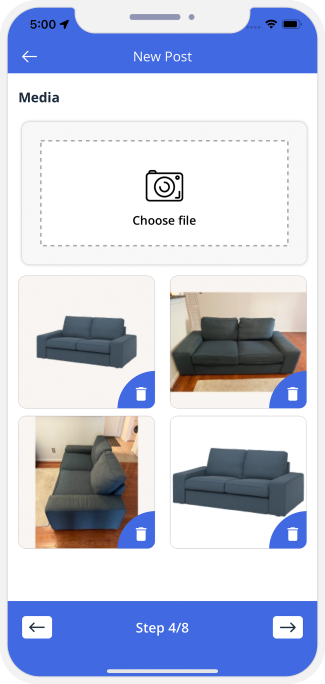
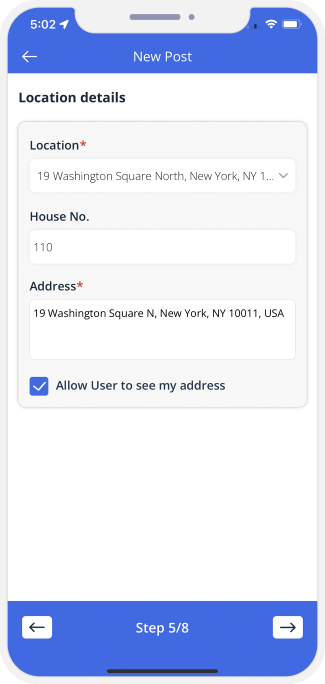


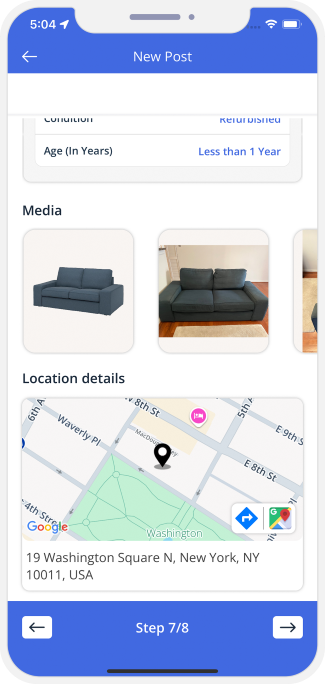
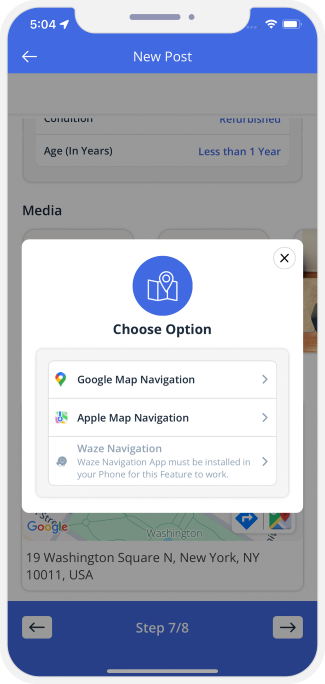


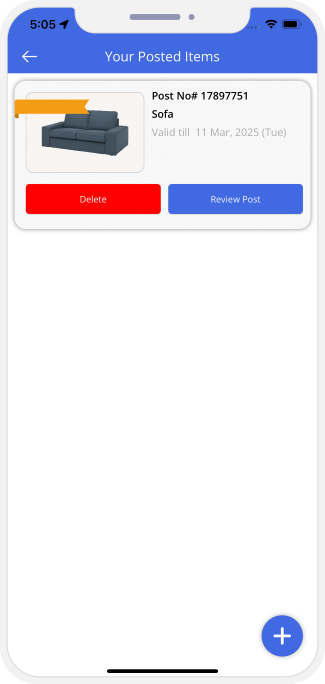
Component 11: Car Pool
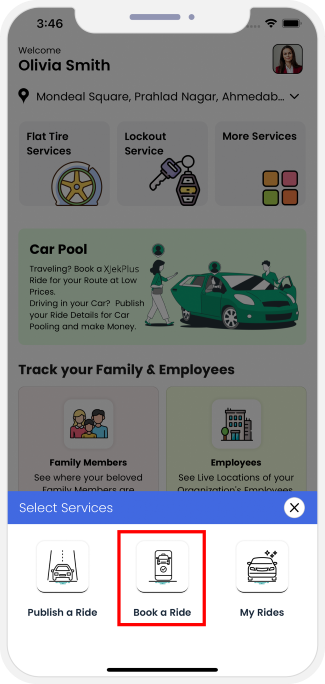
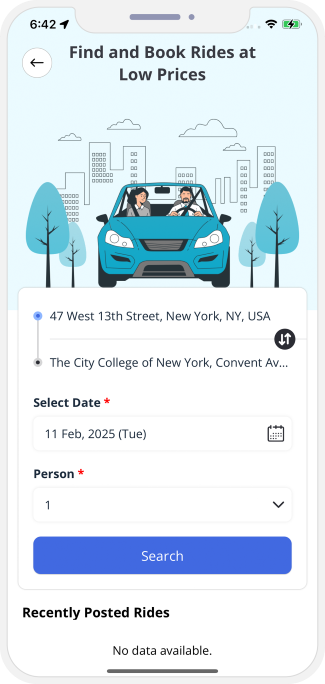
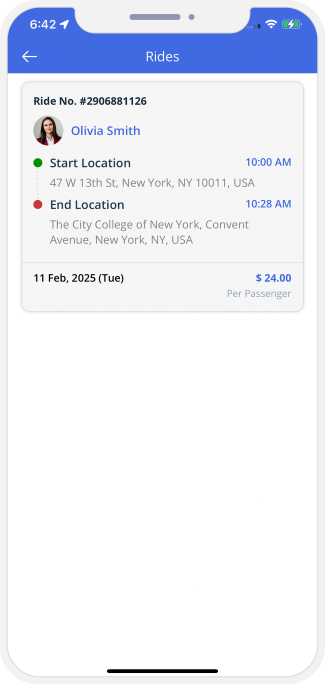
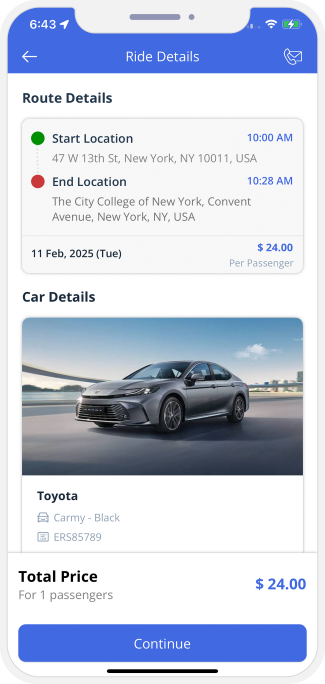
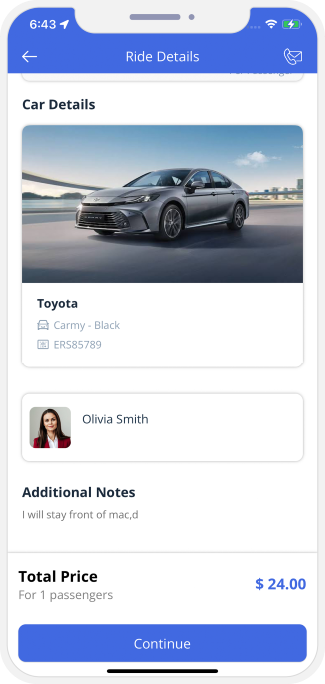
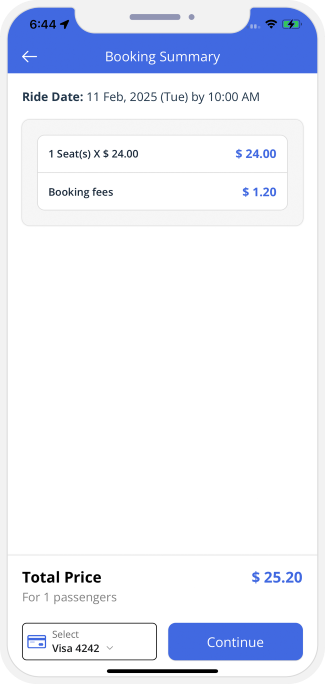
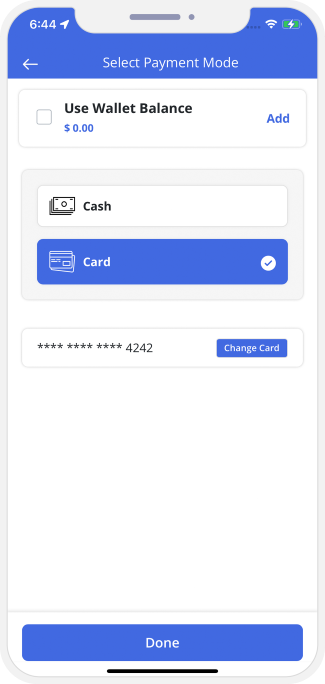
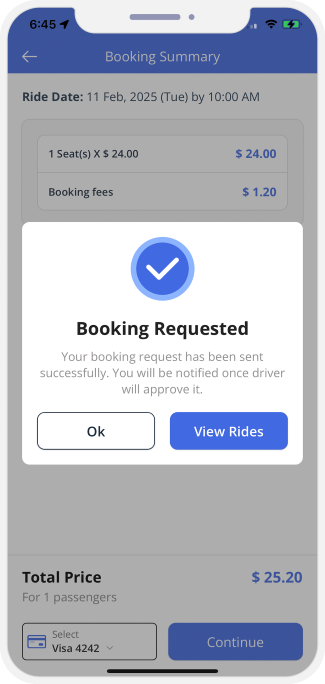
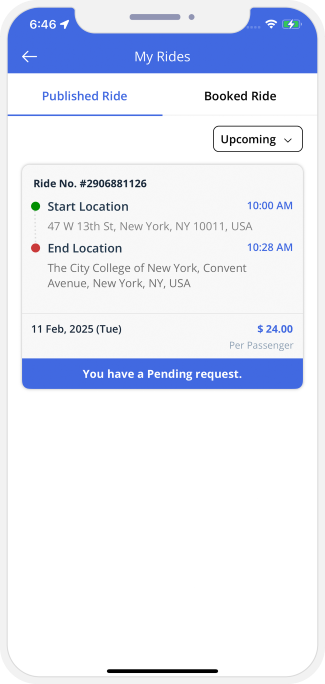
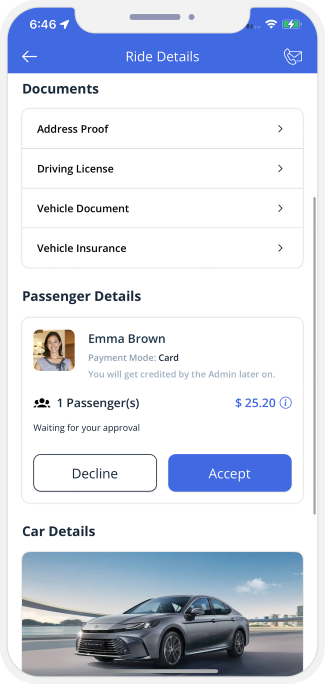
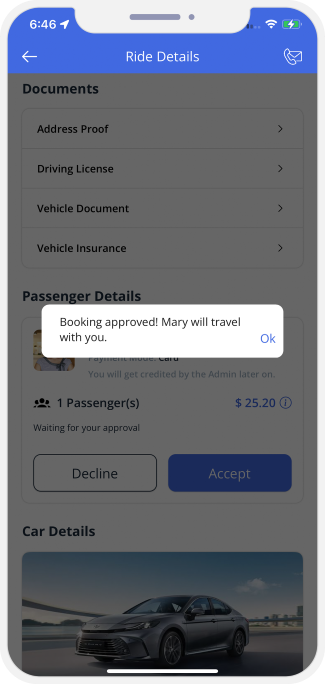
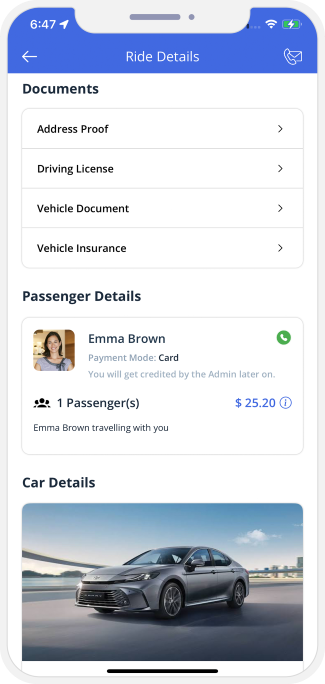
Car Pool / Ride Share - Publish a Ride
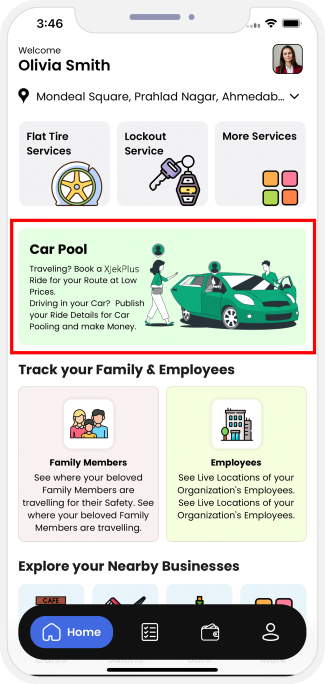
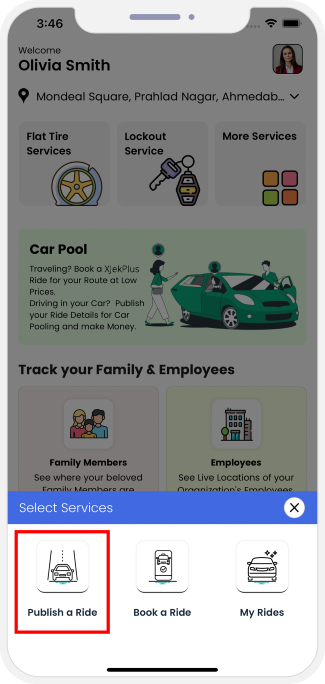
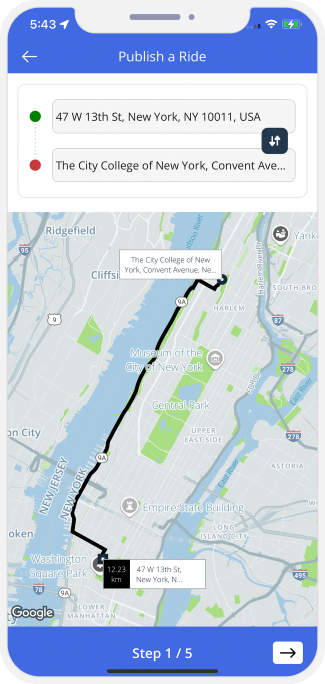
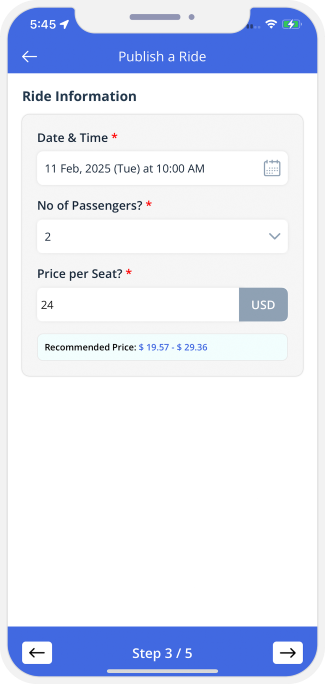
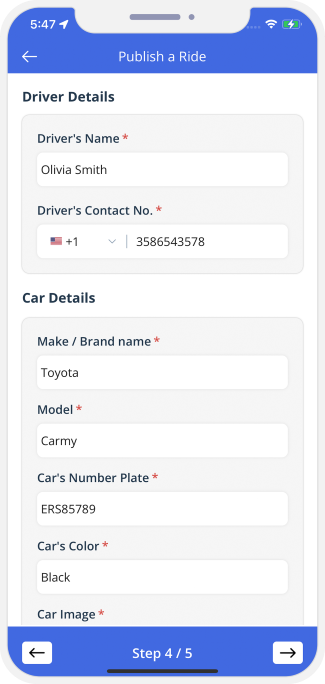
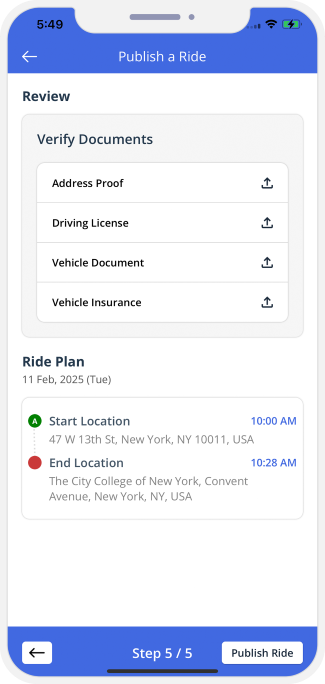

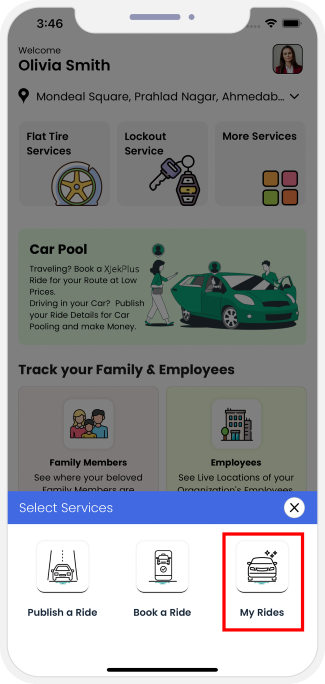
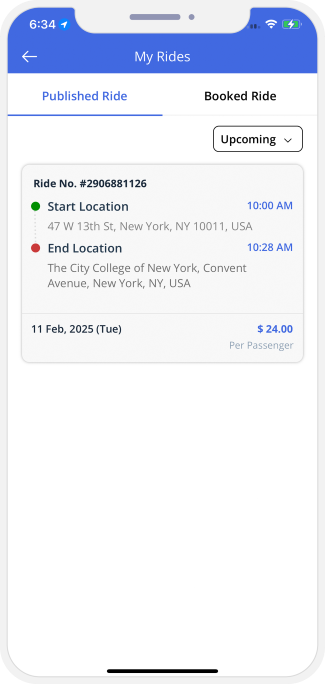
Component 12: Medical Services
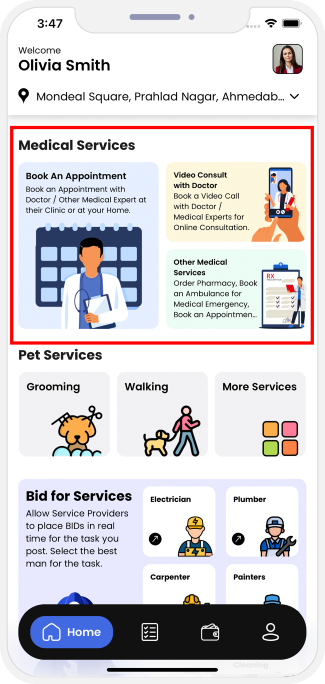 Book A Medical Service
Book An Appointment - Doctor / Physiotherapist / Nurse / Psychologists etc..
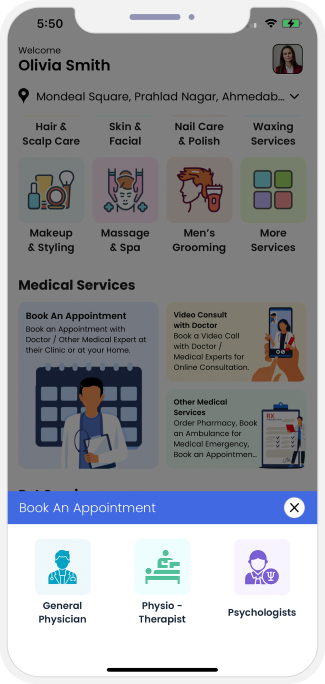
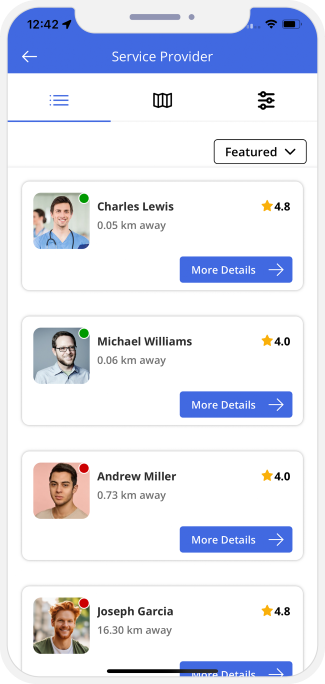
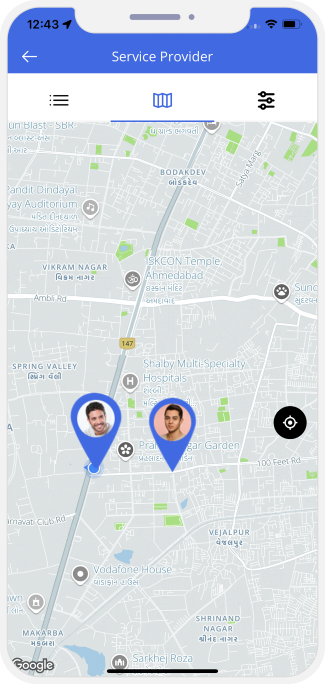
Manage Services
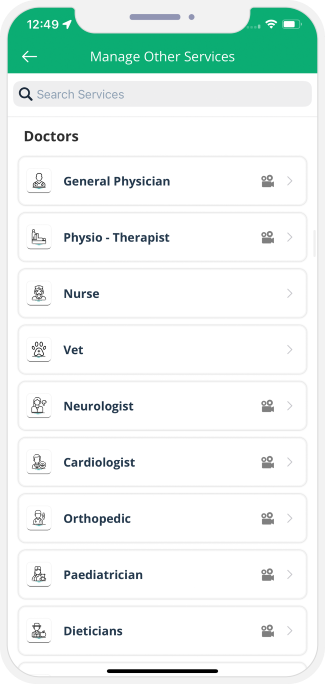
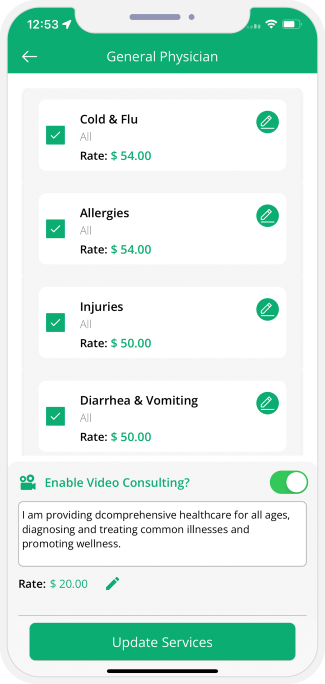
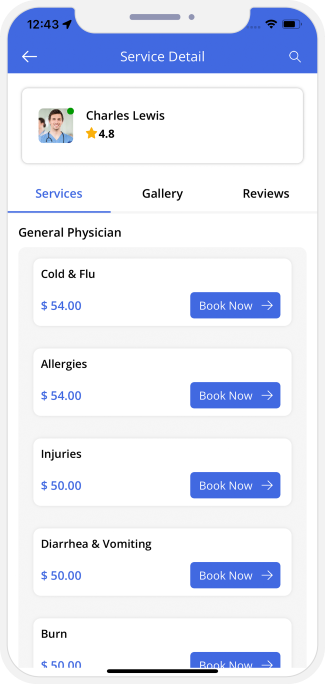
 Profile and Booking Summary
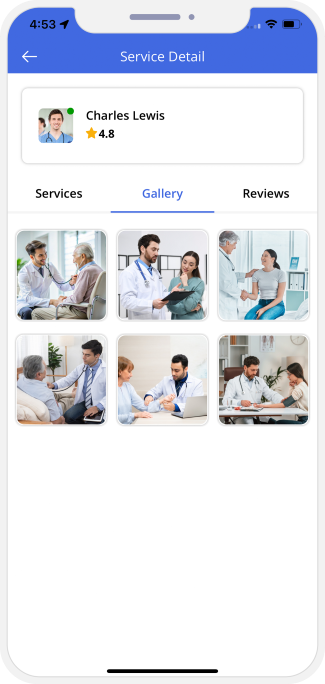
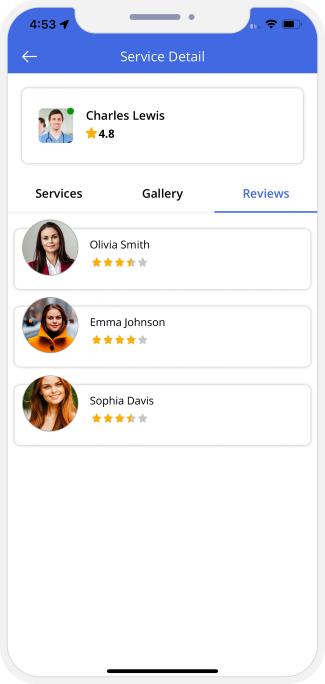 View Gallery and Reviews
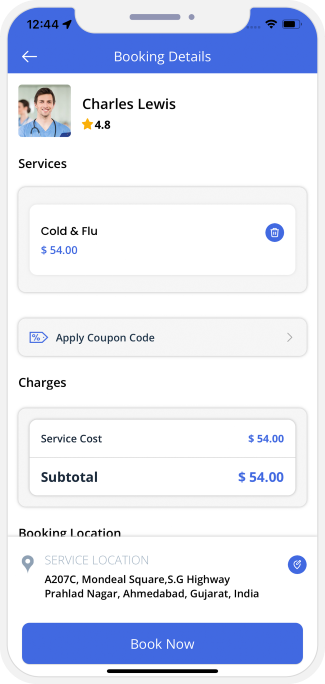
 View Booking Summary and Pay
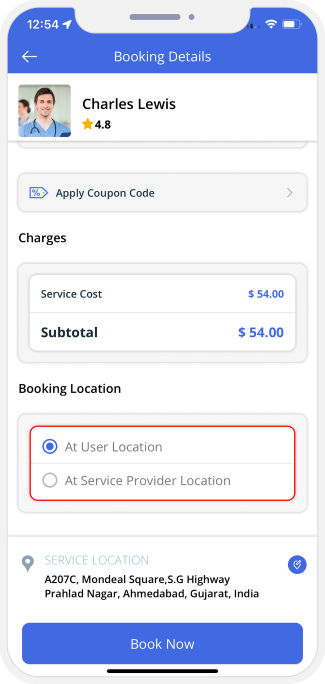
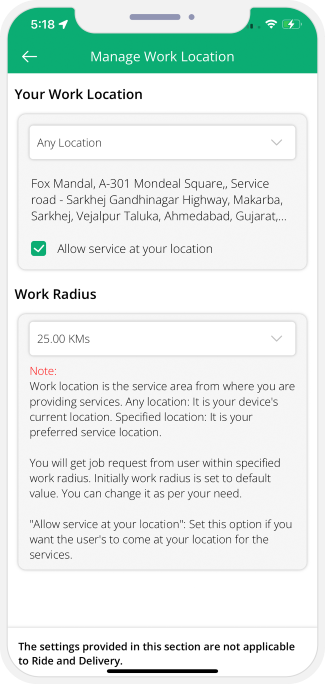
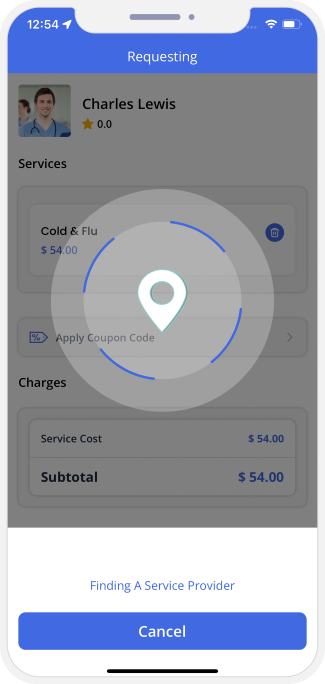
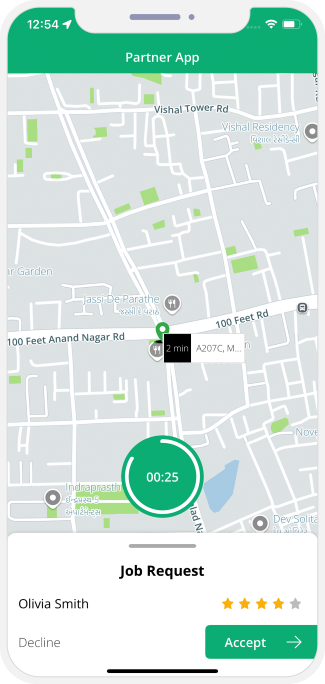
Job Request Accepted
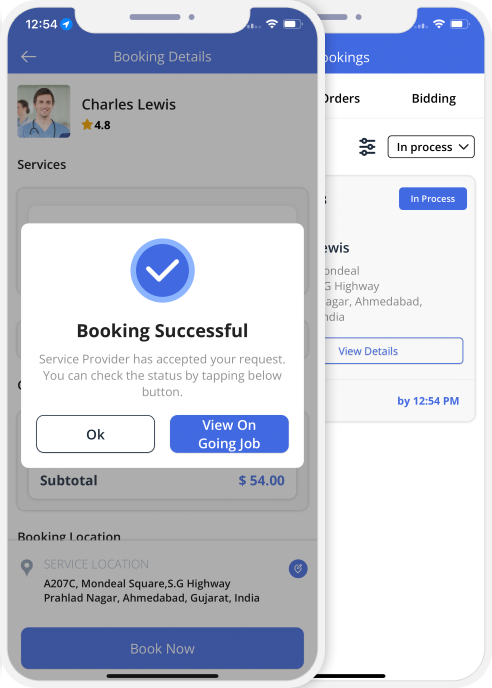
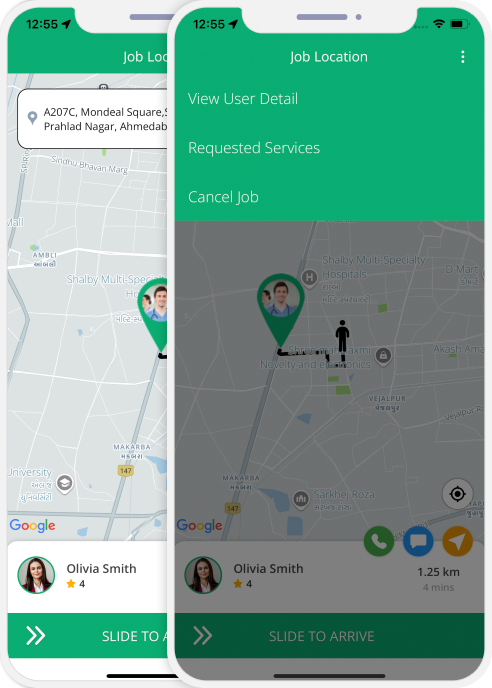
Doctor Arrives at Job Location
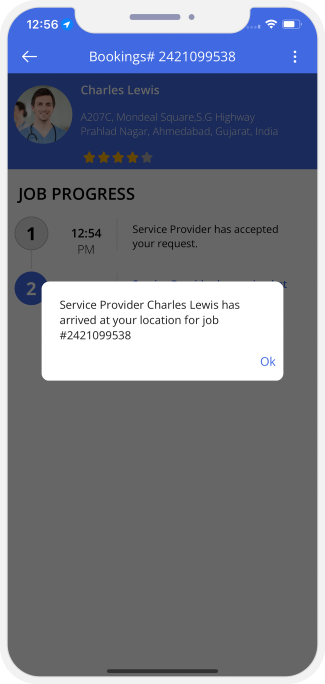
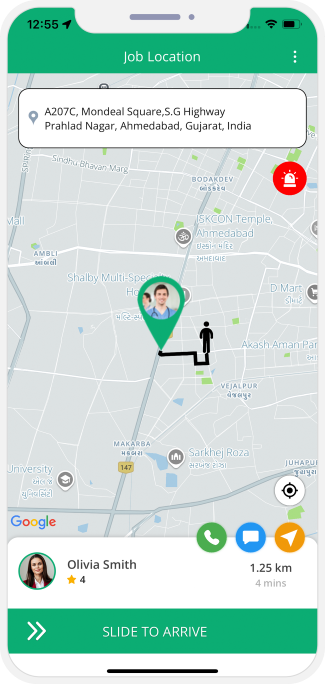
Job started
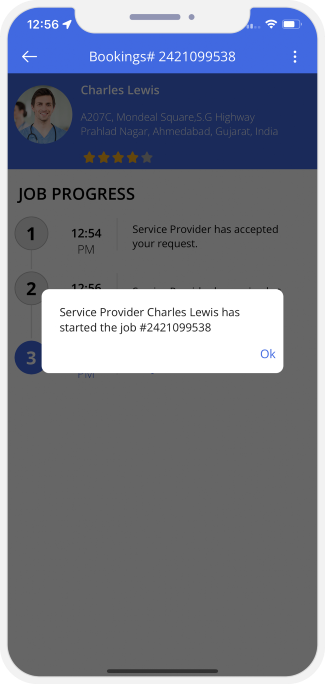
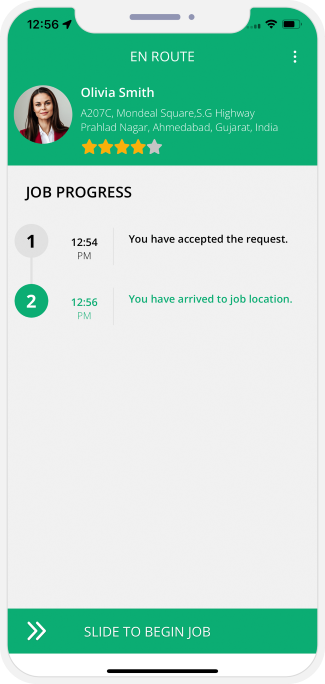
Job completed
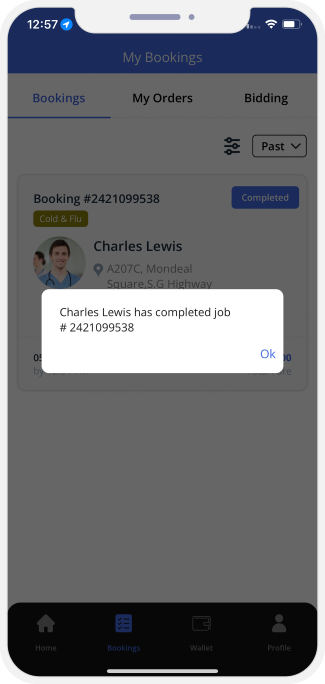
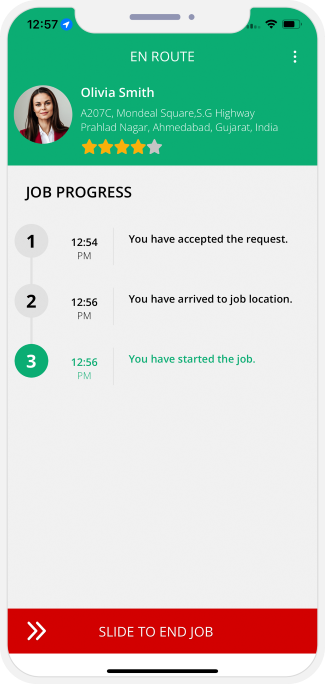
Invoice Summary
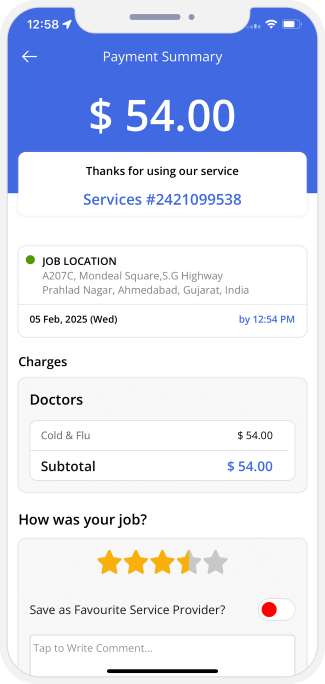
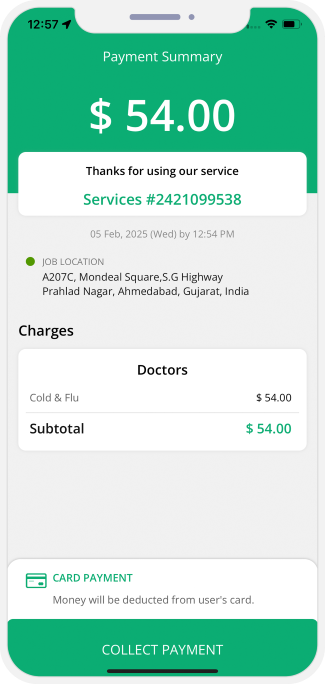
Reviews and Ratings
The Review and Rating section present on the app of the Patient and Doctor both help both provide reviews to each other
as well as provide rating to each other based on the experience of services.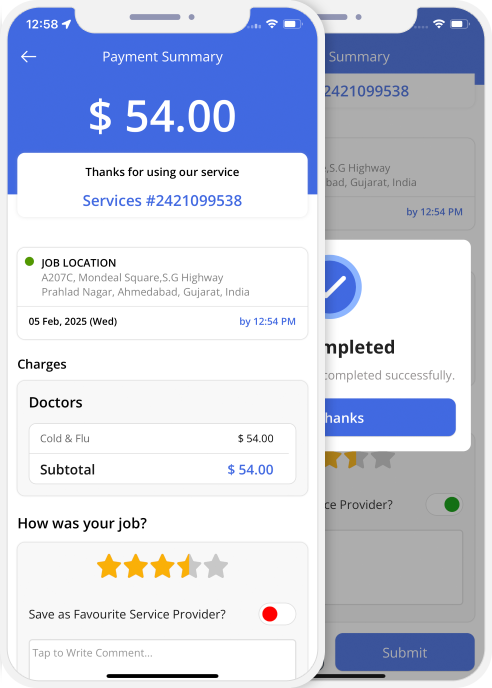
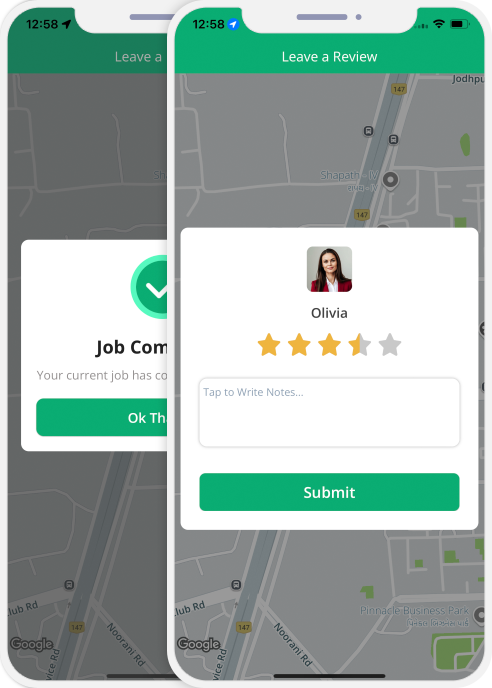
Book An Ambulance
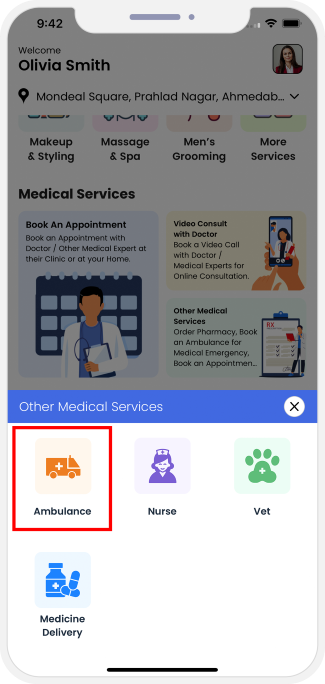
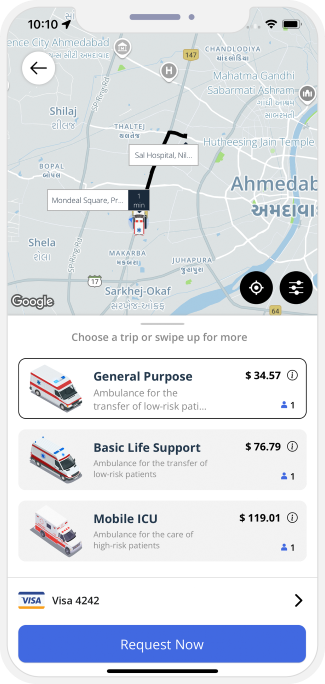
Ambulance Driver Gets Online and Start Accepting Request

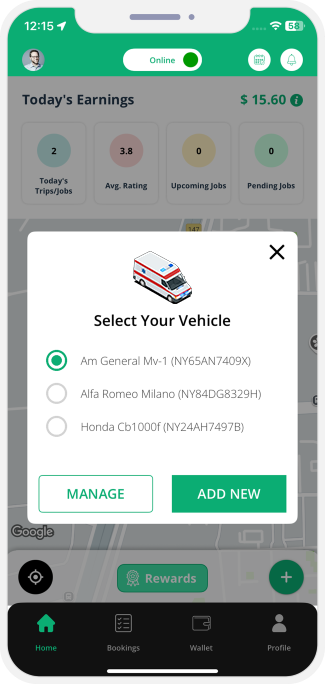 Ambulance Driver Sets Availability (Online / Offline) to get Ride Requests.
Sending Ambulance Request
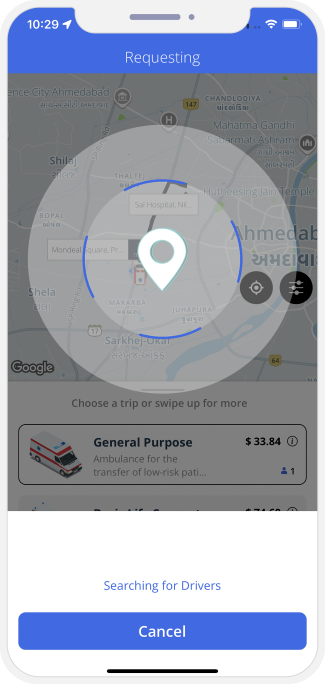
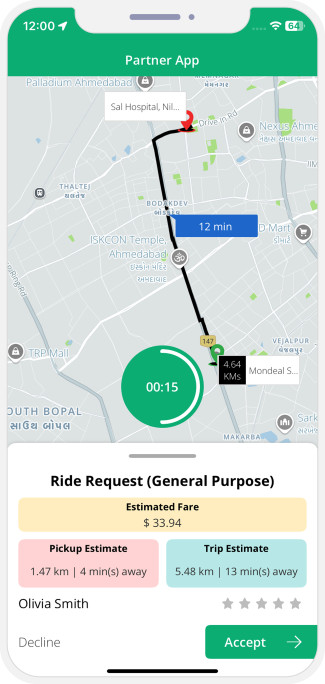
Ambulance Driver Arriving
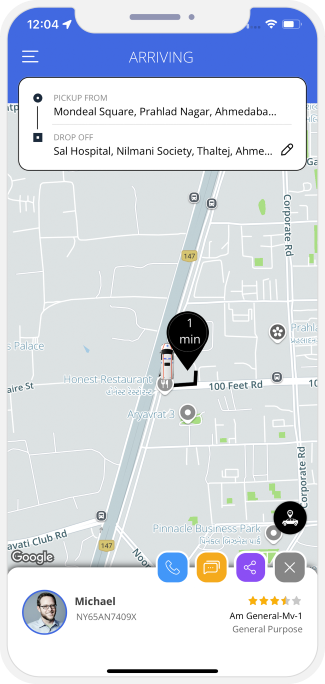
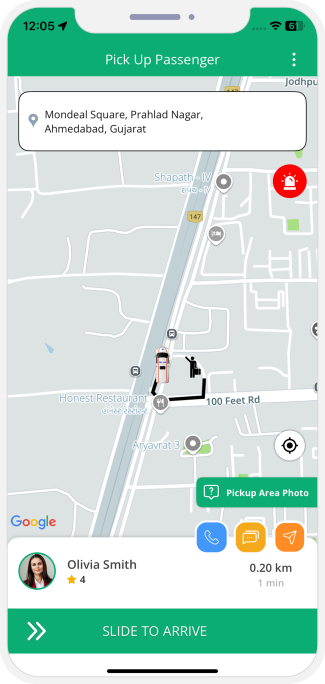
Ambulance driver Arrives at Location
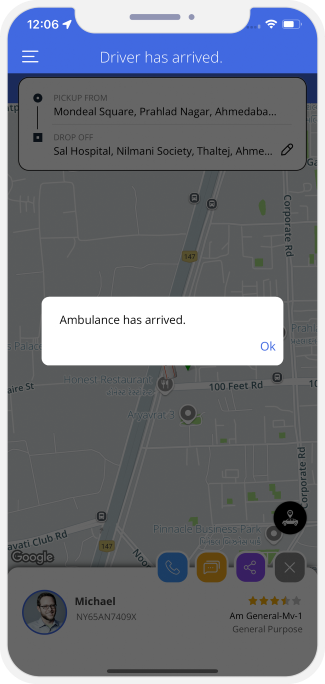
Ambulance service Begins
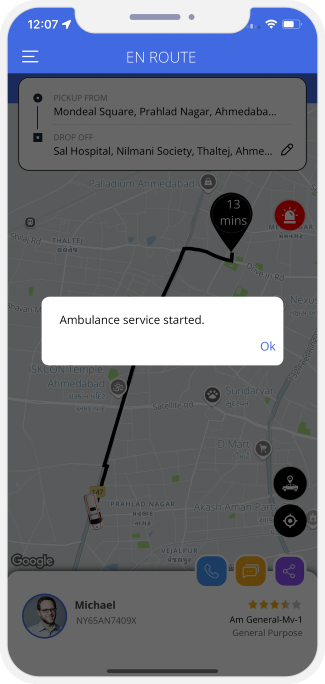
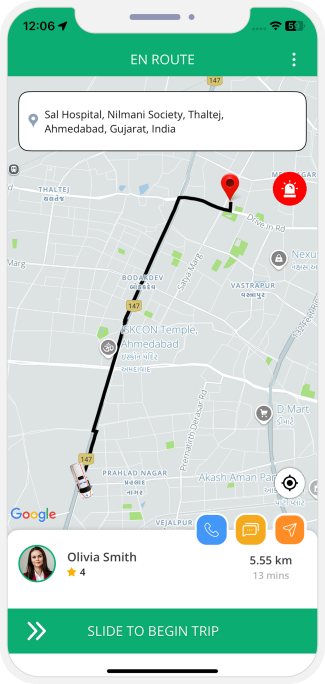
Ongoing Ambulance service
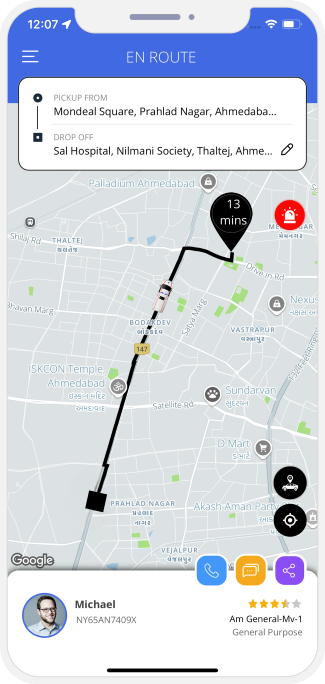
Ambulance service Completed
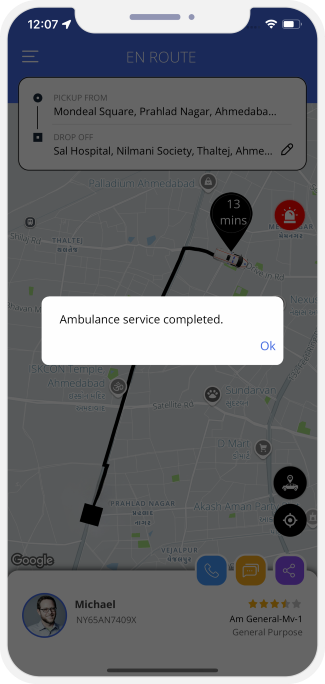
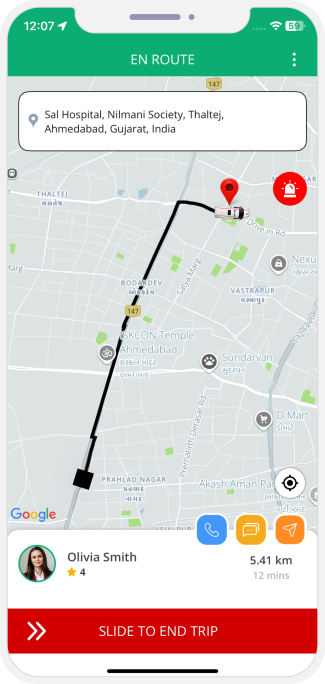
Summary of the Invoice
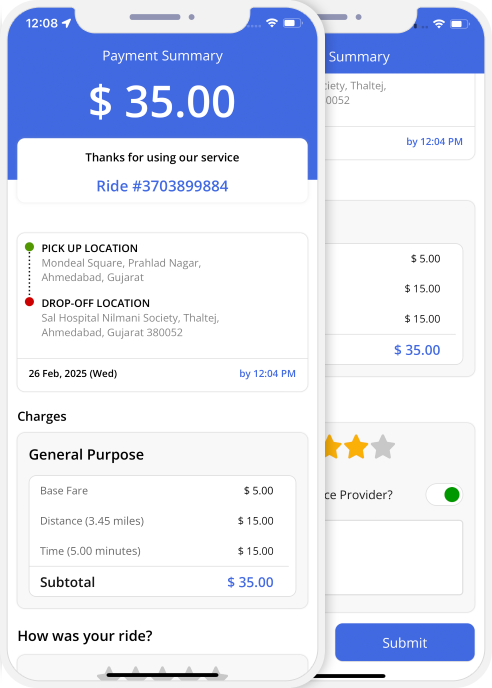
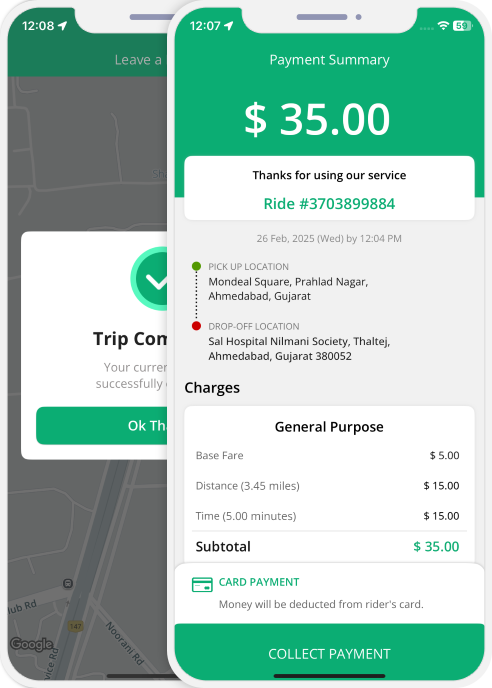
Pharmacy Delivery
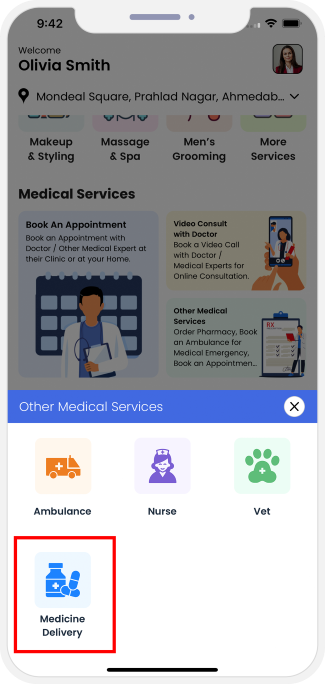
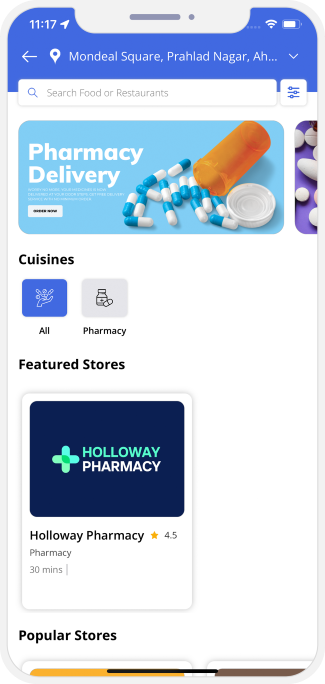 Ordering Medicines
Placing Order for Medicines
User Flow of Ordering the Medicine
After User Places Order
Tracking the Order
Order Assignment to Delivery Driver
Order Processing
Status of Delivery Driver
Driver can now reach the Pharmacy Store and pick up the order. The delivery driver will be able to see the particulars of the order so that he can pick it up without any confusion. He will then take a picture of having collected the order and update on the app as "ORDER PICKED UP".
Last Leg of Delivery
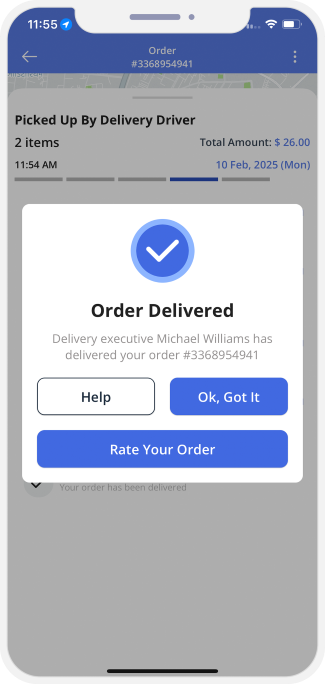
Order Delivered Successfully
Once the order gets successfully delivered to the Customer's place, it is appropriately updated on the app. the order delivered icon turns green along with a time stamp for the same. The page also mentions that the order has been delivered.
Apart from that the page has 2 buttons in the bottom:
Reviews and Ratings
Video Consultation with Doctor
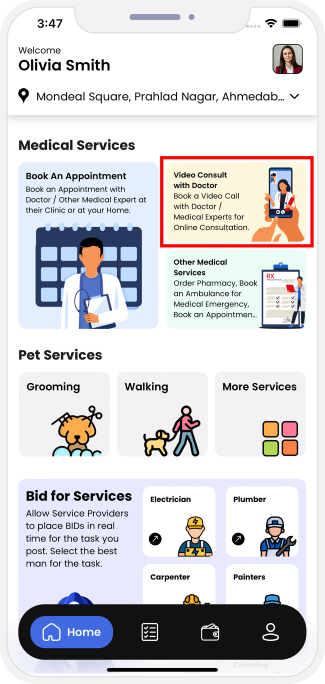
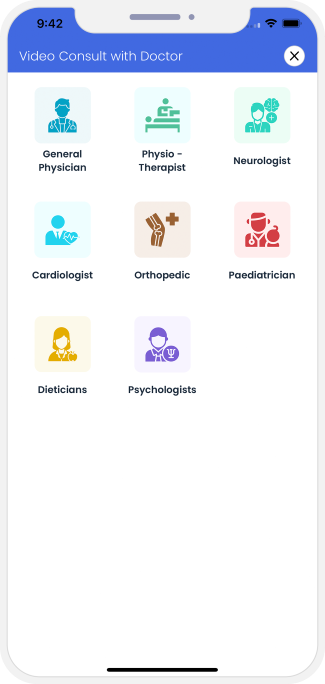 Online Video Consultation
Doctors List
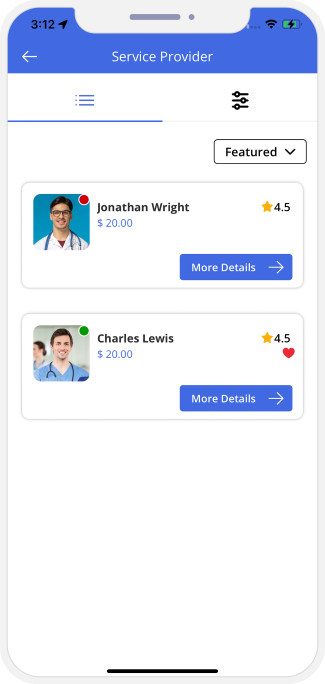
Profile details
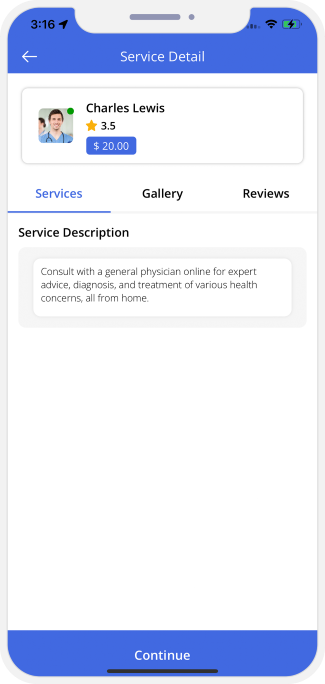
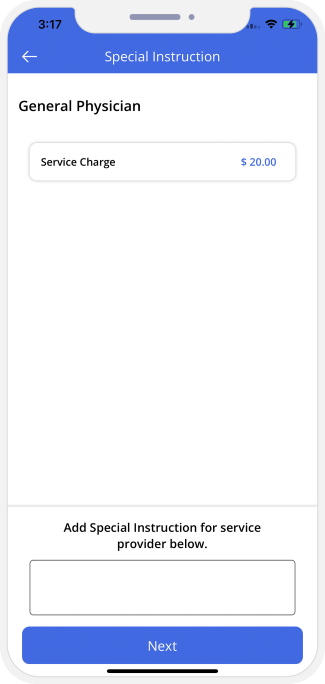
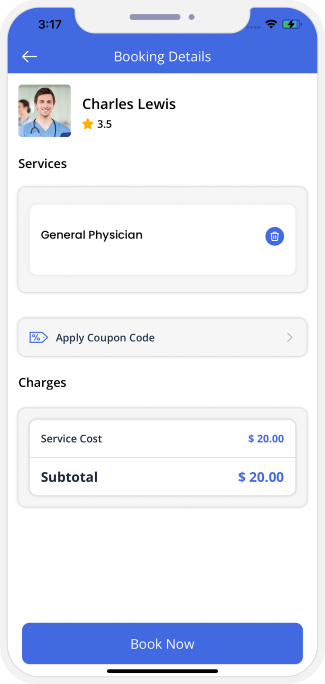
 Booking and Payment
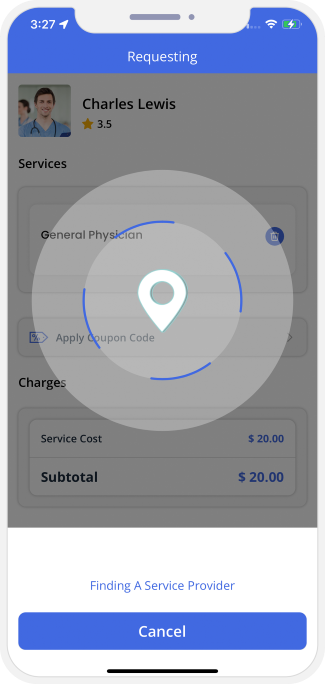
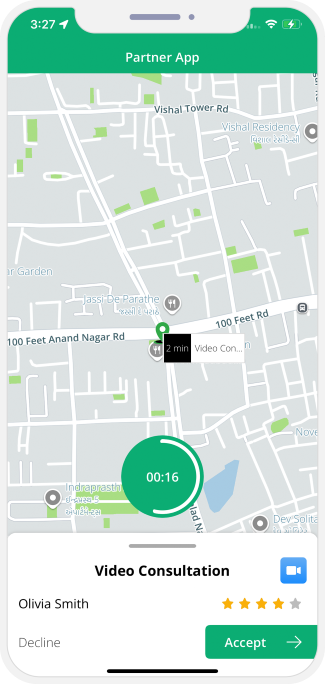
Job Request Accepted
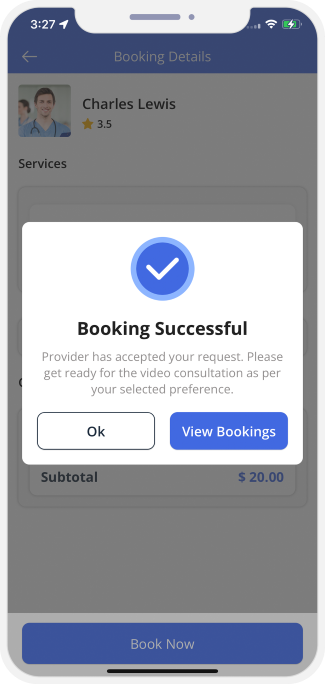
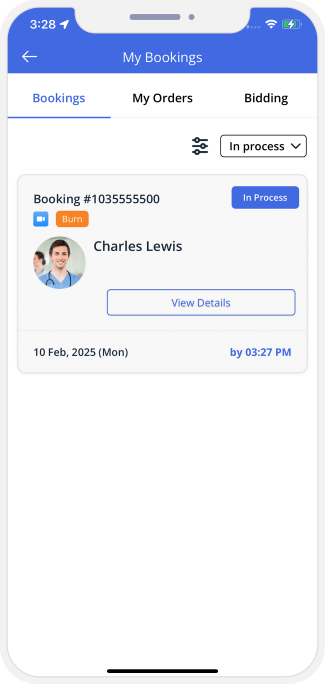
Start Service
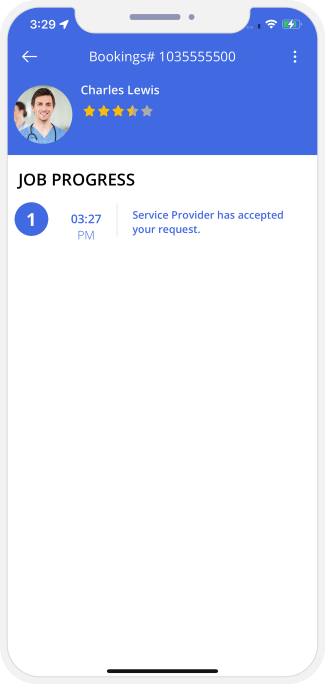
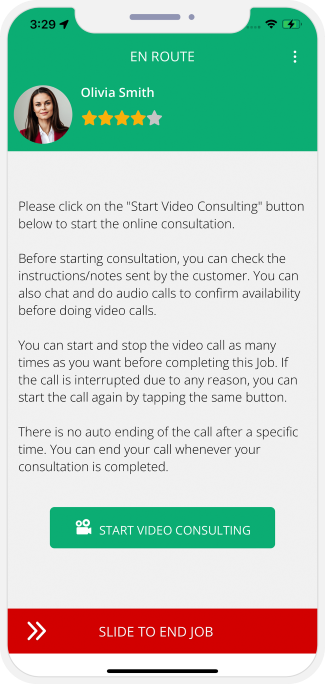
Video Call
Patient and Doctor can connect to each other via Video call.
Invoice Summary
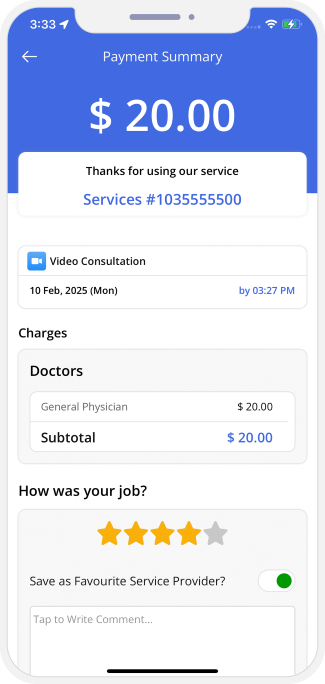

Component 13: Track your Family & Employees
Create New Tracking User
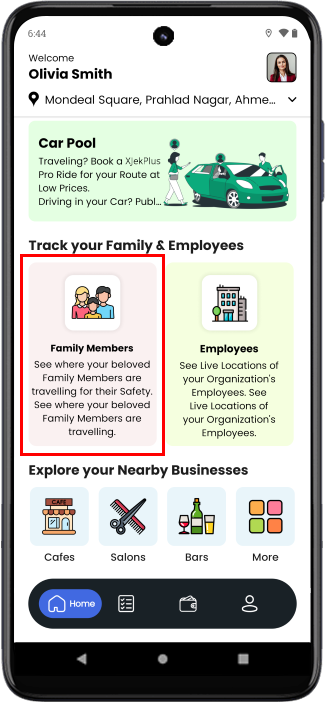
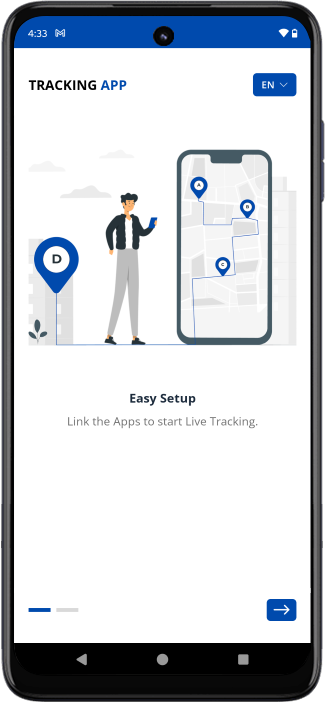

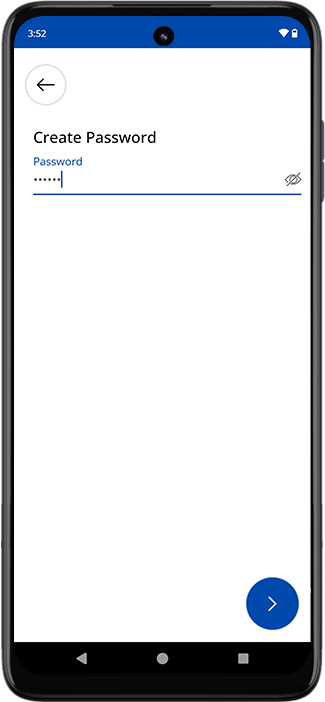
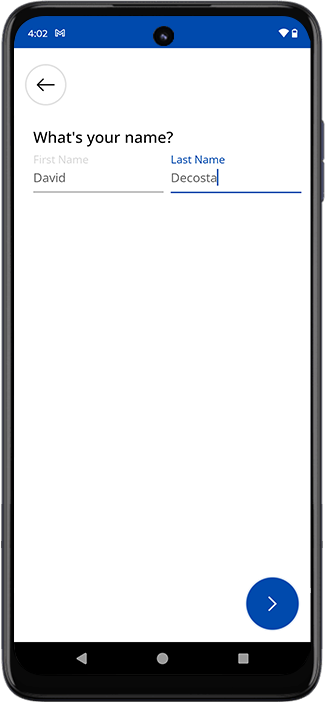
Pairing Your Tracking Account
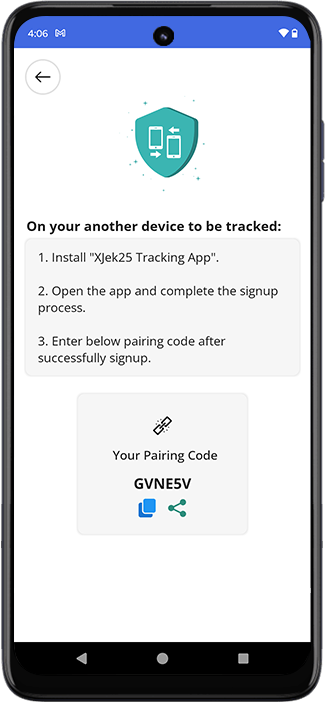
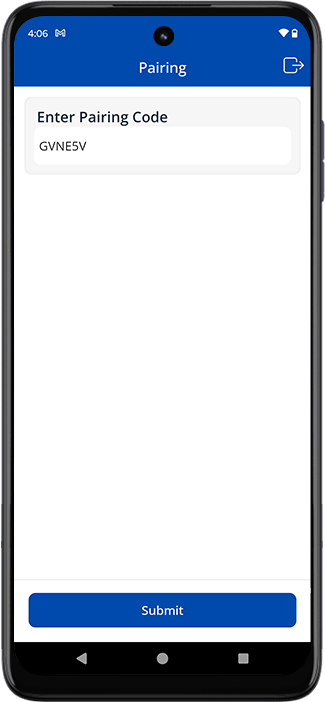
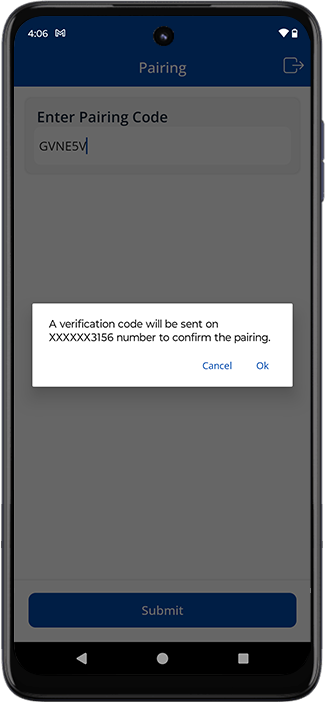
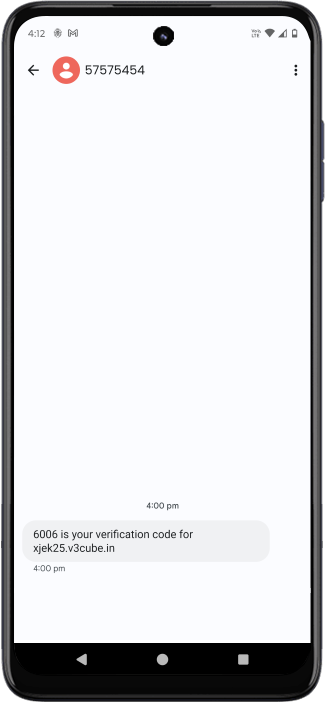
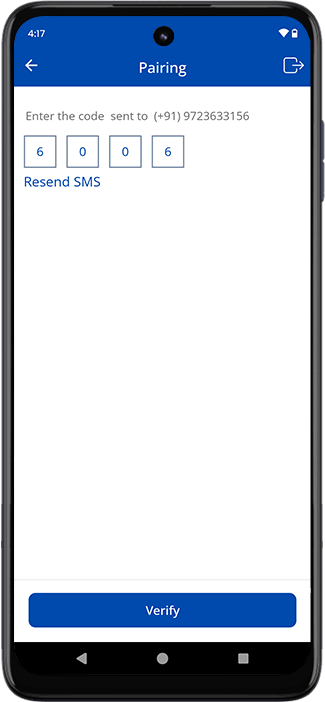
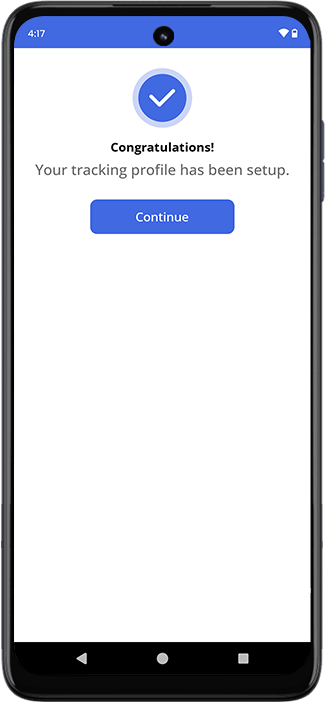
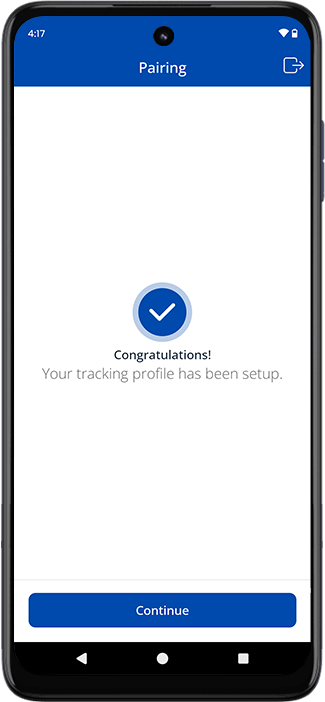
Tracking Your Family Members / Employees
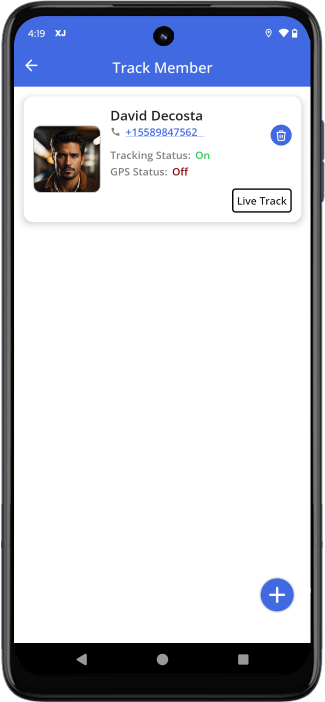
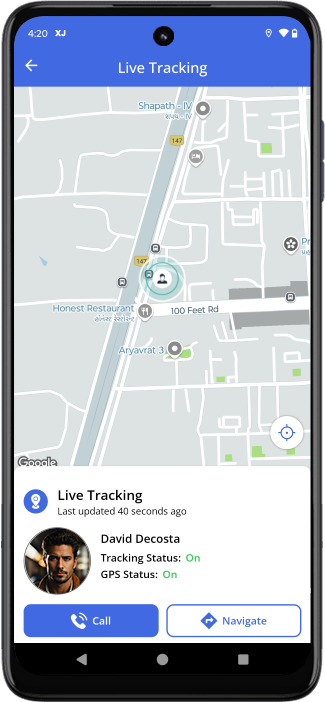
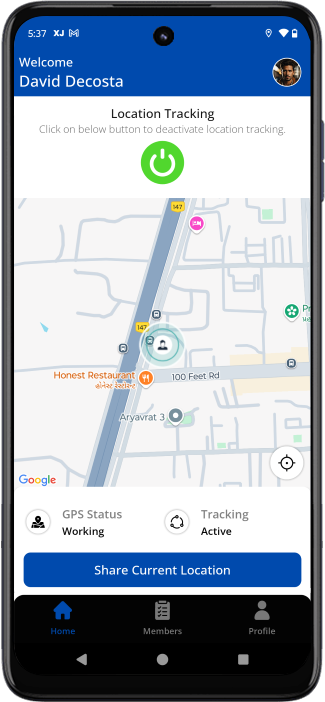
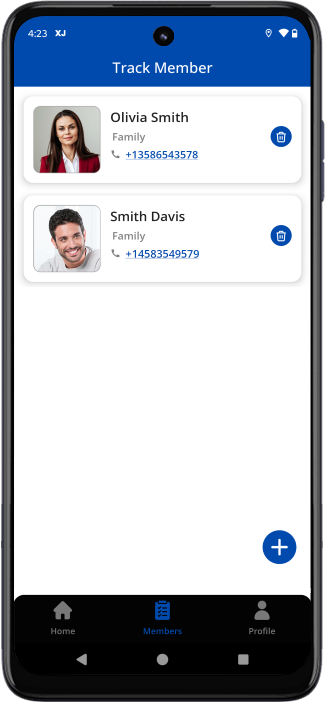
Component 14: Explore your Nearby Businesses
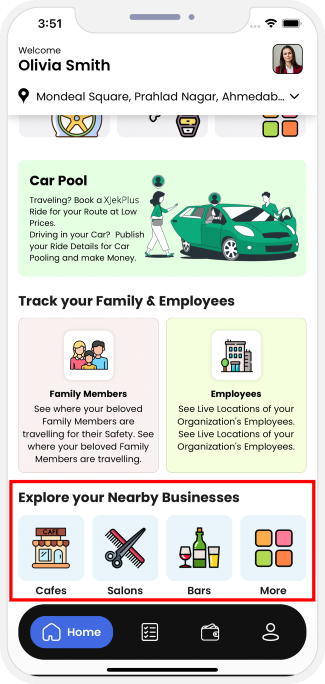
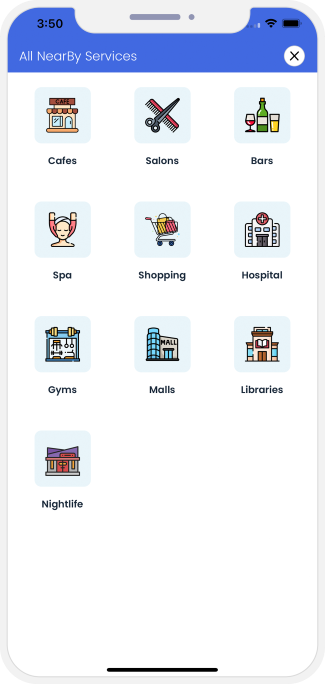
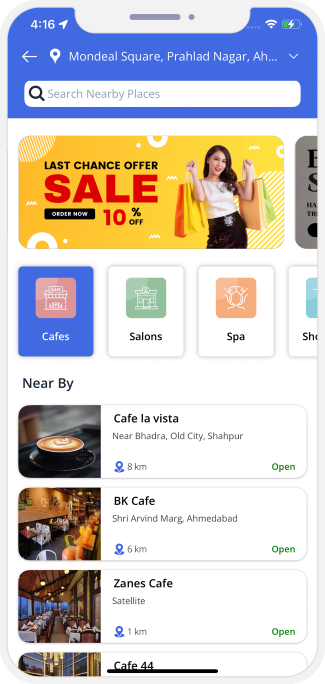
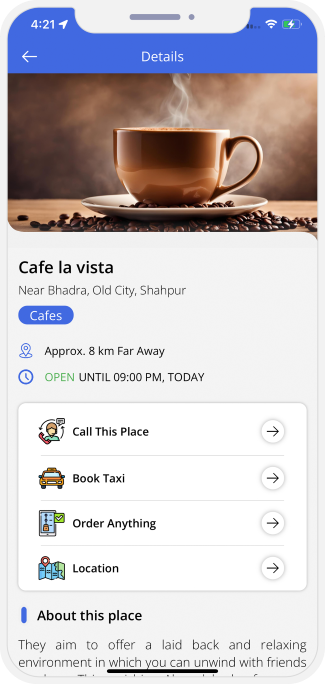
Component 15: Beauty Services
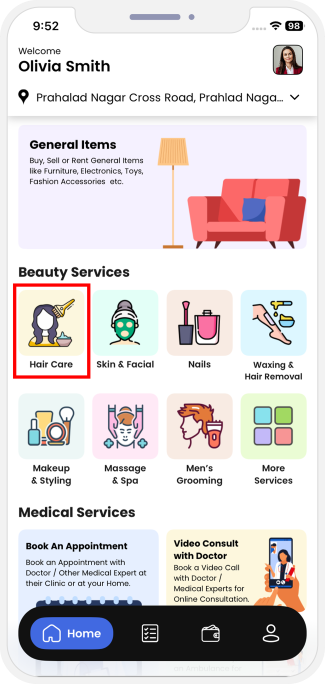
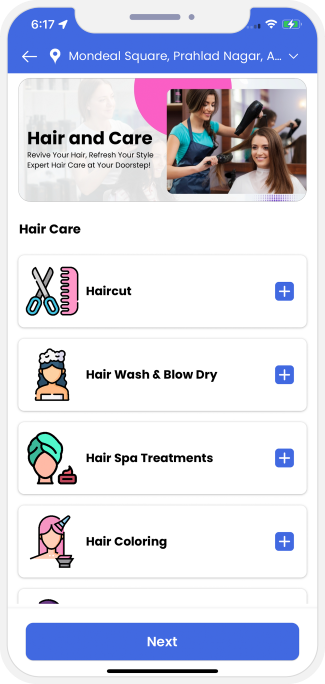 Pick the Service You Need (For example: Hair Care)
Book Service Provider
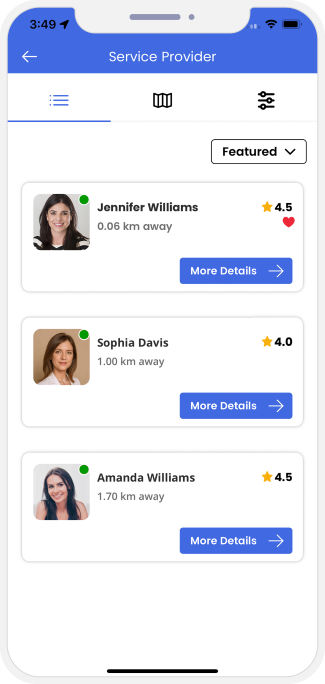

Manage Services
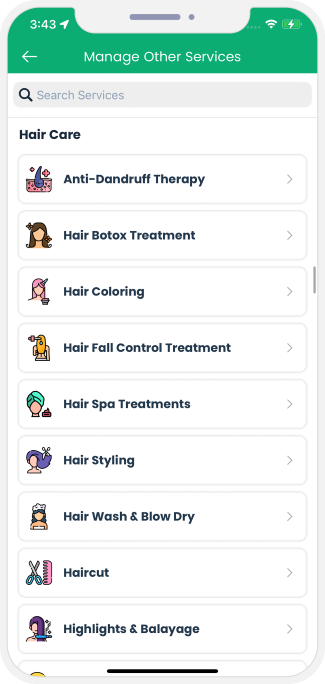
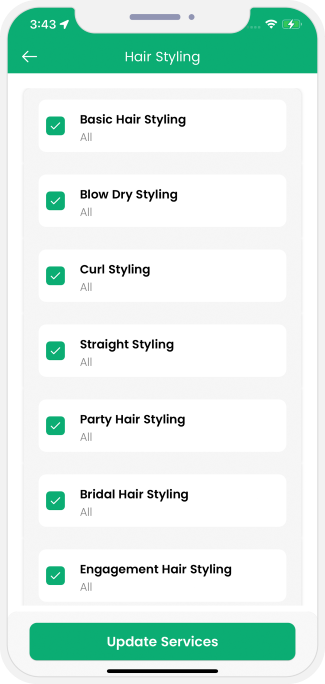

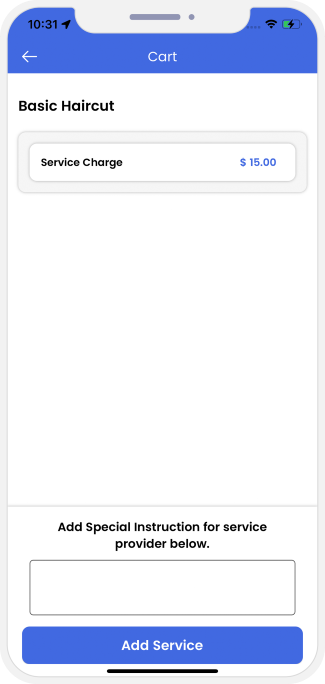 Profile and Booking Summary
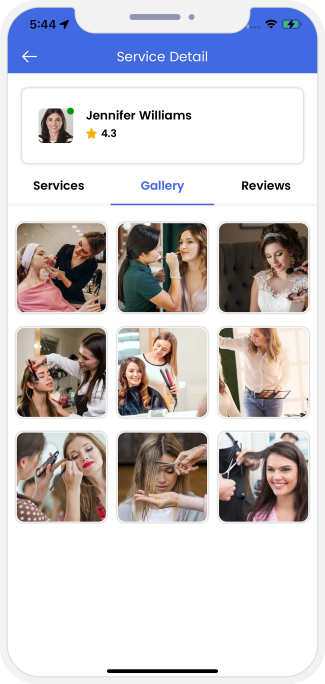
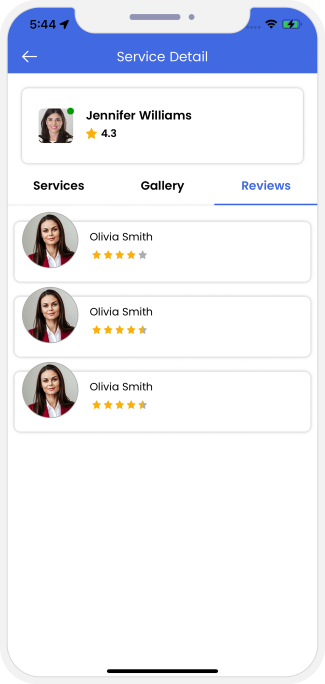 View Gallery and Reviews
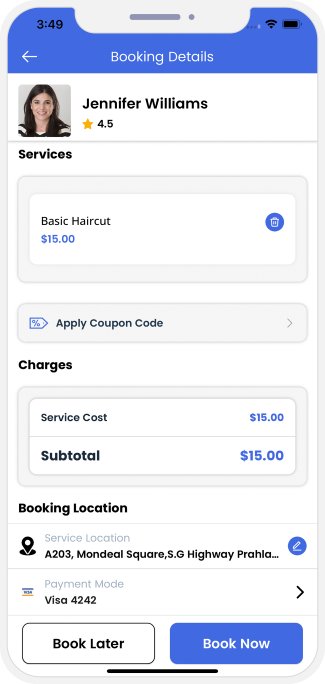
 View Booking Summary and Pay
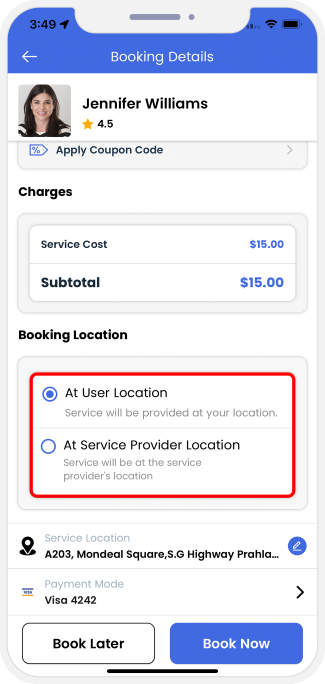

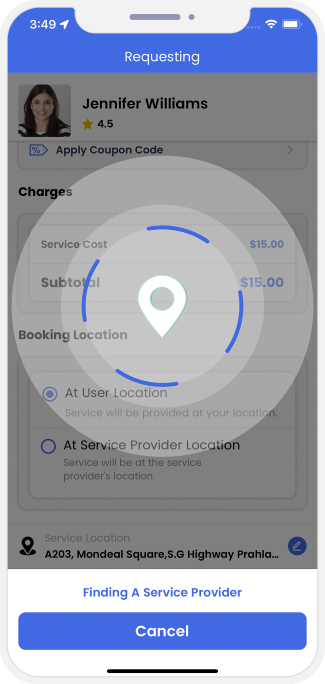
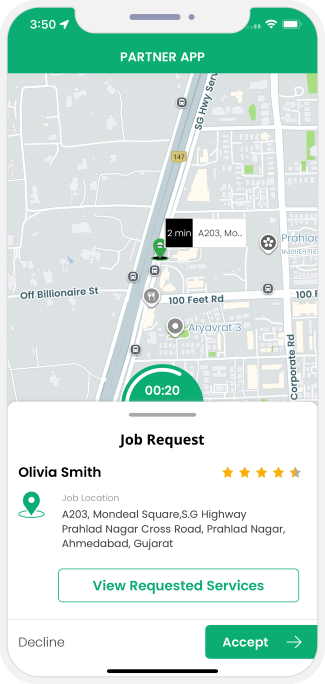
Job Request Accepted
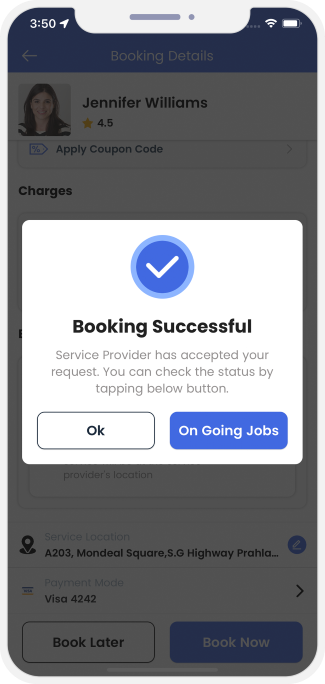
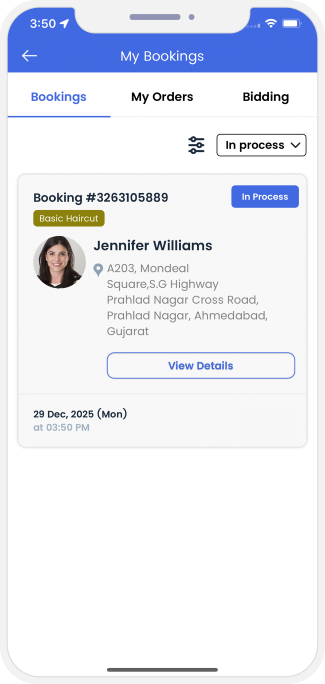
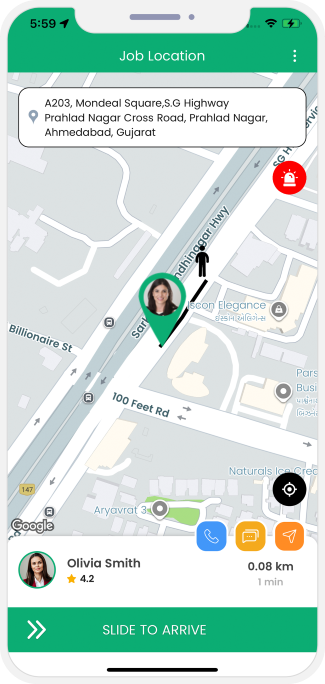
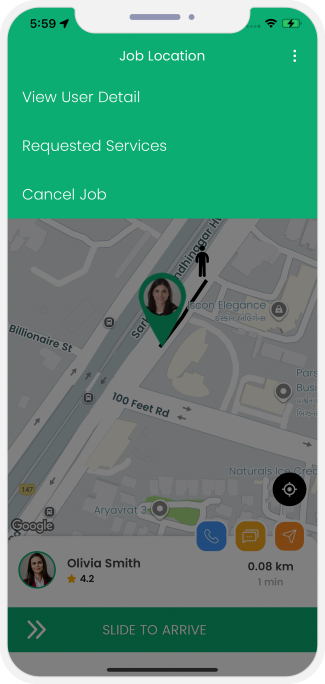
Service Provider Arrives at Job Location
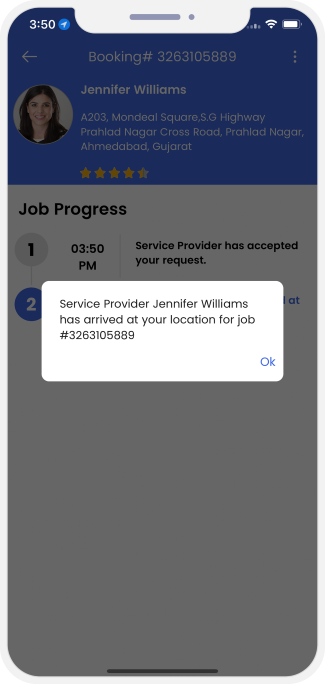
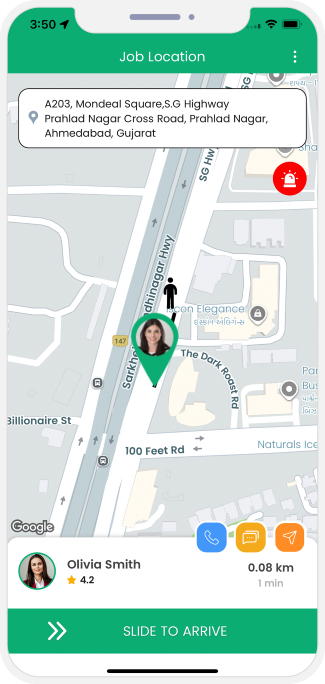
Job started
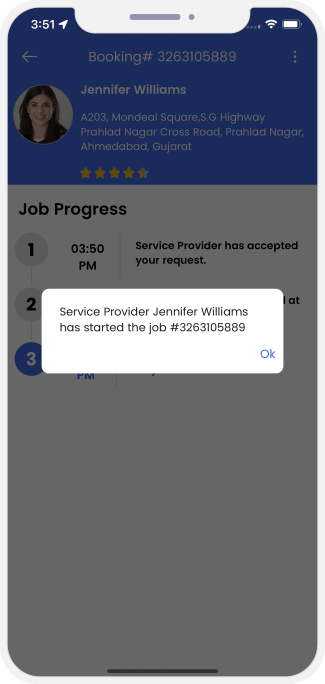

Job completed
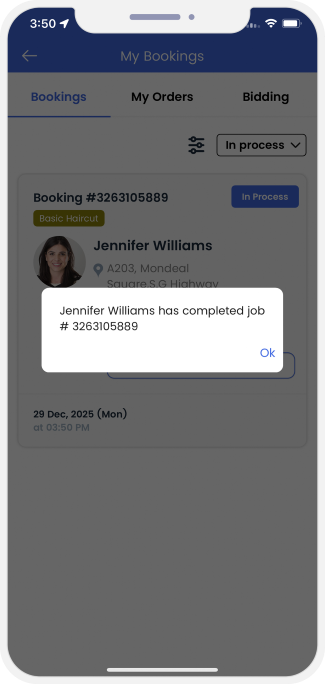
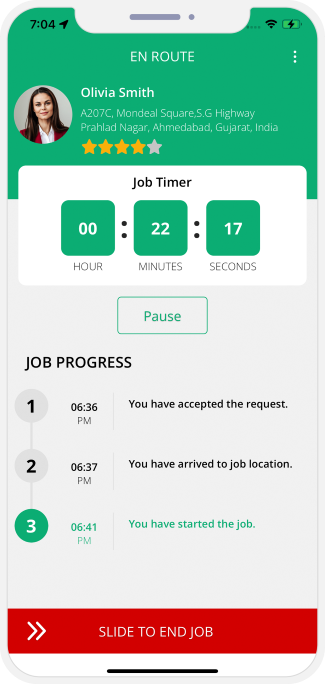
Reviews and Ratings
The Review and Rating section present on the app of the user and service provider both help both provide reviews to
each other as well as provide rating to each other based on the experience of services.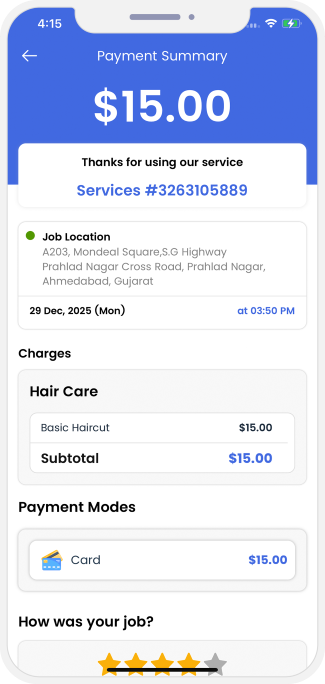
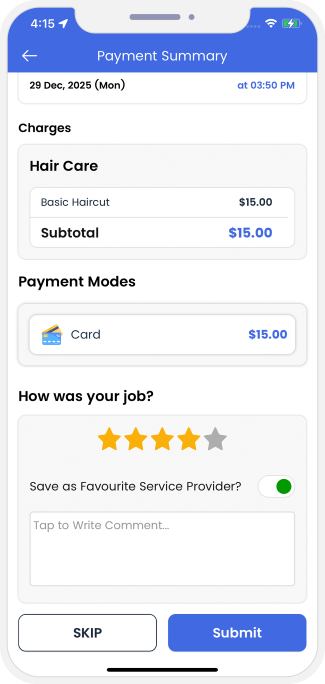
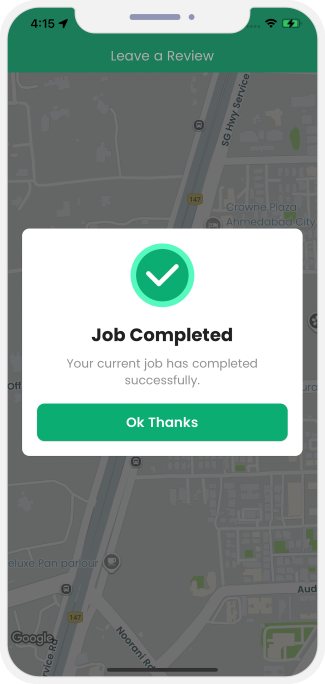
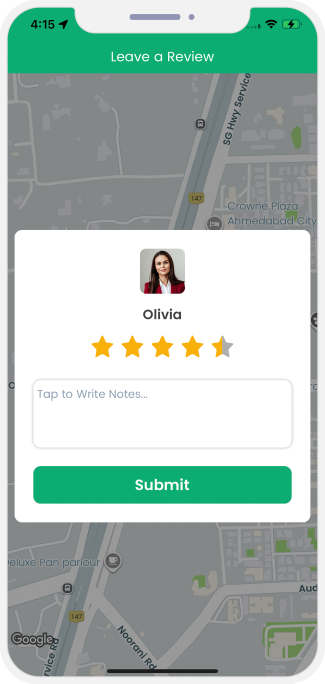
Payment
Component 16: Pet Services
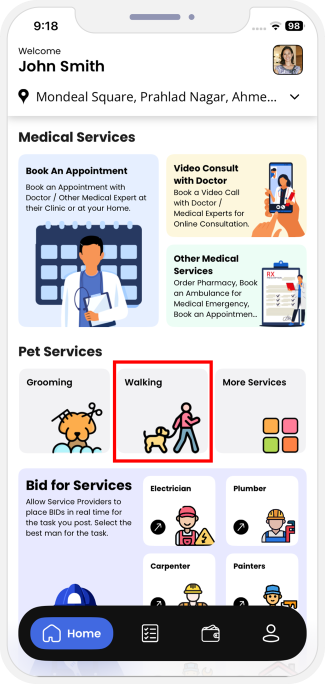
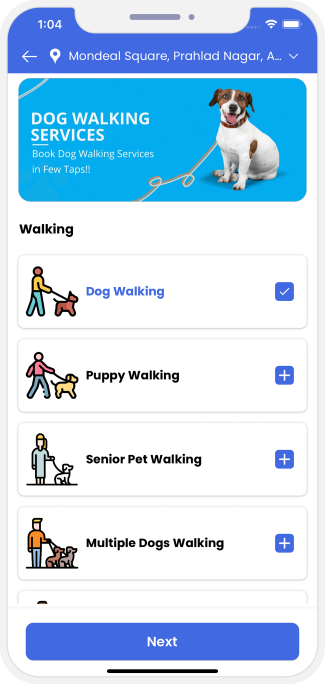 Select the Service You Want (For example: Pet Walking)
Book Service Provider
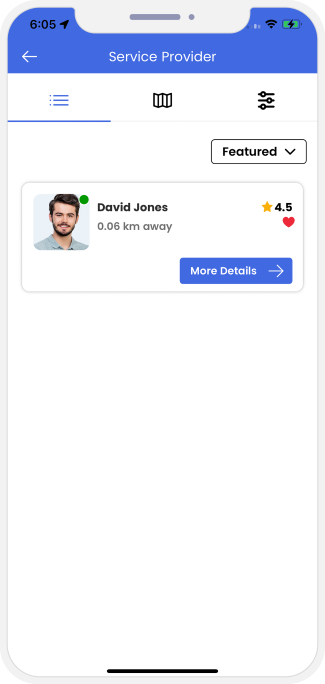
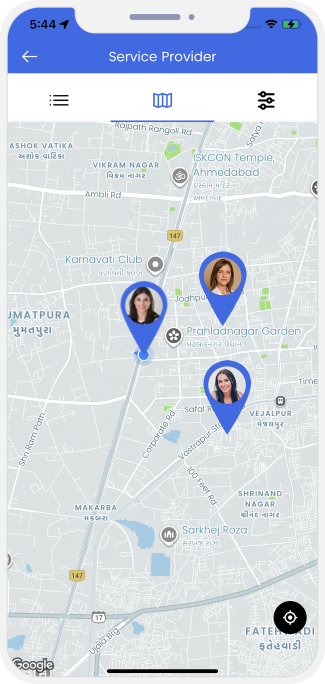
Manage Services
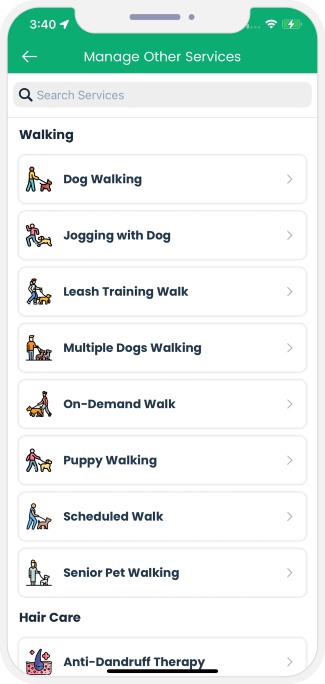

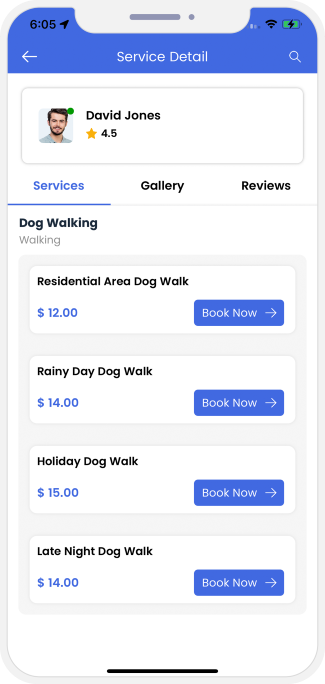
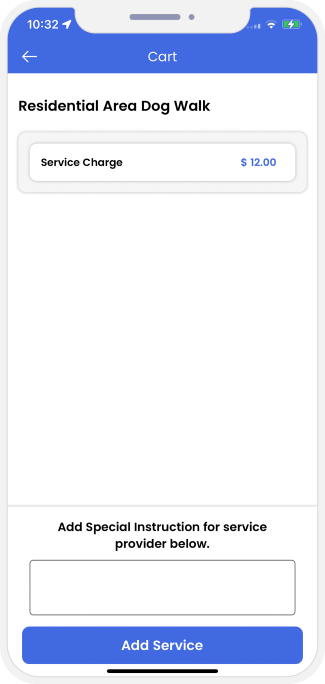 Profile and Booking Summary
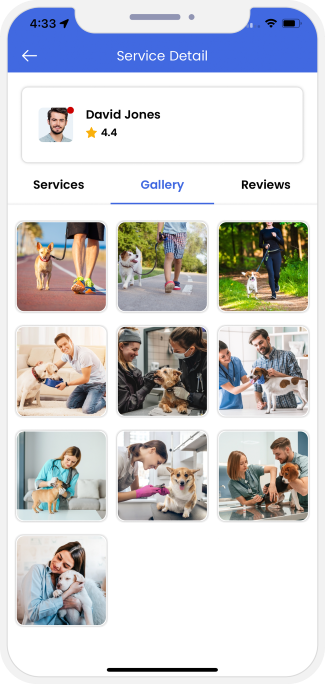
 View Gallery and Reviews
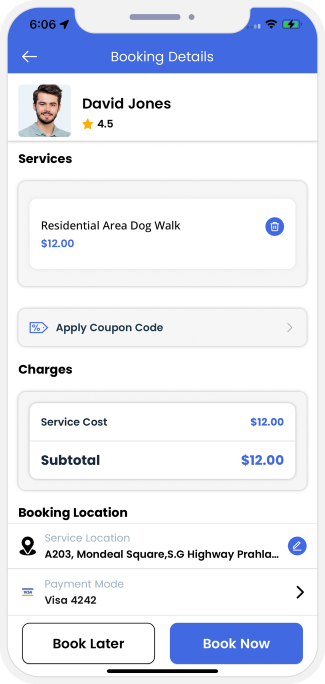
 View Booking Summary and Pay
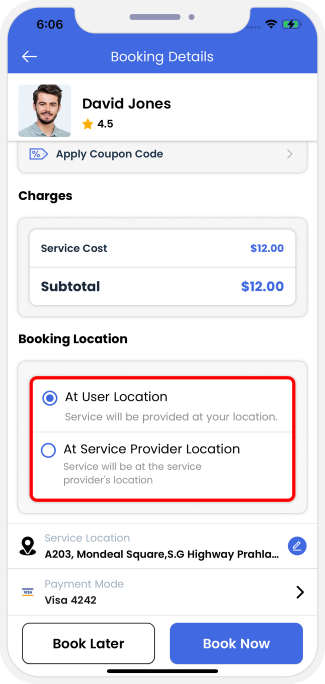

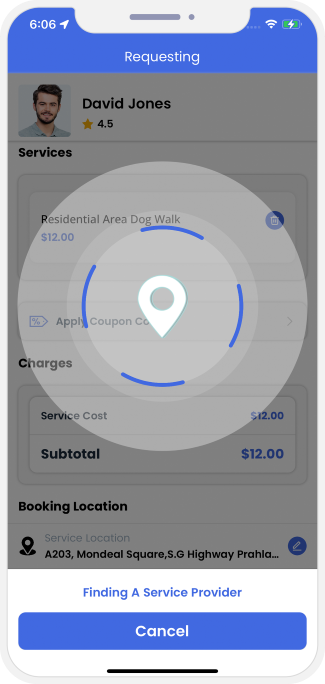
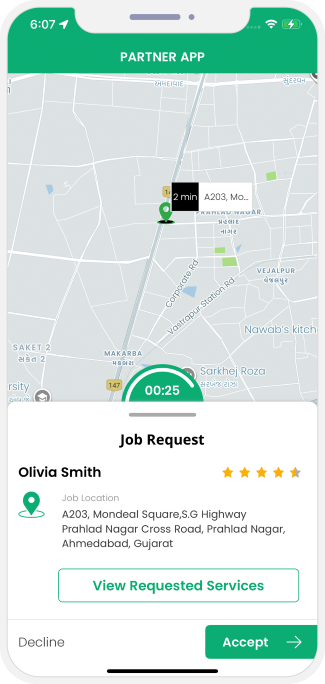
Job Request Accepted
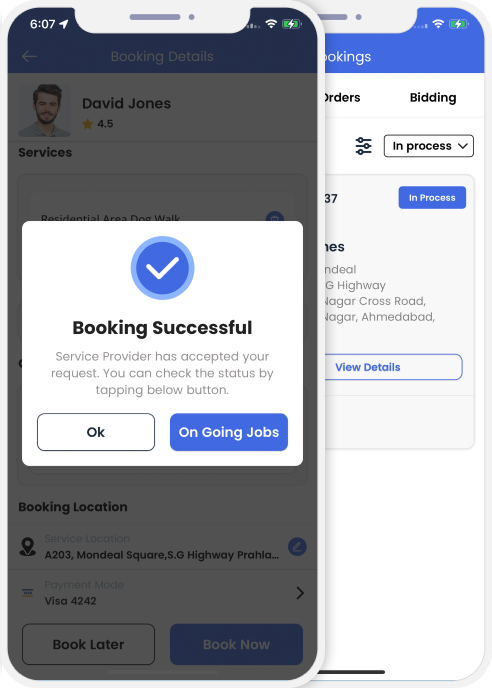
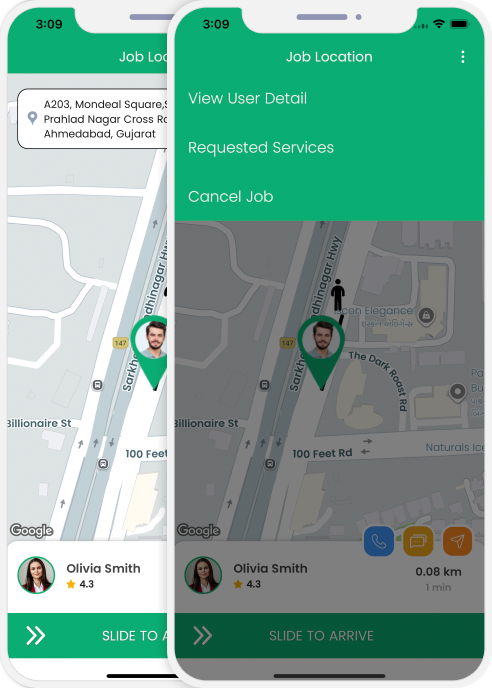
Service Provider Arrives at Job Location
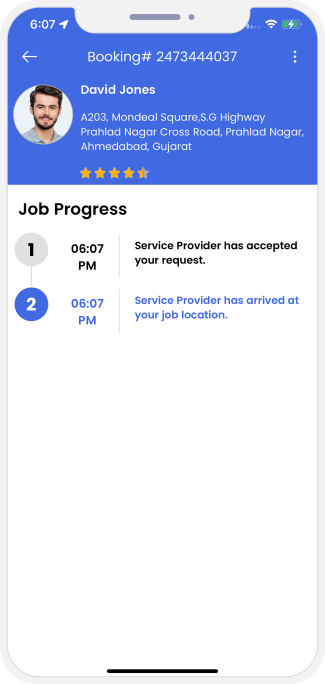
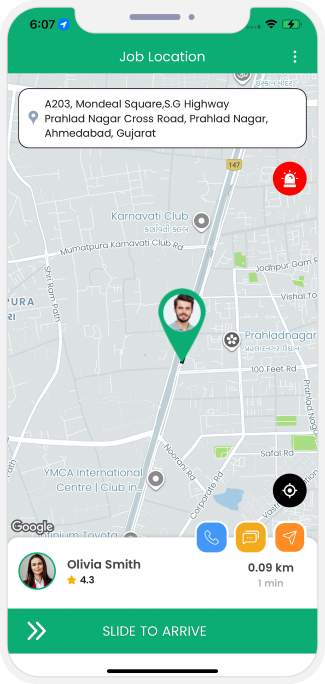
Job started
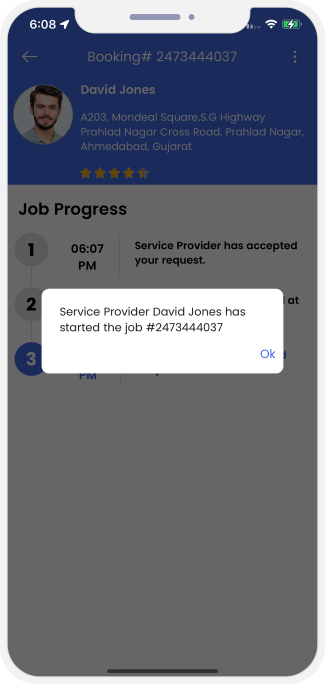
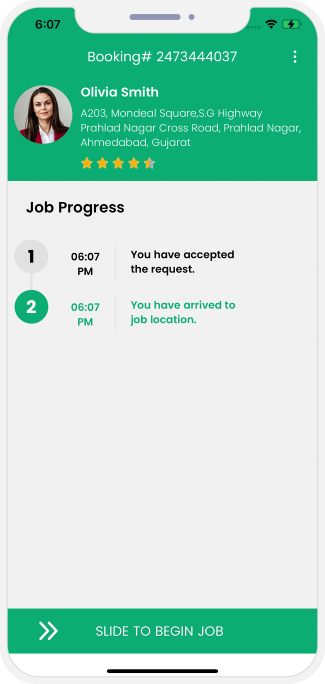
Job completed
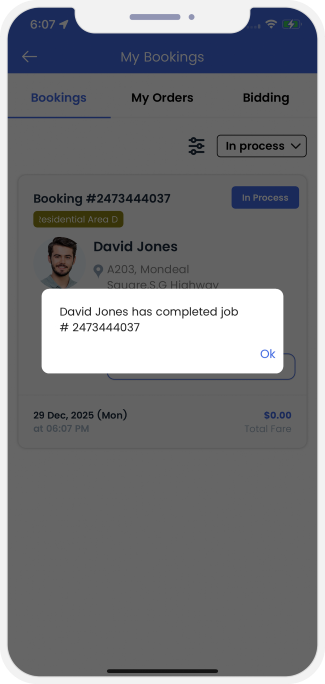
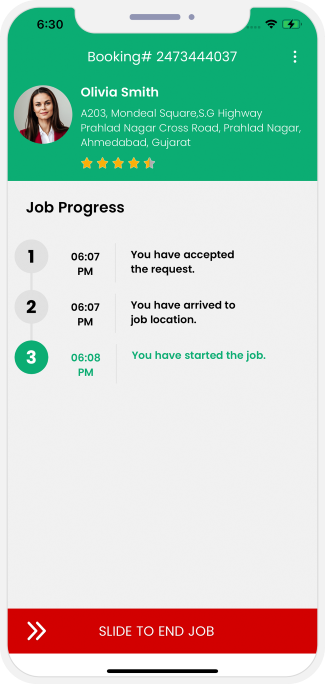
Reviews and Ratings
The Review and Rating section present on the app of the user and service provider both help both provide reviews to
each other as well as provide rating to each other based on the experience of services.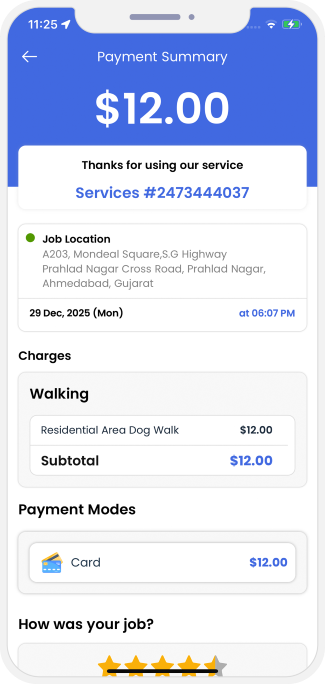
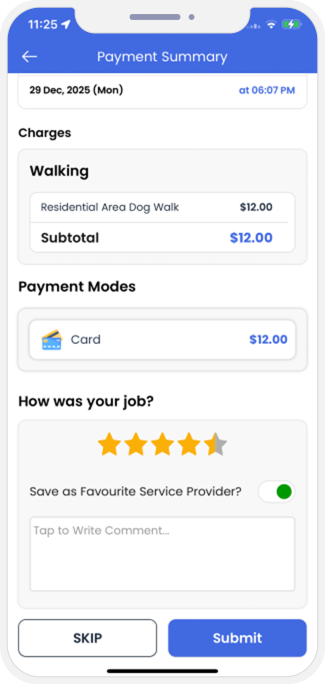
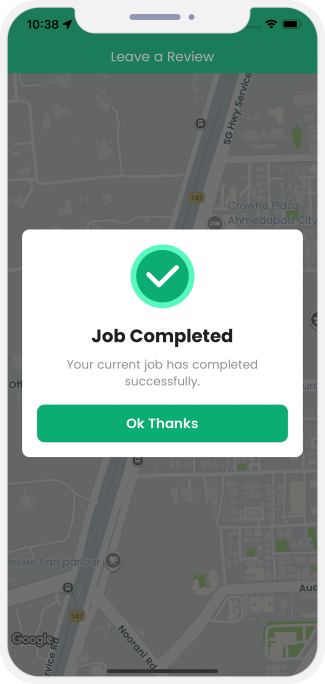

Payment
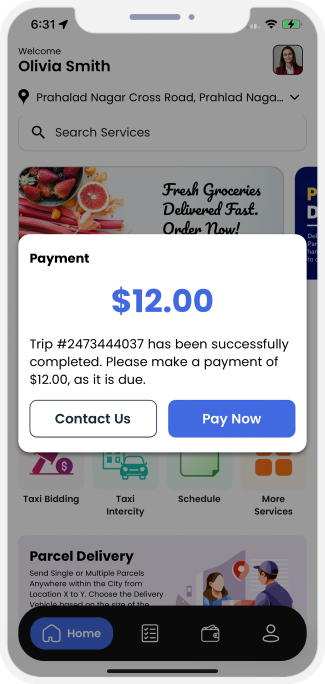
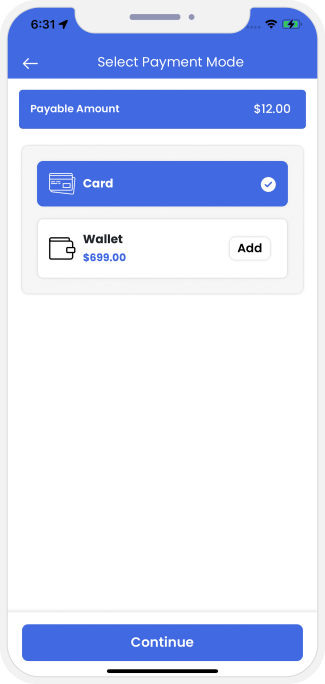
Component 17: Car Care Services
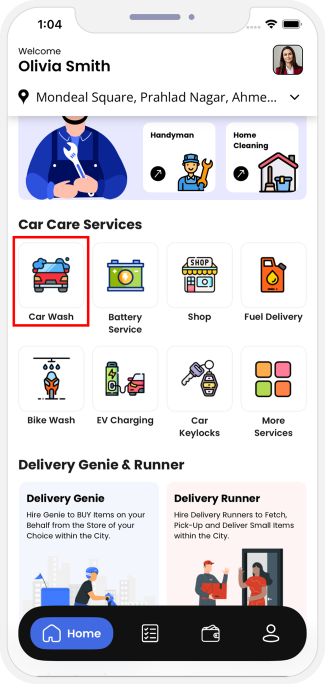
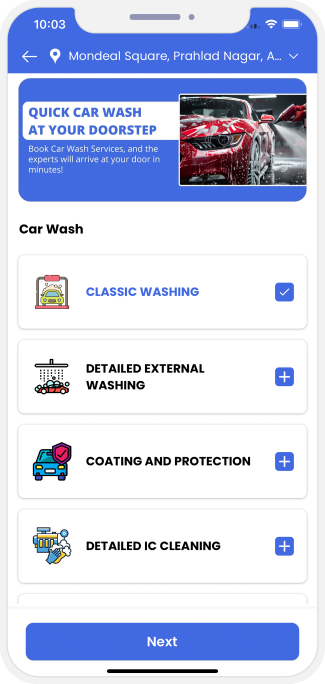 Pick the Service You Need (For example: Hair Care)
Book Service Provider

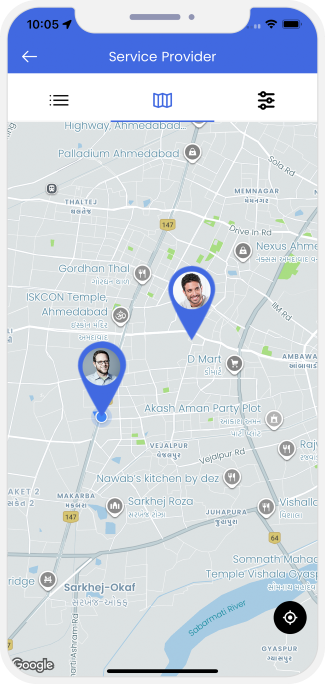
Manage Services
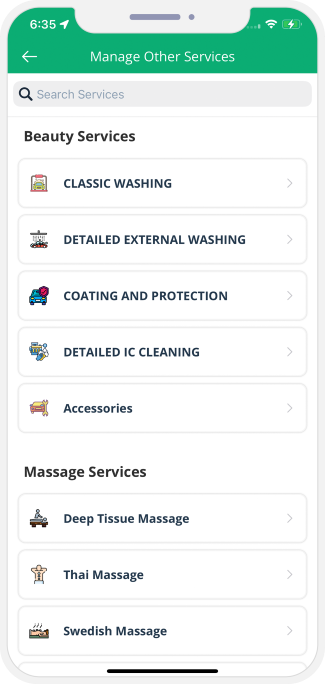
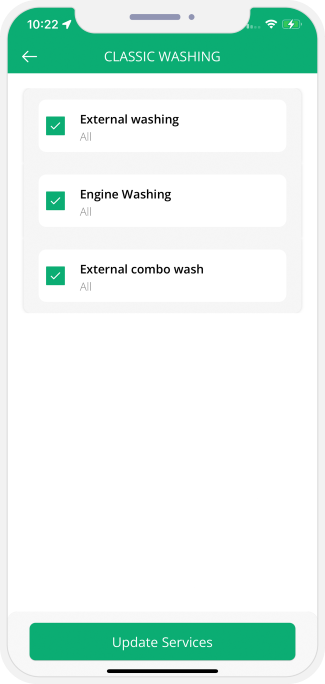
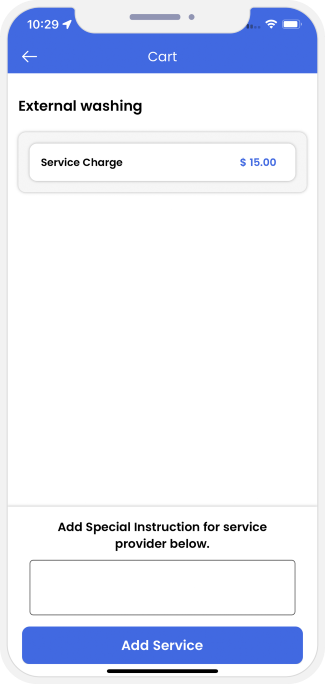
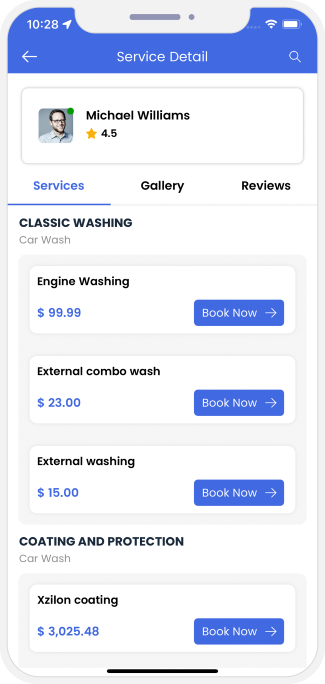 Profile and Booking Summary
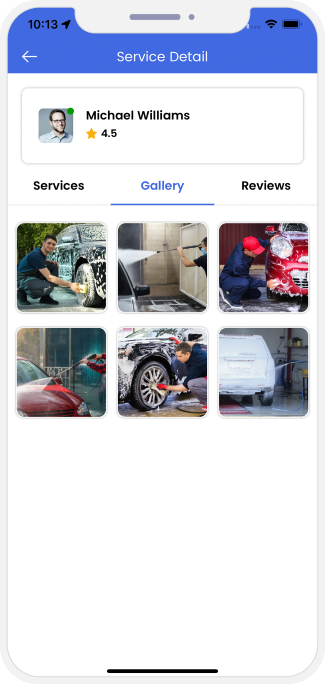
 View Gallery and Reviews
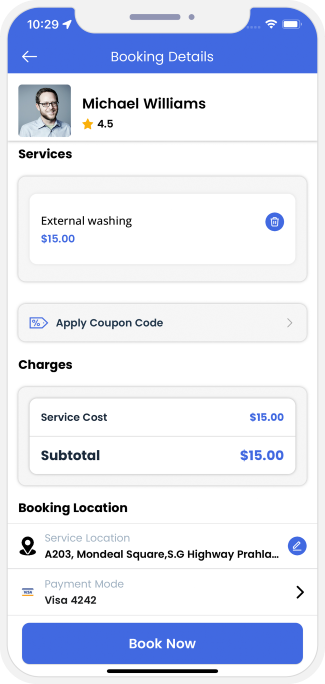
 View Booking Summary and Pay


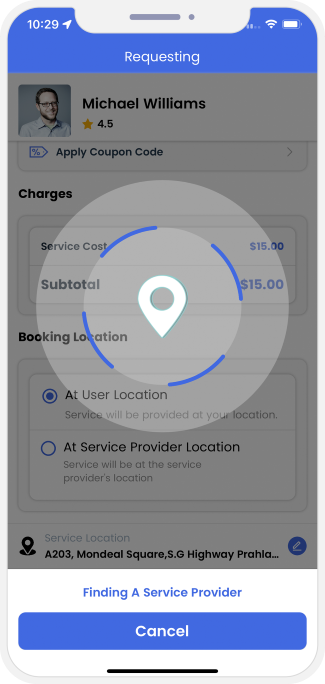

Job Request Accepted

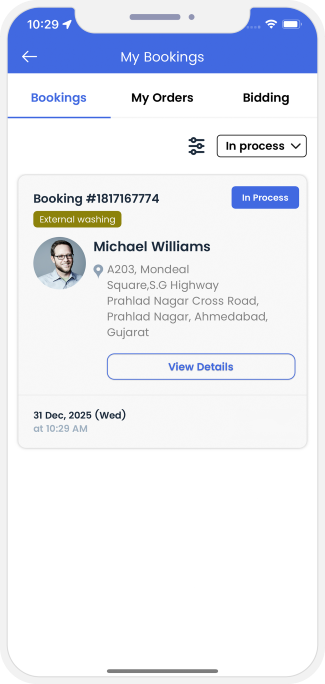


Service Provider Arrives at Job Location
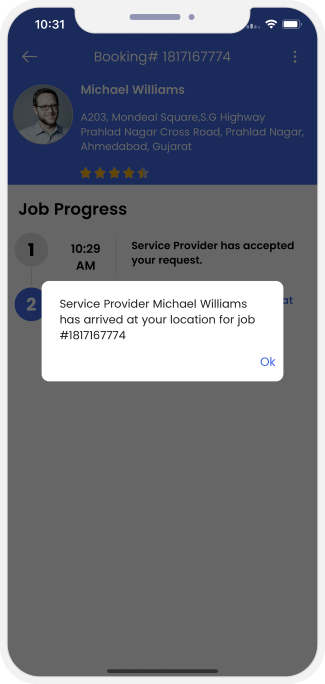

Service Provider Uploads Photo before Service
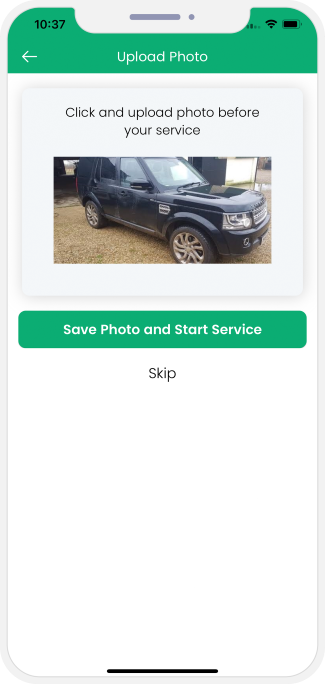
Job started

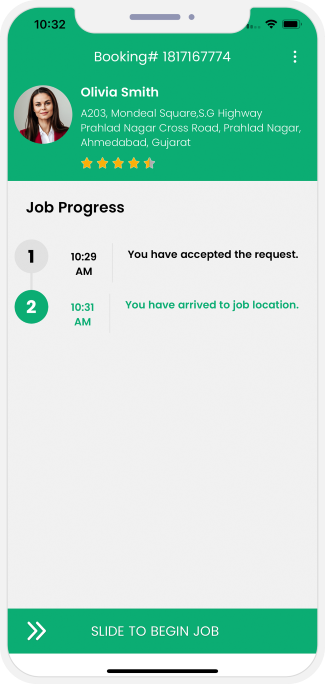
Service Provider Uploads Photo After Services
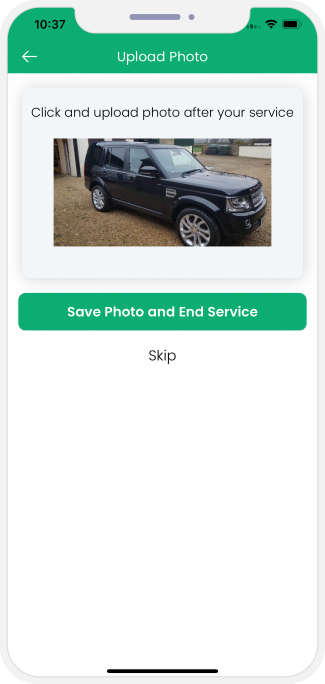
Job completed
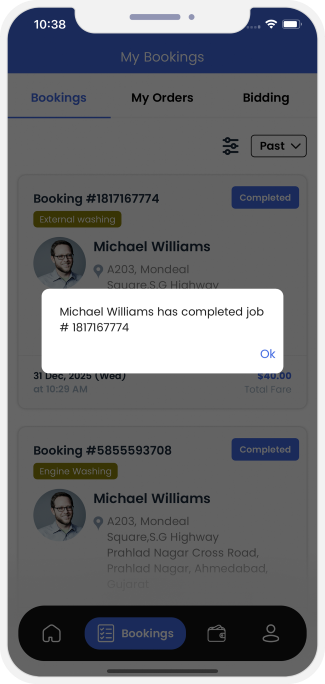
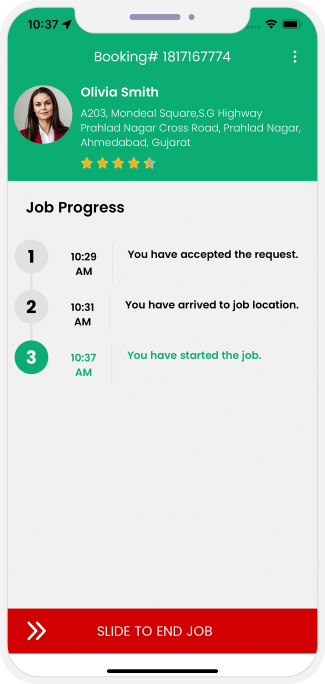
Reviews and Ratings
The Review and Rating section present on the app of the user and service provider both help both provide reviews to
each other as well as provide rating to each other based on the experience of services.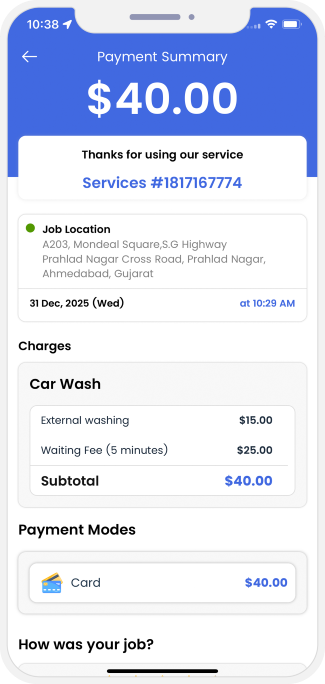
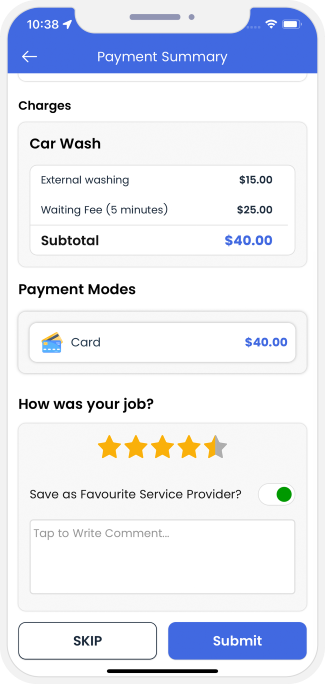


Payment

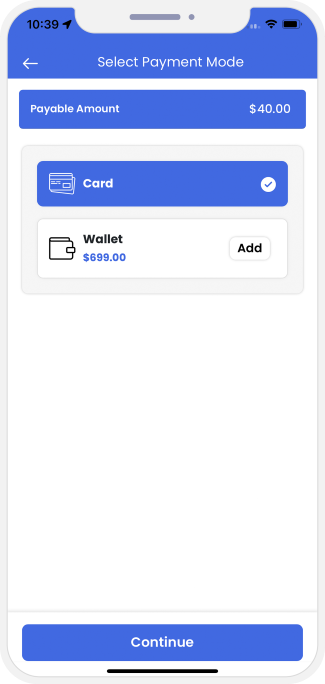
Component 18: Towing Services
Booking of Tow Truck Services
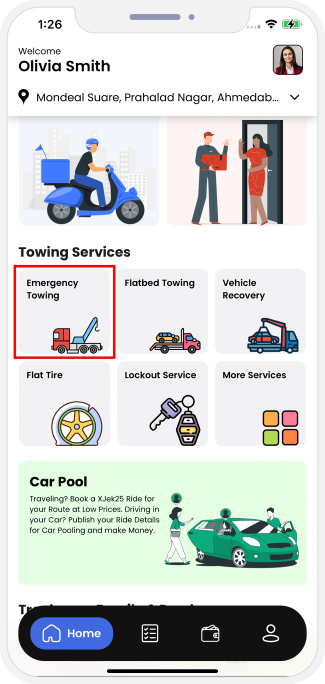 User can choose the services they need from the categories listed on the Tow Truck.
BOOK A Tow Truck Driver
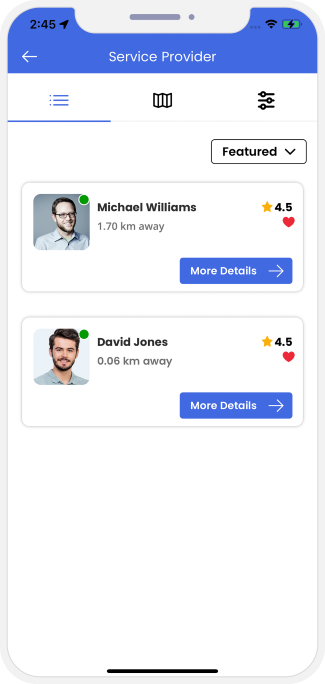
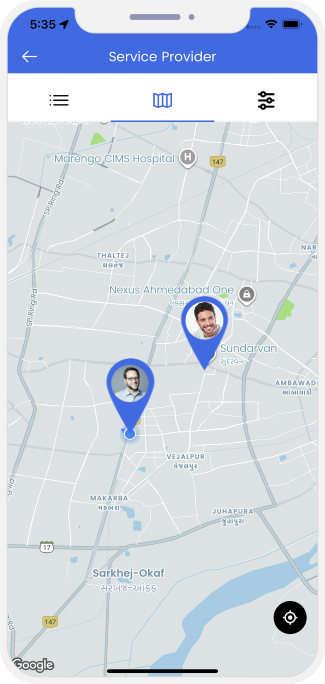 View Nearby/Available Tow Truck Drivers
Manage Services
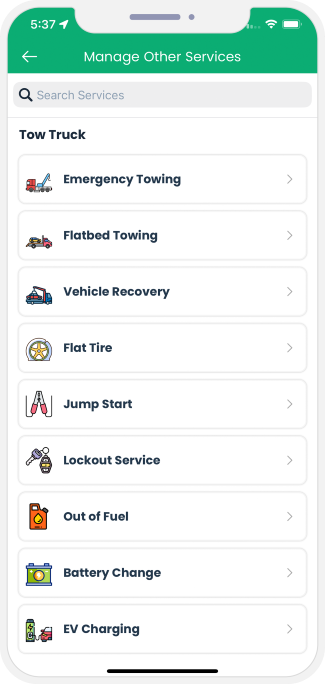
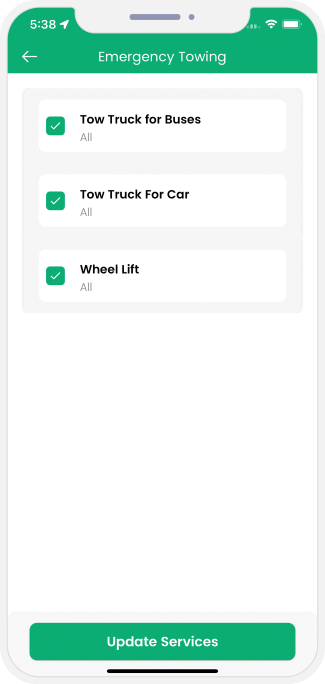 Manage Services from the Application for the Tow Truck Driver.
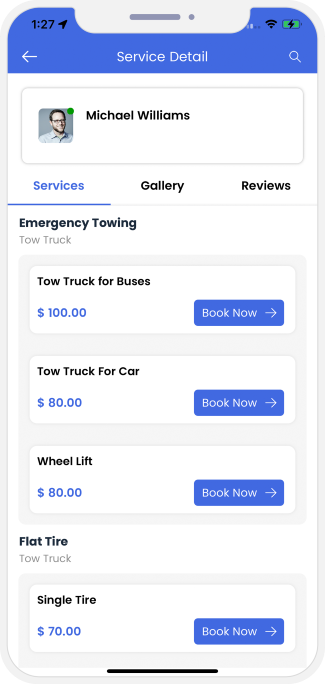
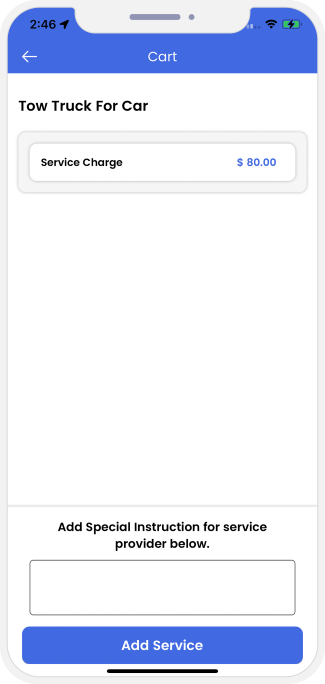 Check Tow Truck Drivers Profile - Select the Best Tow Truck Driver (For Users)

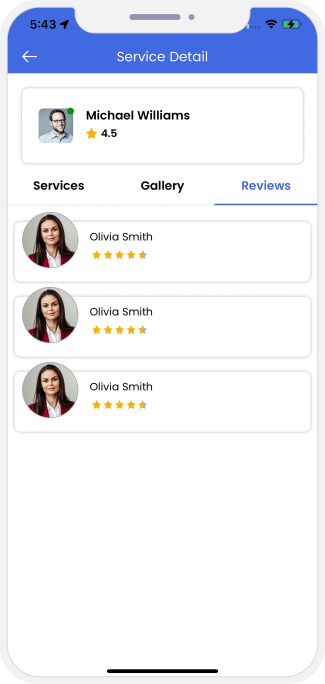 View Gallery and Reviews
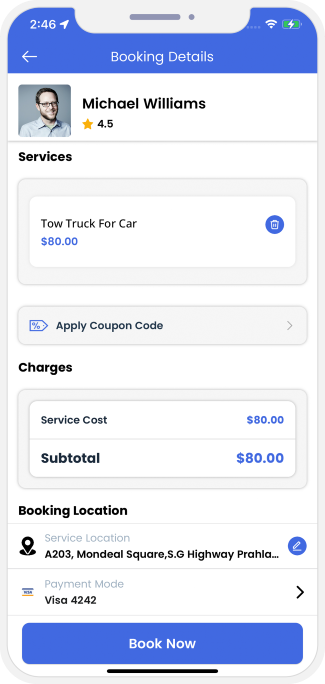
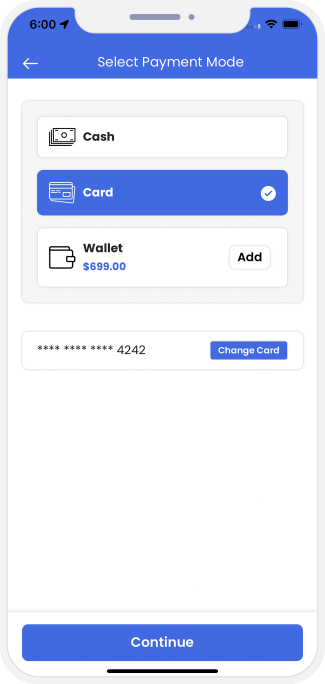 Provide Your Location and Make Payment (For Users)
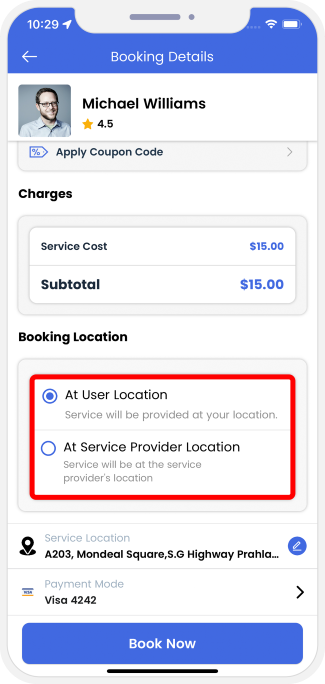
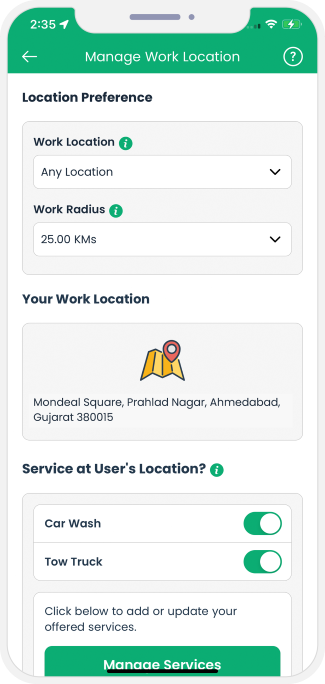
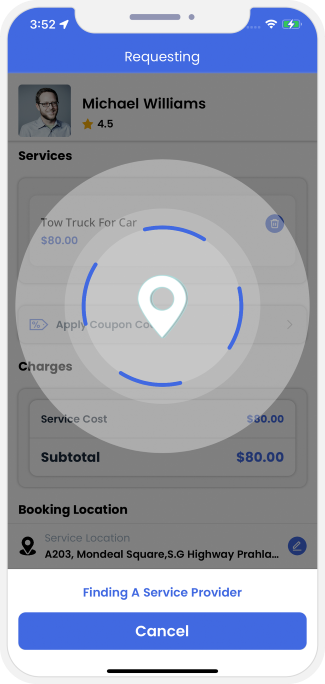
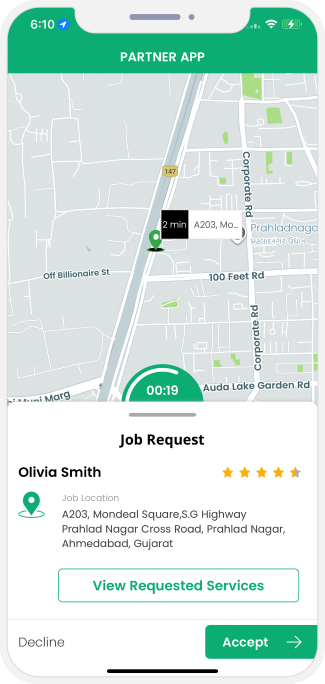
Job Request Accepted
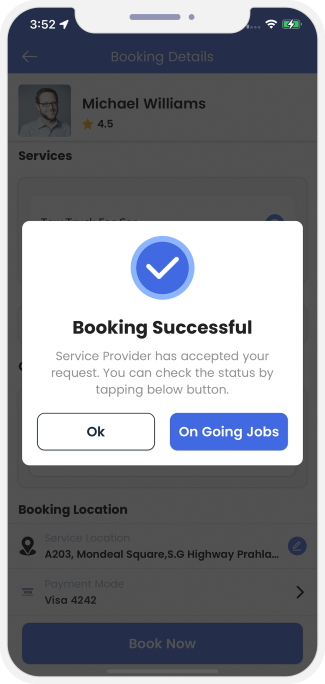

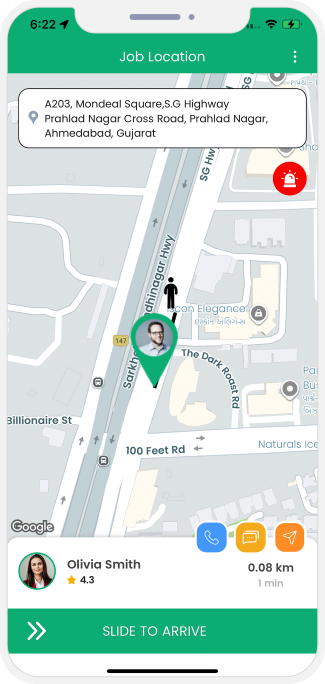
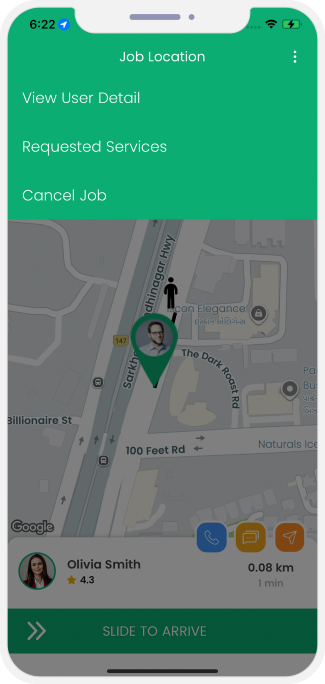
Tow Truck Driver Reaches Job Location
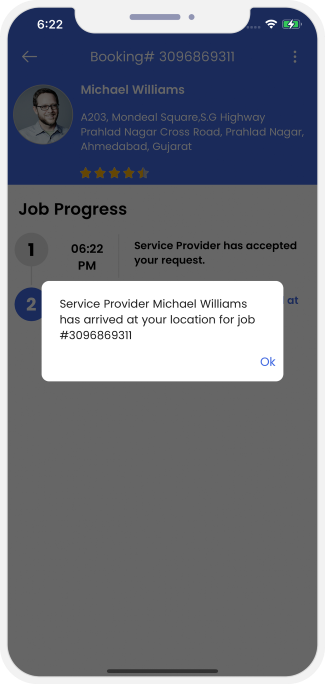

Job started
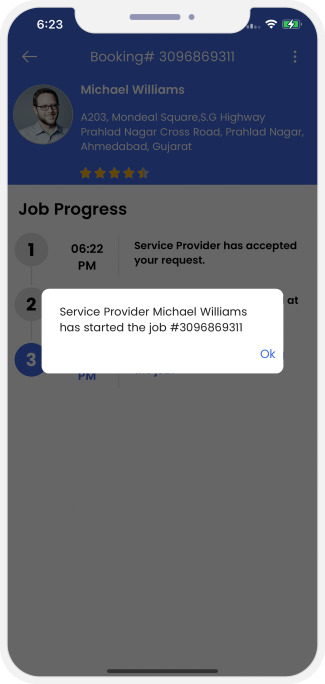
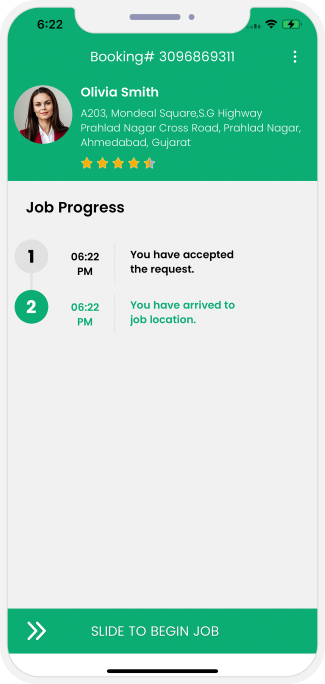
Job completed
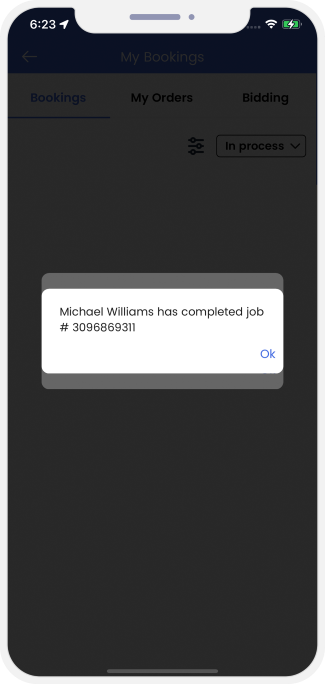
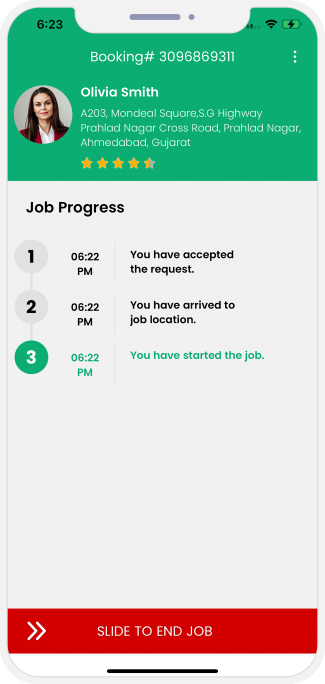
Additional Charges
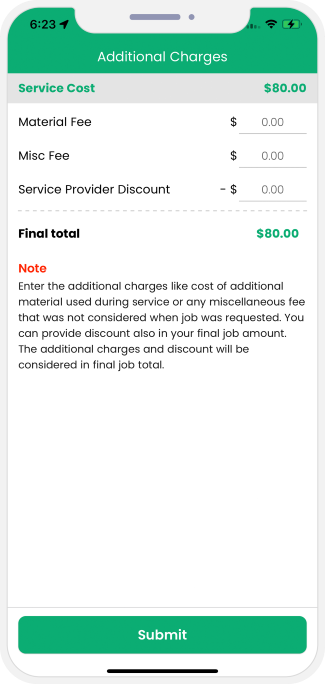
Invoice Summary
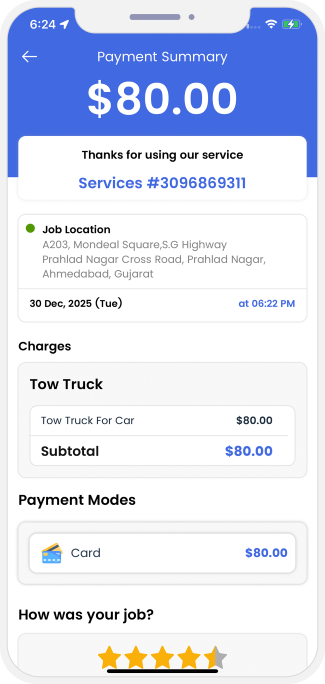
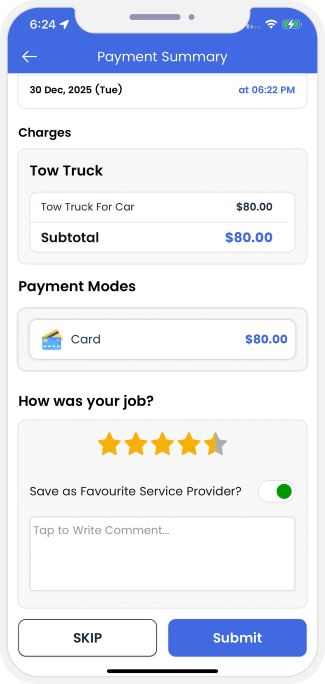
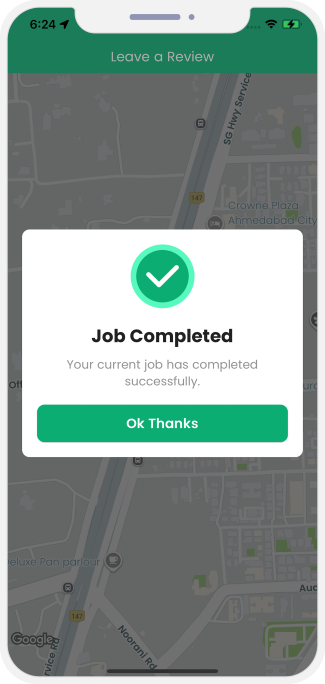

Payment

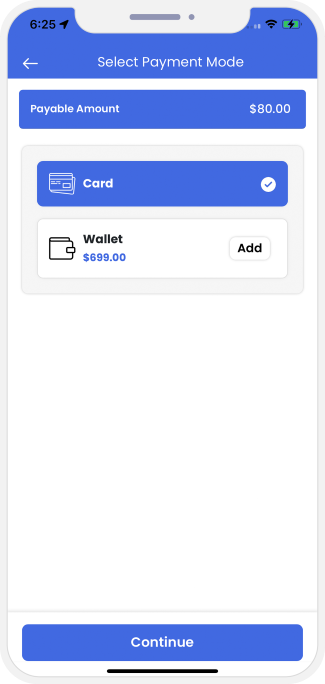
Other Features
Wallet Voucher
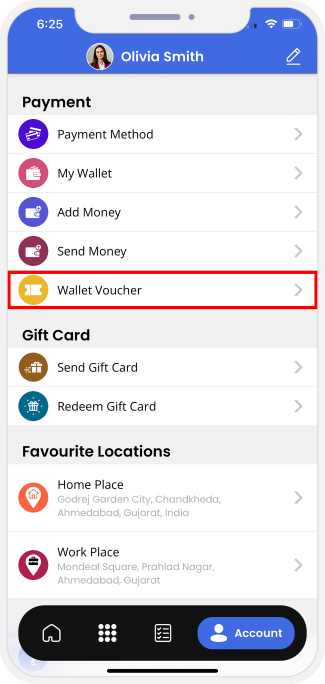
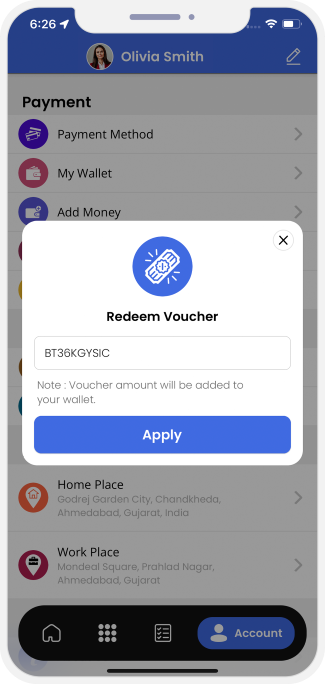
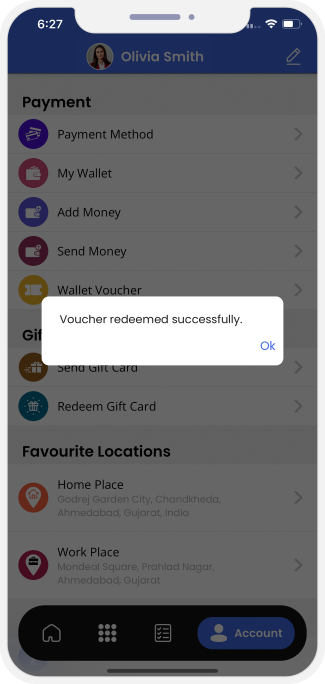
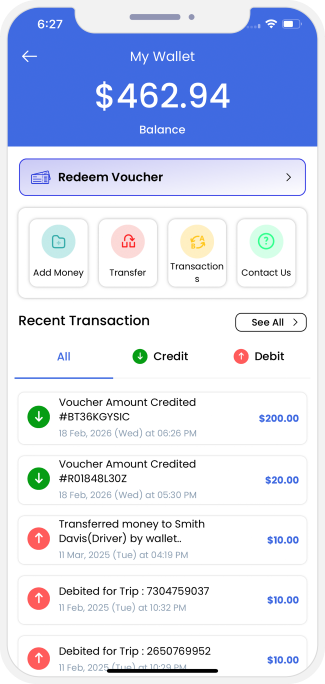
Driver App - Training Videos
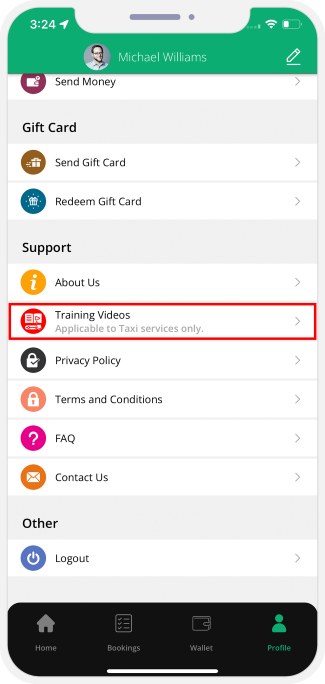
User App - Identity Verification
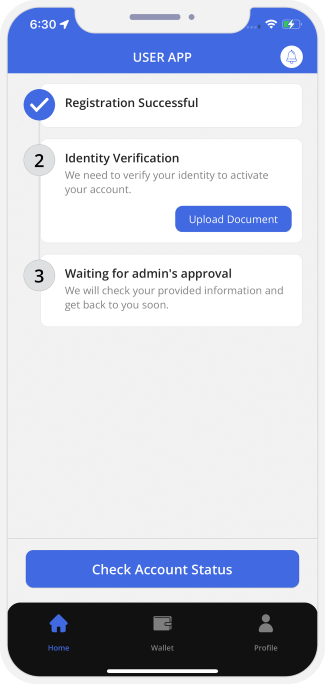
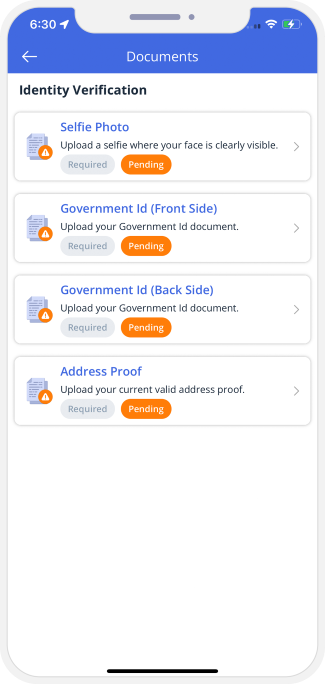
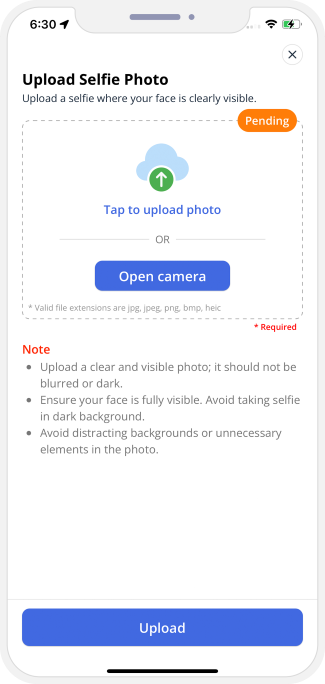
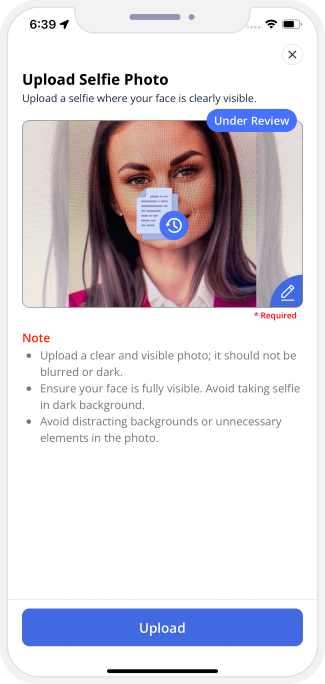
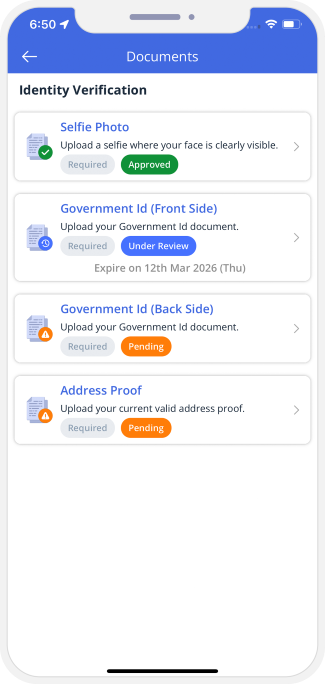
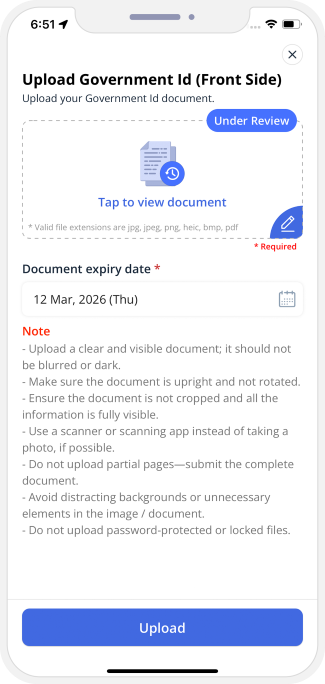
Driver / Service Provider App - Identity Verification
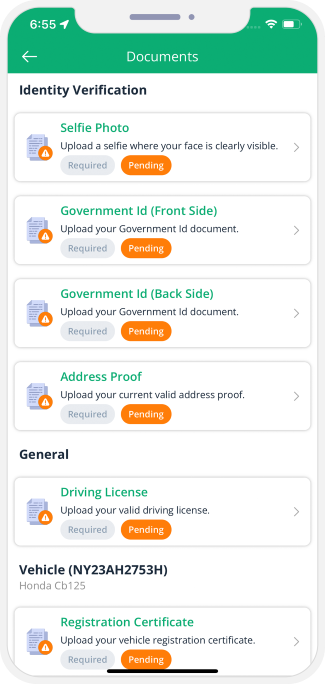

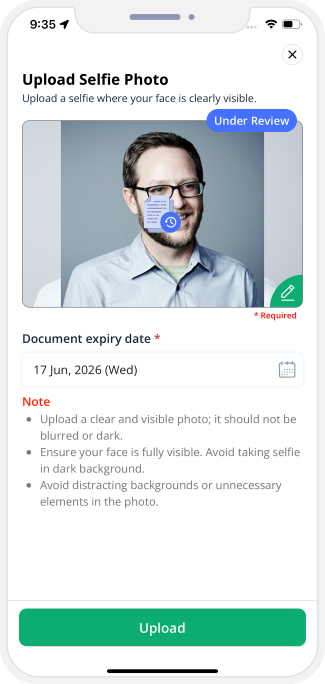
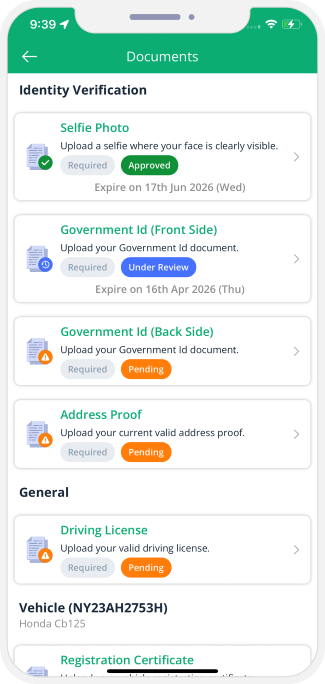
Store App - Identity Verification
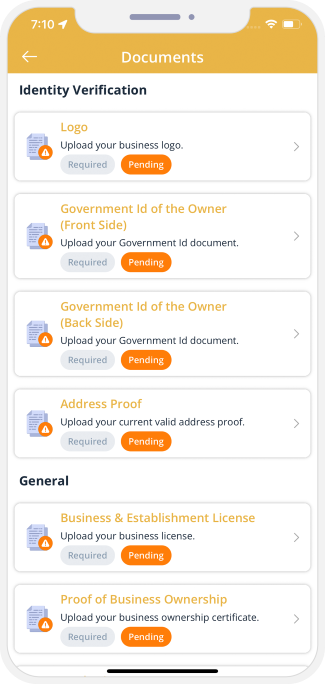
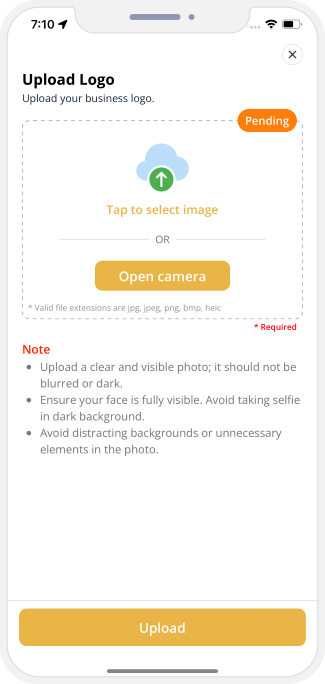
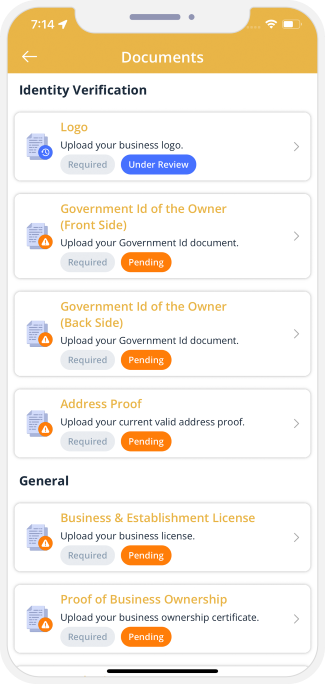
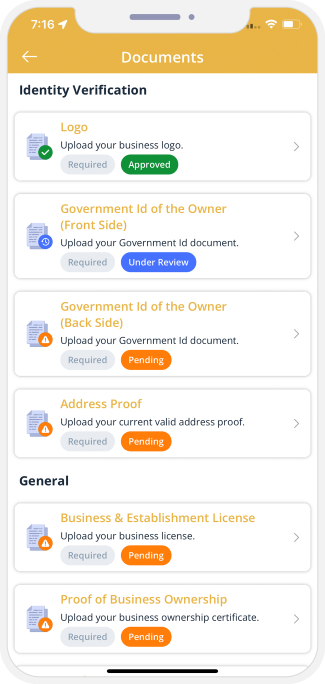
OTP verification via WhatsApp
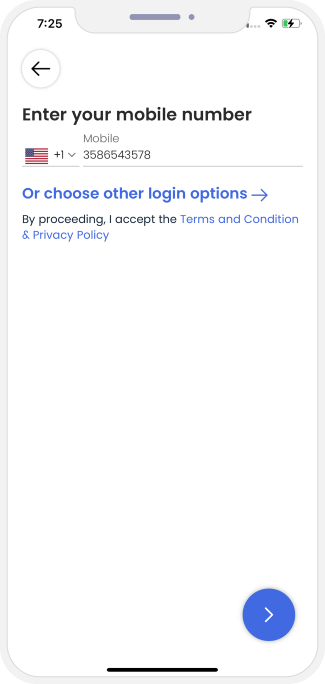
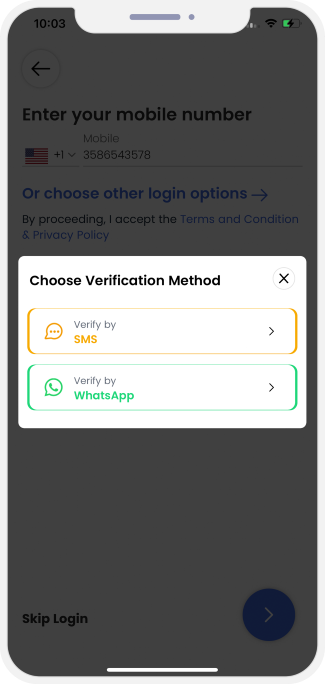

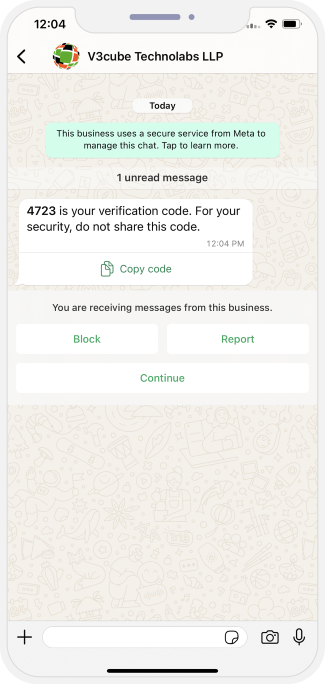
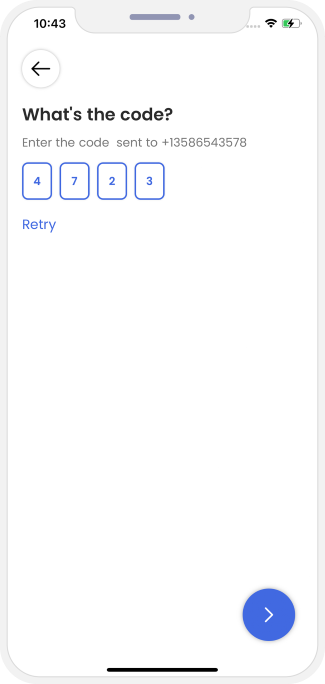
Send Gift Card
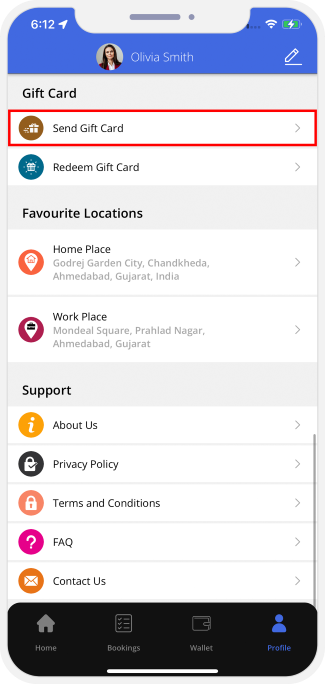
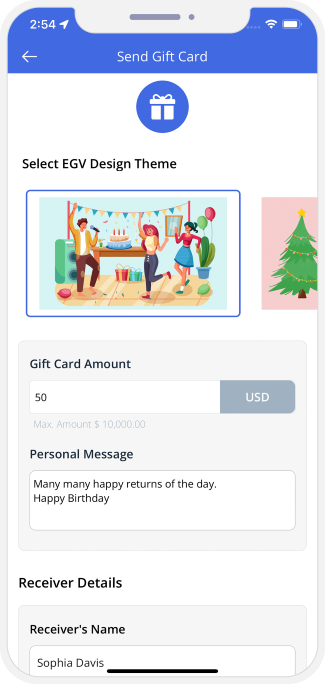
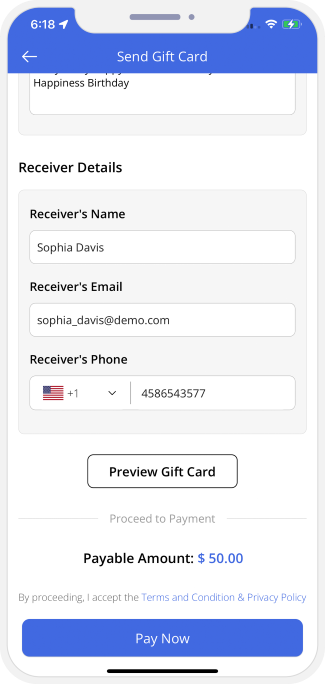
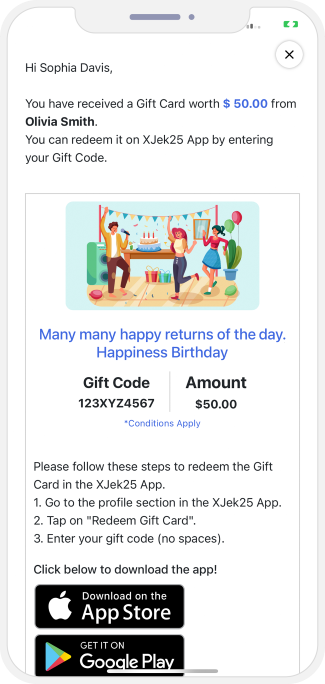
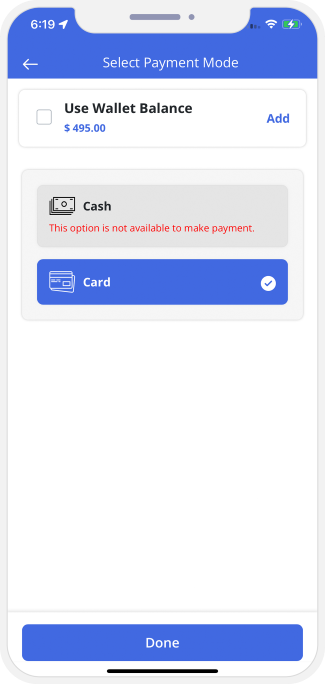
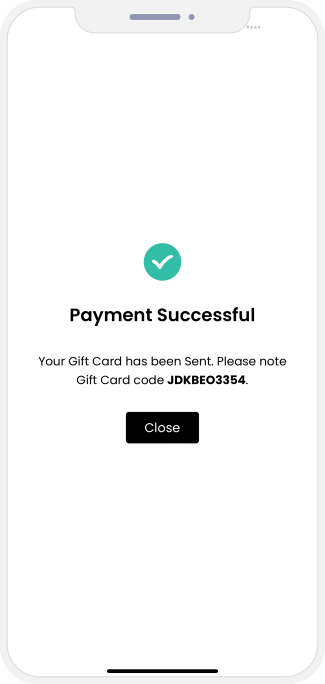
Receiver's End - Gift Card Details
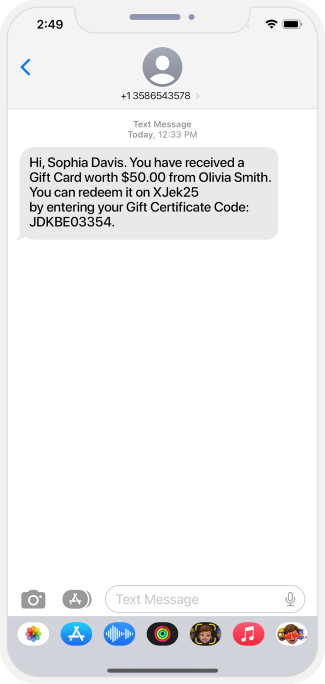
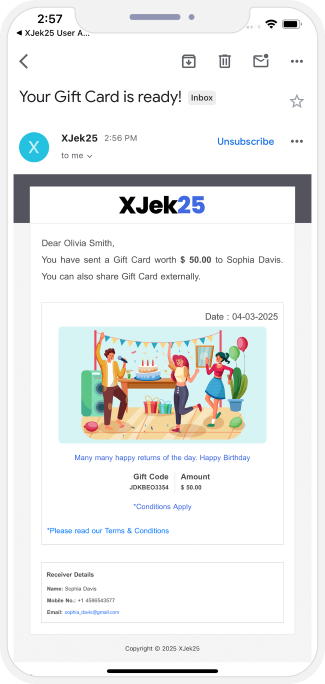
Redeem Gift Card
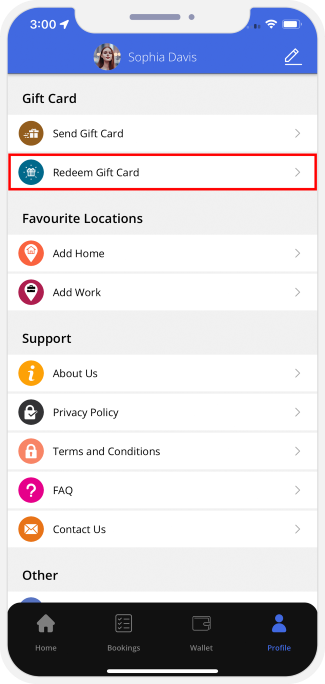
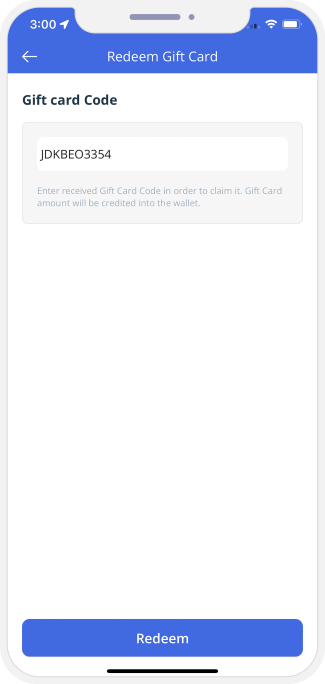
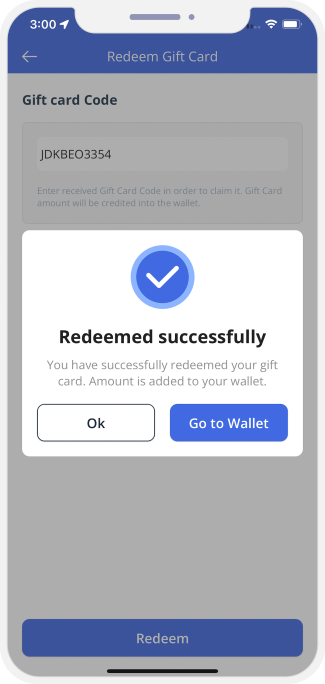
Driver Reward feature

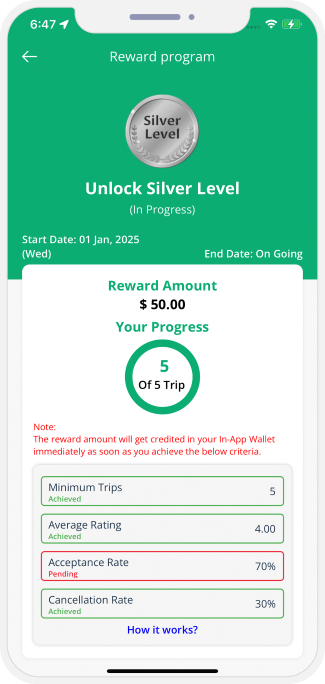
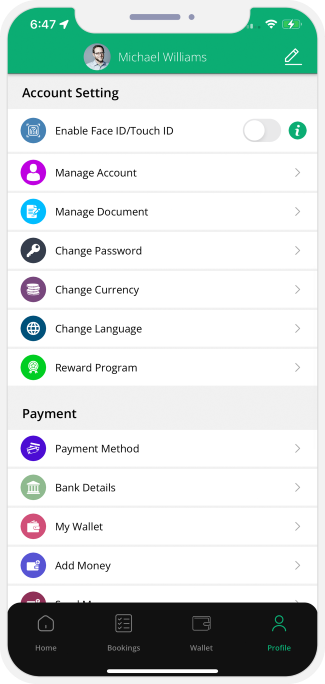
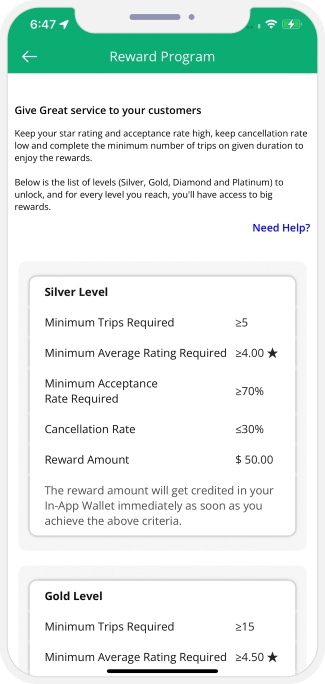
Restricting Driver's Fraud in Taxi Component

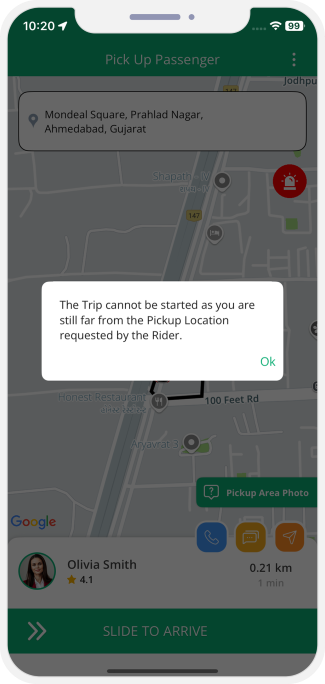
Restaurant menu multiple options/toppings in Food Component
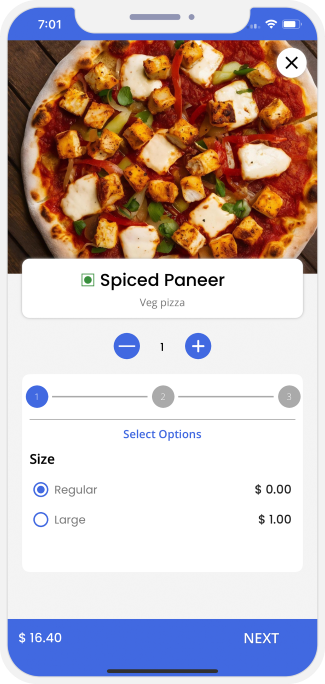
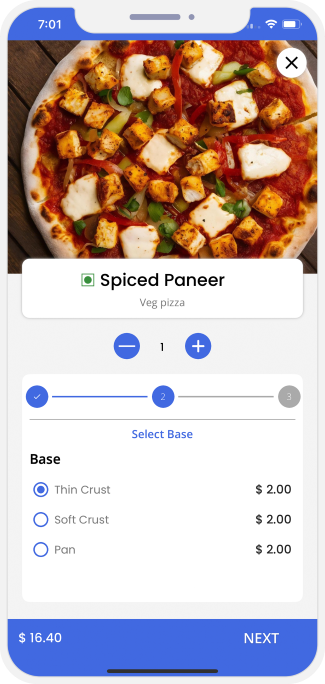
One store under several categories in DeliverAll Components
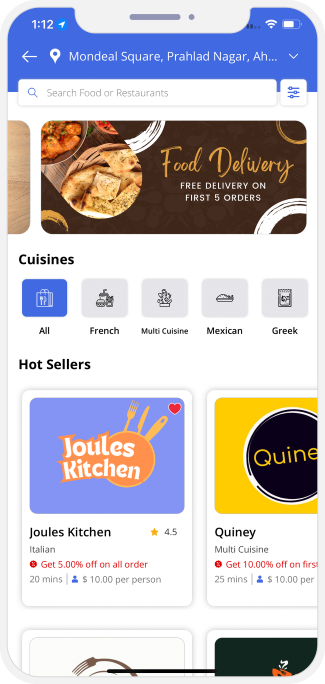
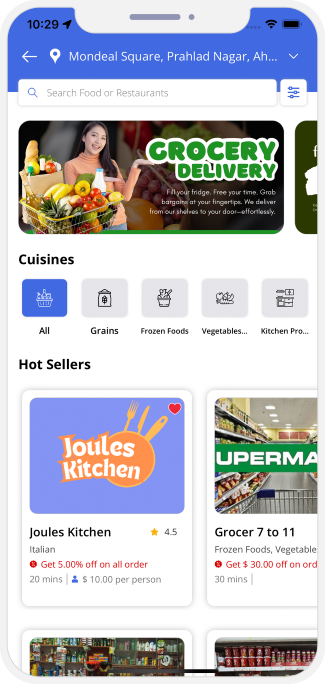
Free Delivery Promo Codes for Specific Delivery Stores

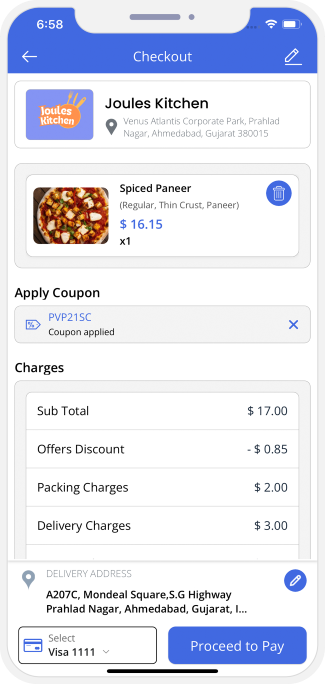
Advanced Rating Flow for Food Items and Delivery Drivers
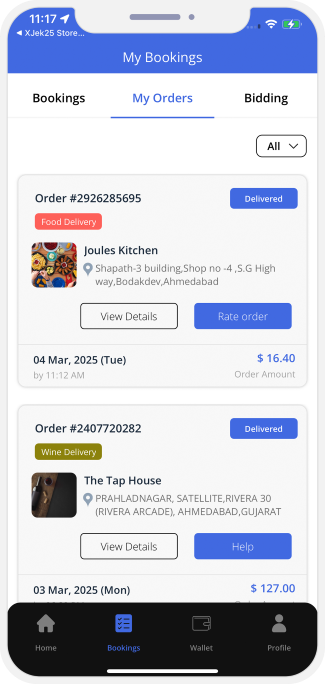
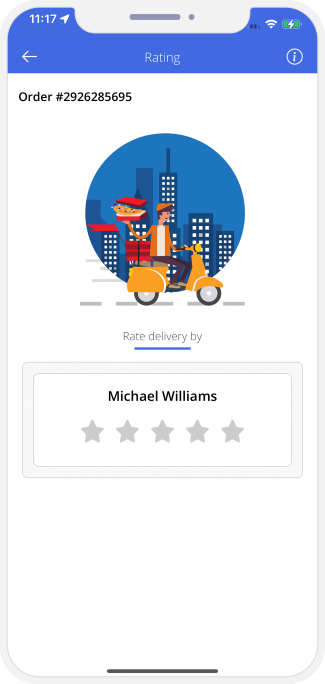
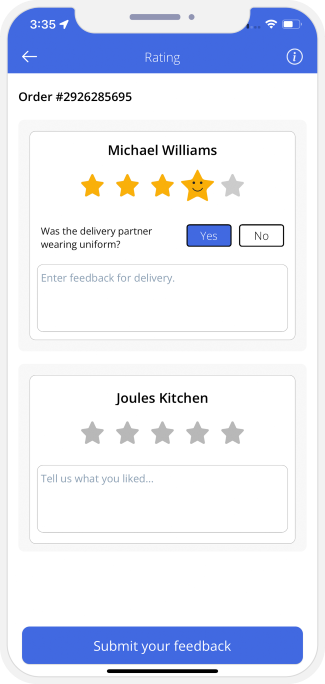
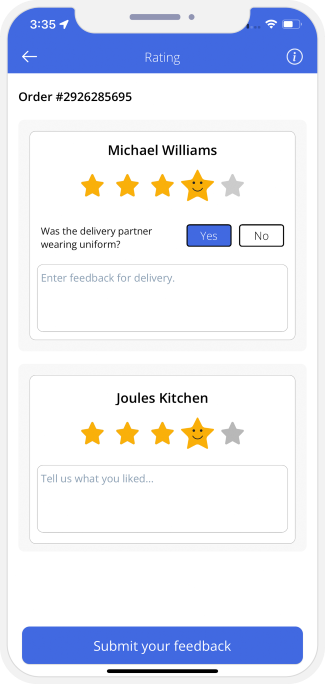
Location Wise Banners throughout the System
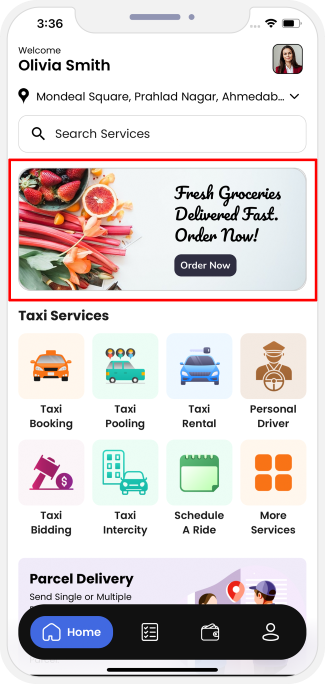
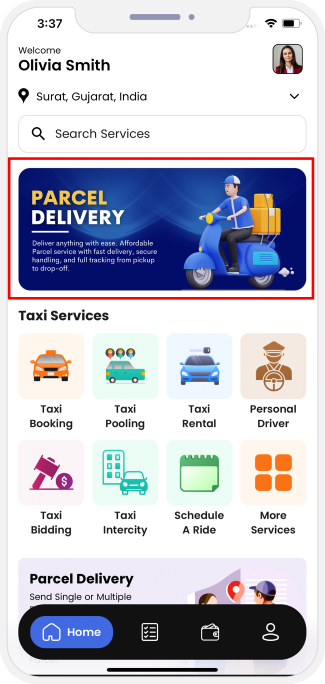
Live Tracking of Taxi Ride


Live Tracking of Ambulance Service
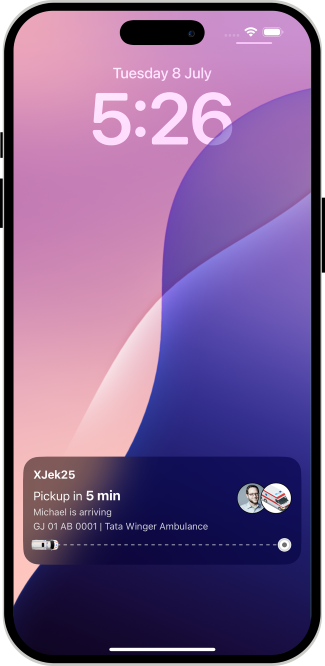
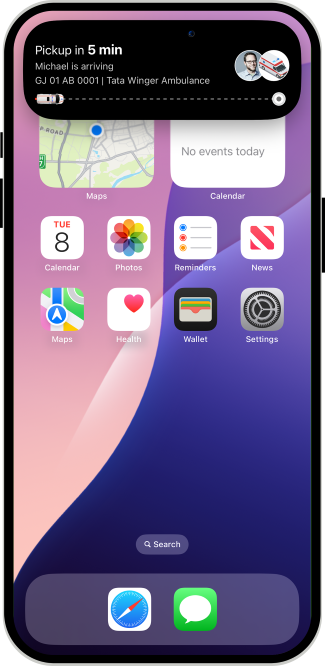
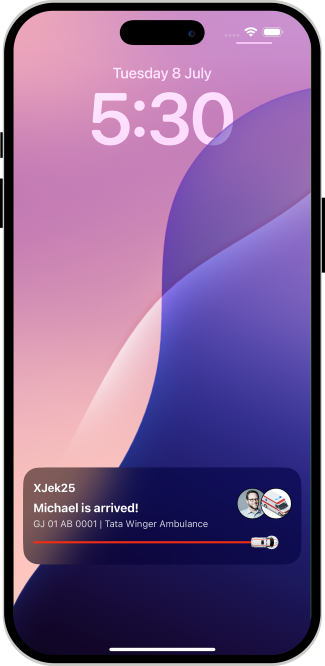
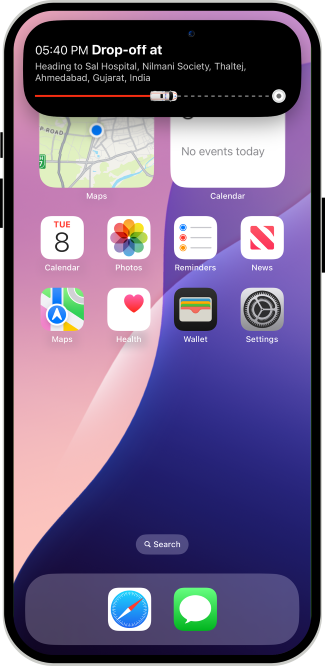
Live Tracking of Orders (Food Delivery / Grocery Delivery / Pharmacy Delivery)
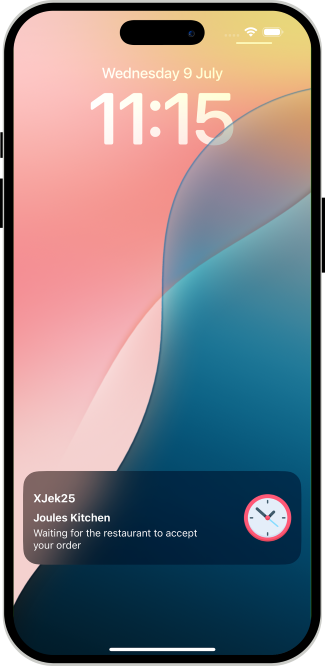
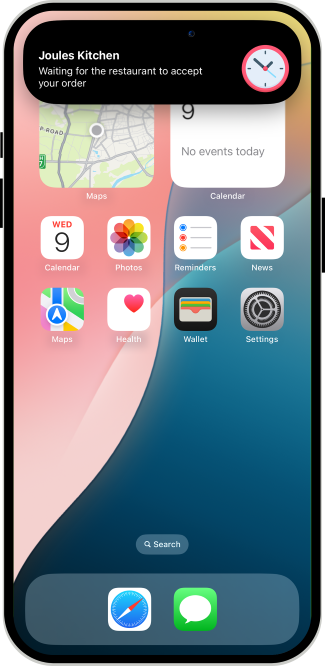
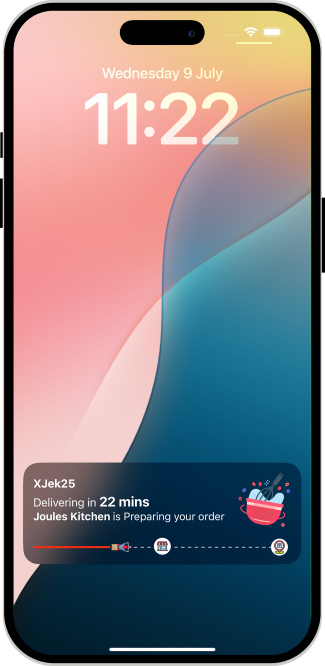
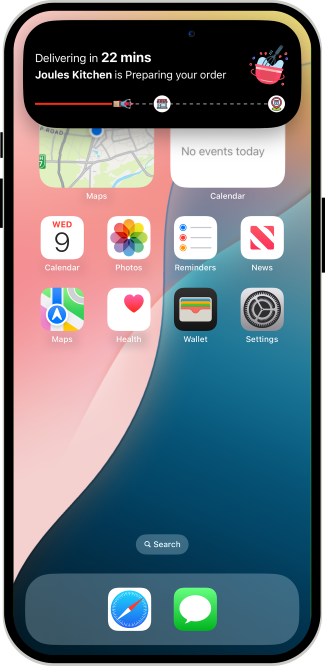
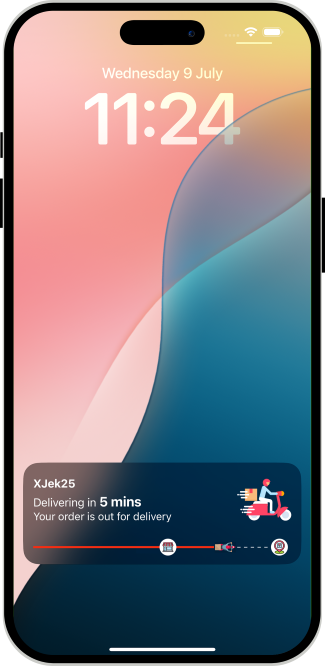
Location Wise Push Notifications throughout the System

Advanced and detailed Service Search in Service Provider Components
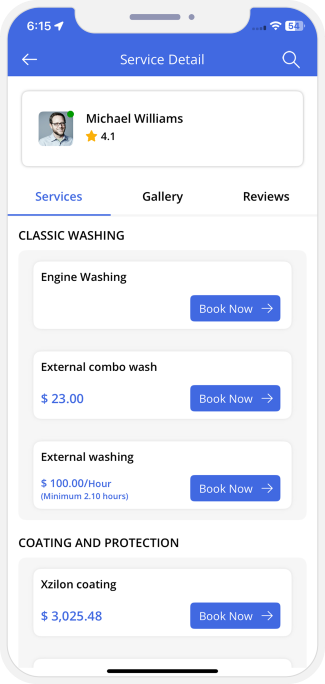
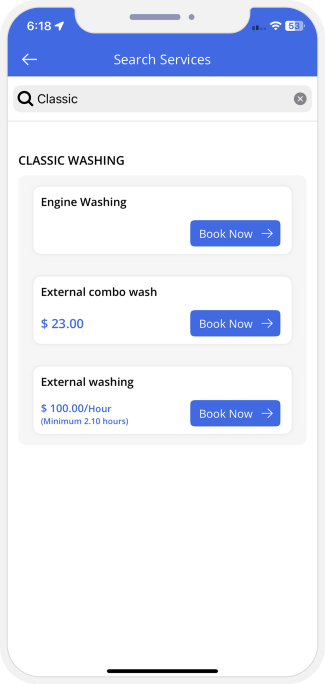
Using Firebase for Mobile Number Verification
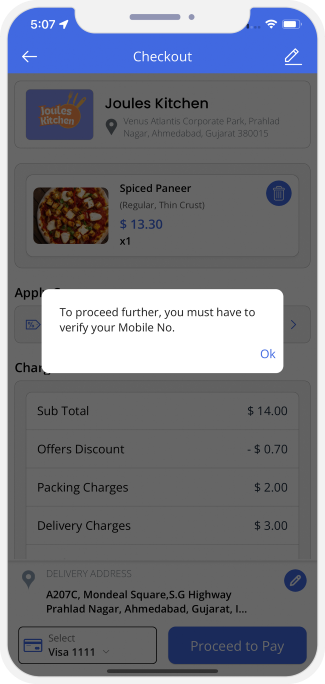
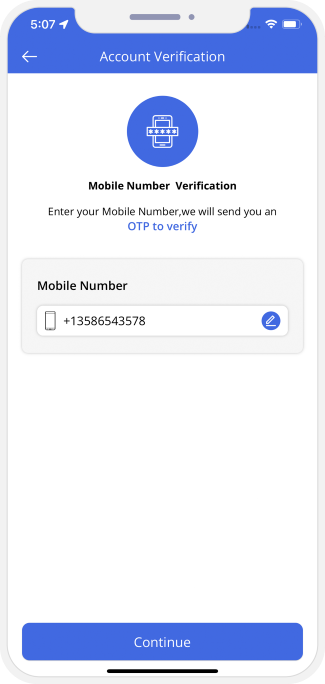
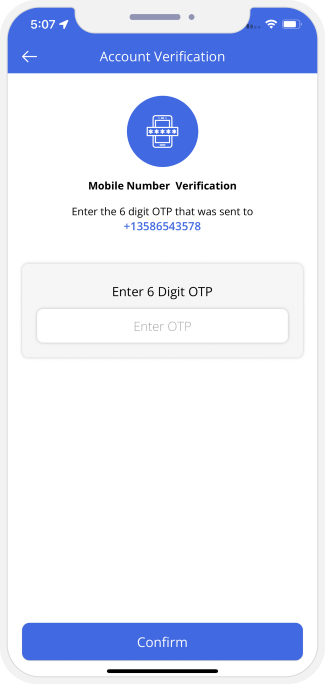
SKU Code For Store Delivery Items
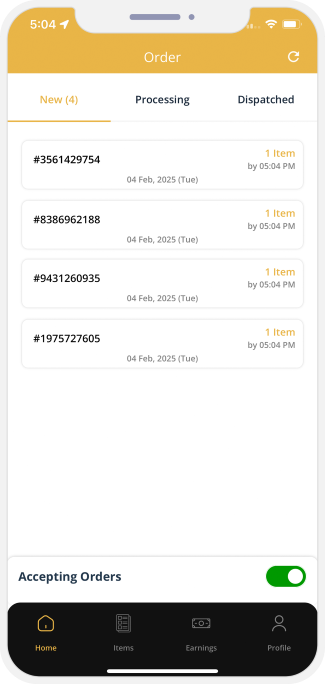
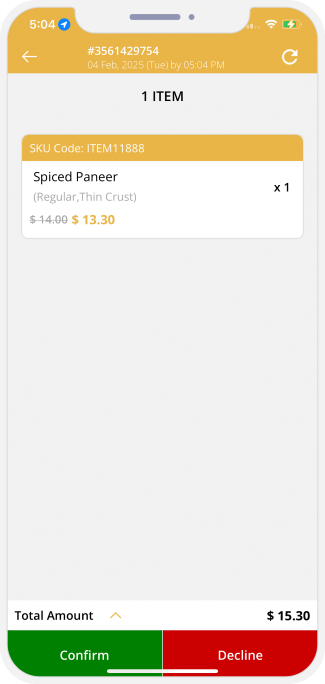
18+ Age Confirmation
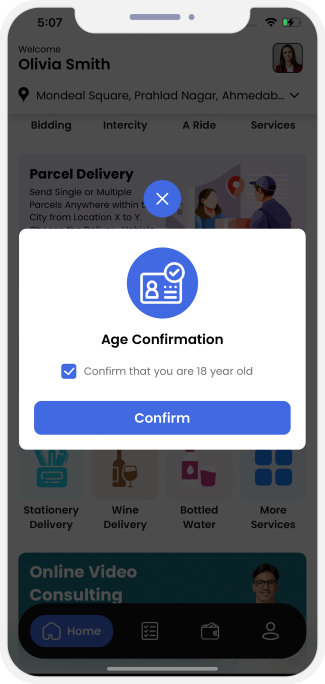
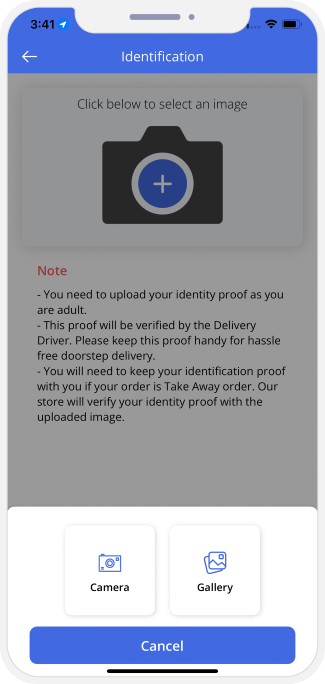
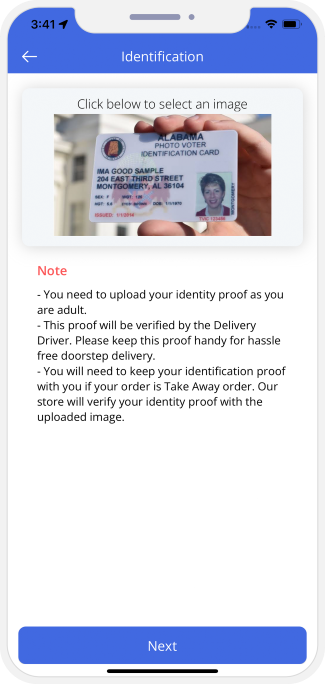
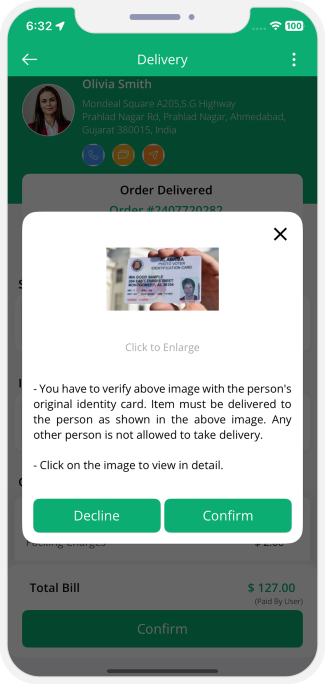
Day Wise Separate Timeslots for Stores
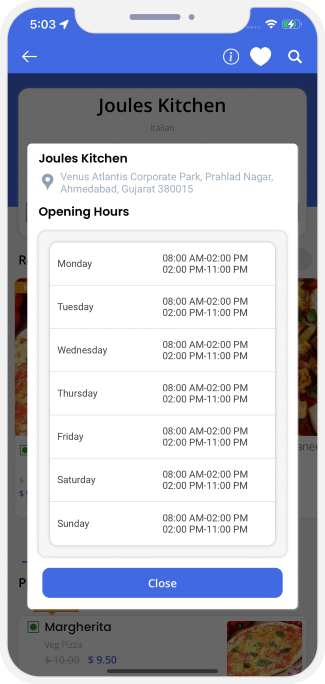
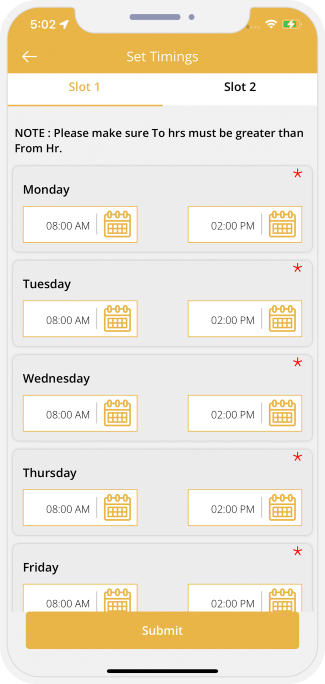
Delivery Helper
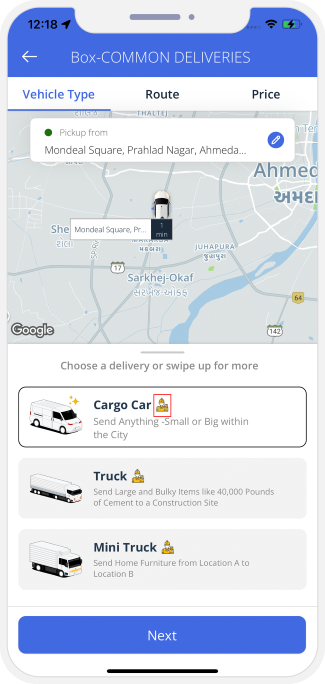
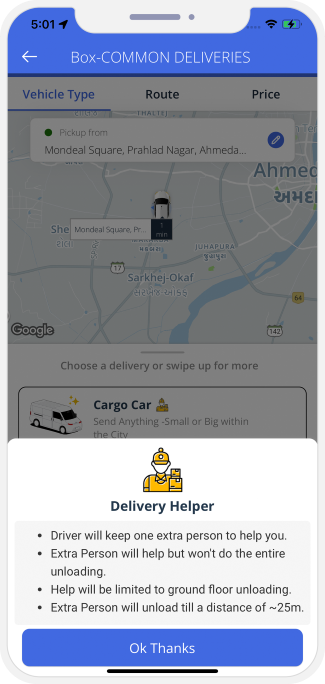
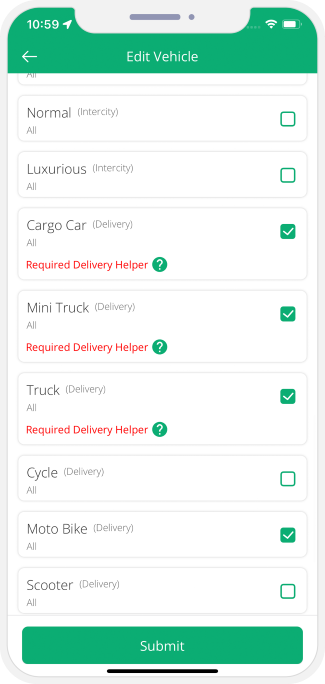
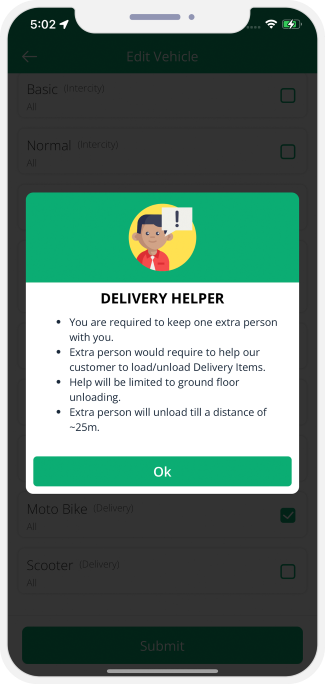
Apply Toll Cost Manually
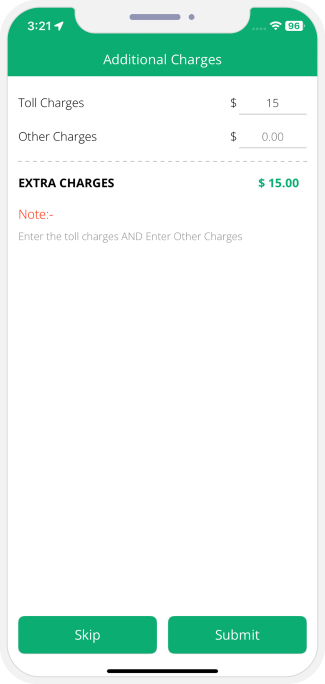
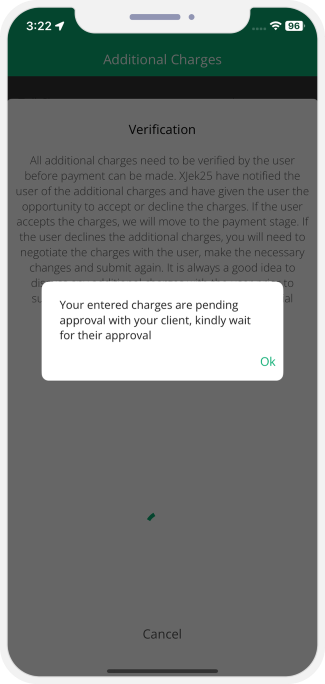
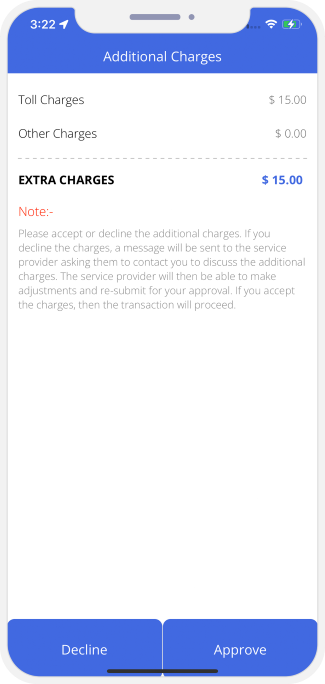
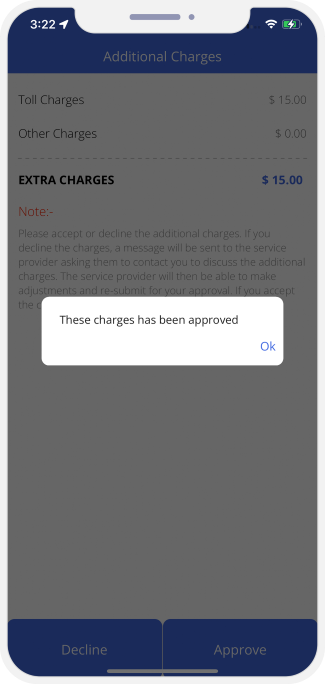
Order Cancellation by Driver
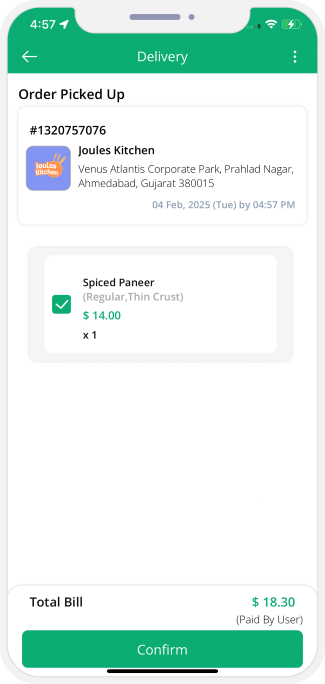
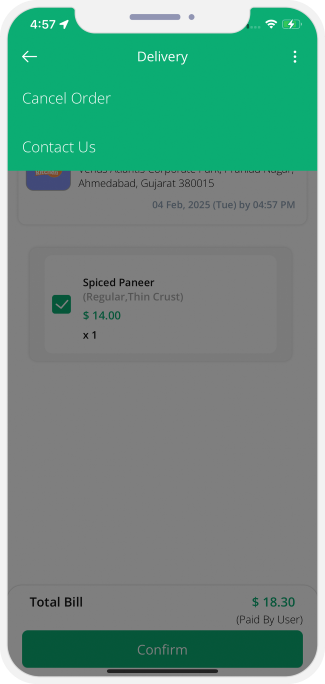
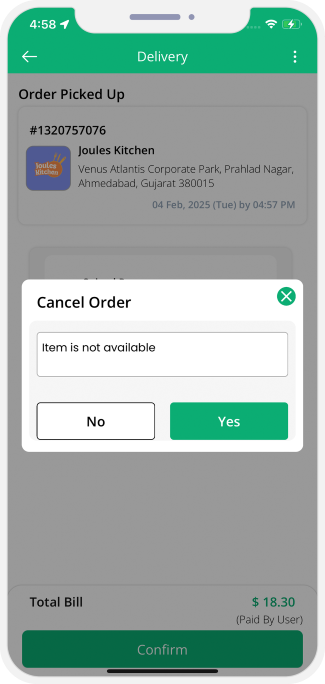
Order cancellation by Store
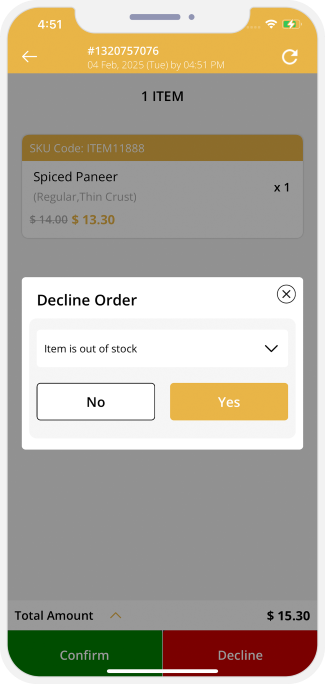
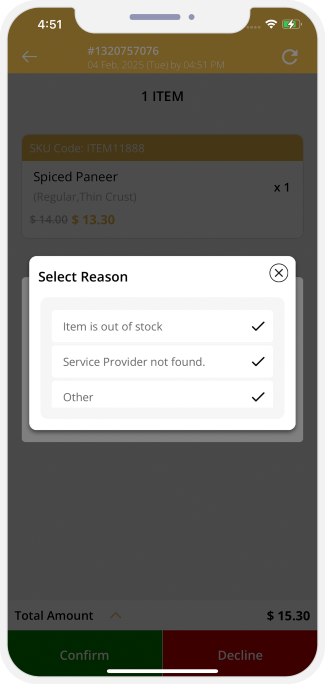
OTP Verification to Start the Job
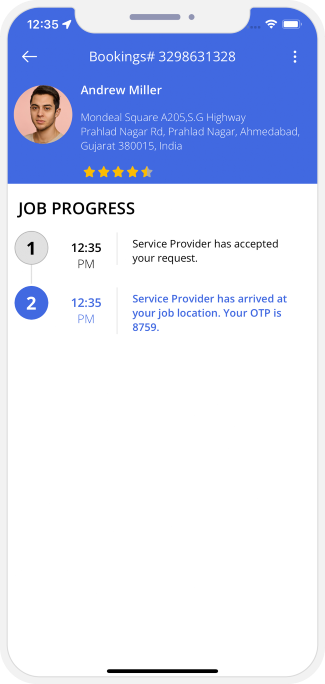
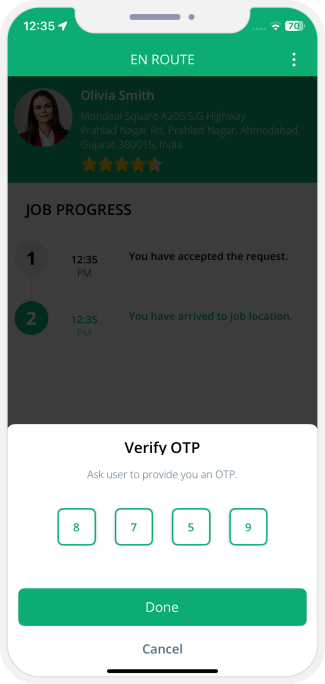
Restaurant Safety Verification
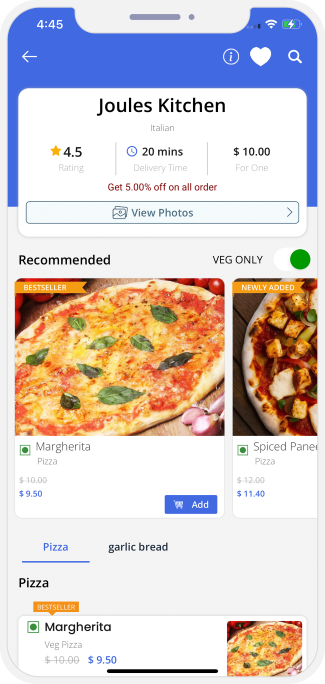

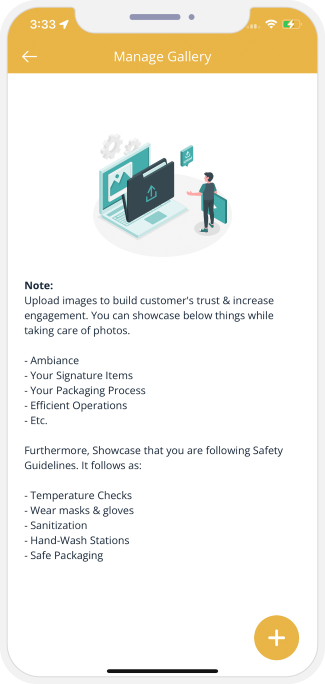
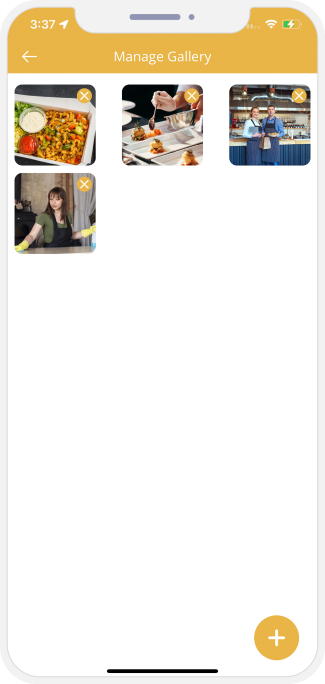
Voice Instruction for Delivery Driver
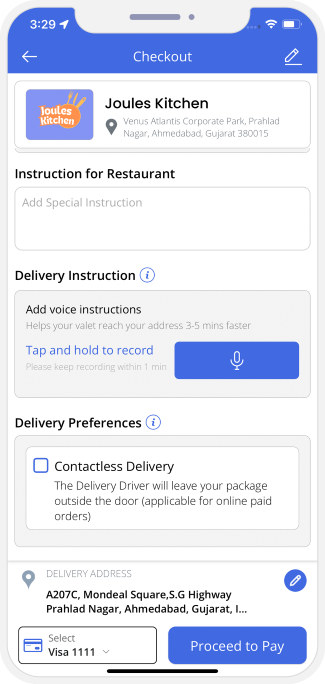
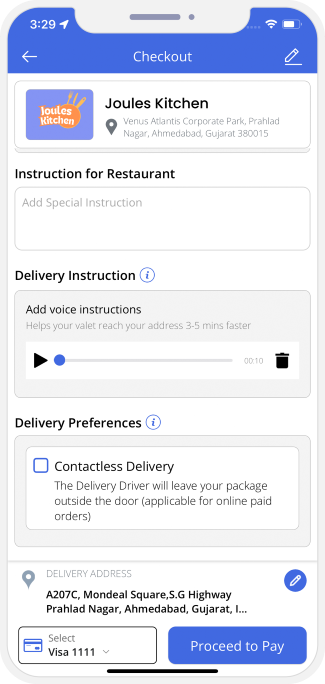
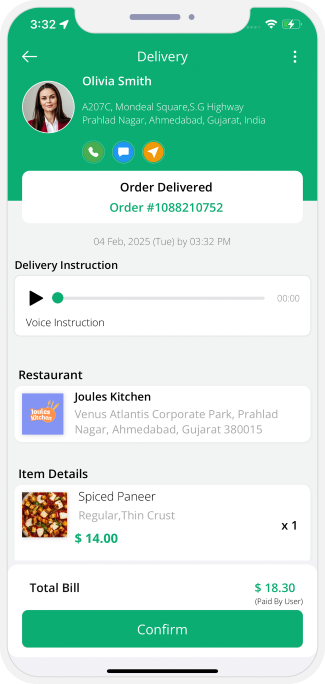
Graphical Status of Job / Delivery / Ride in App Notification
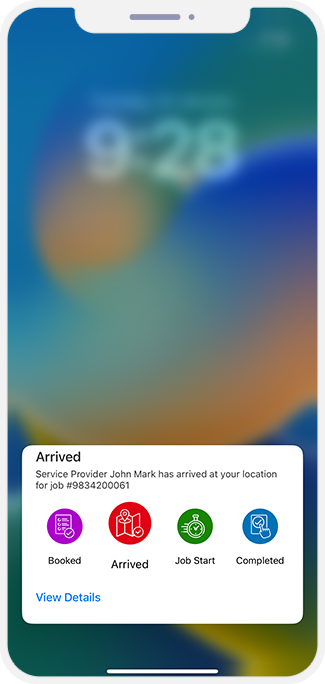
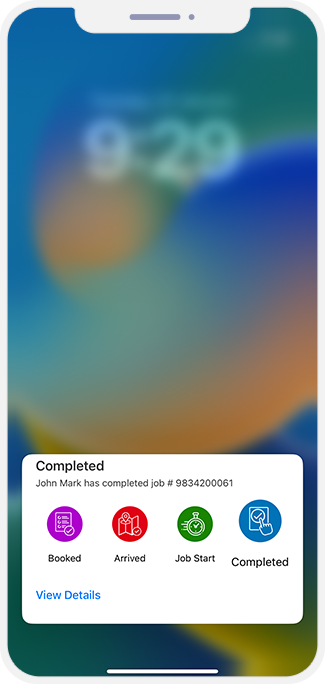
Mark Store as Favourite
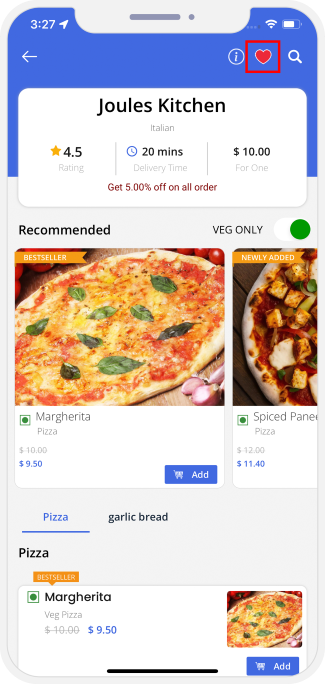
Wallet to Wallet Money Transfer
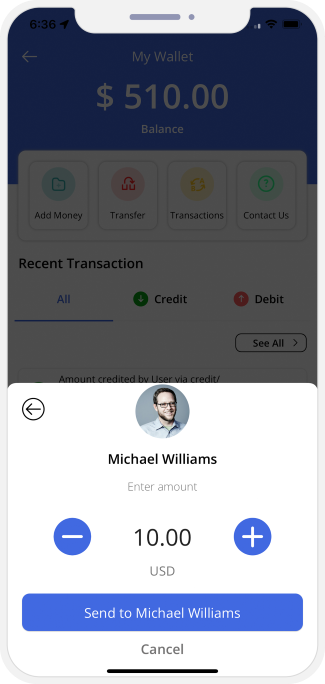
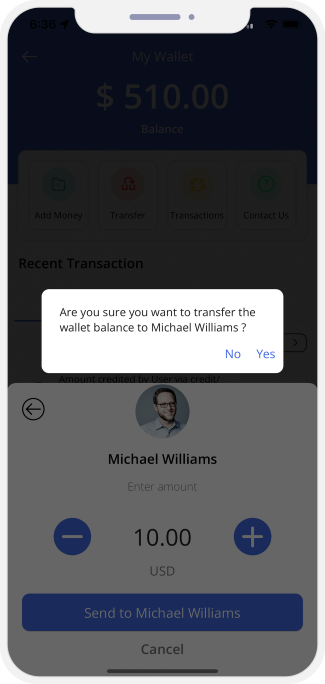
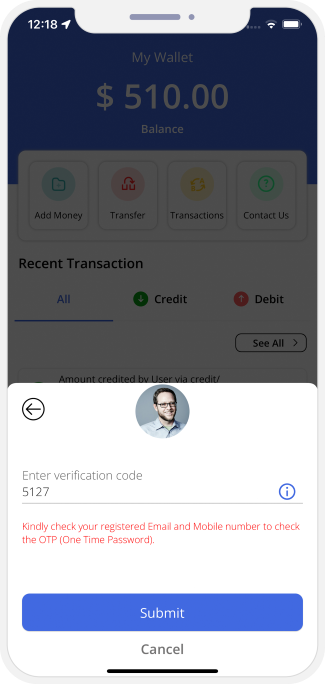
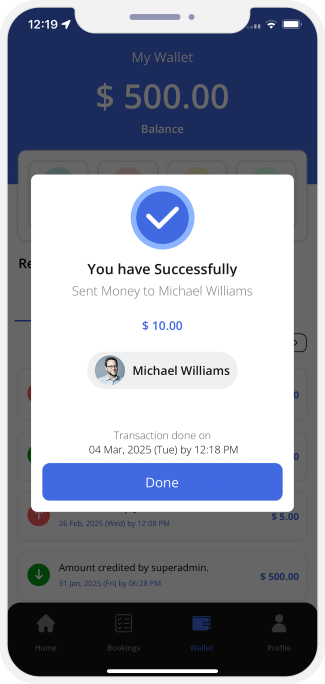
Membership Subscription Plan
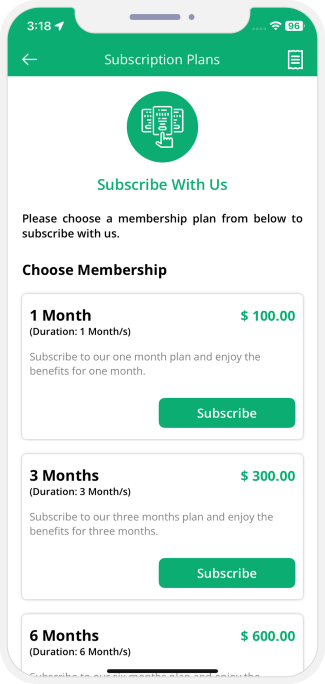
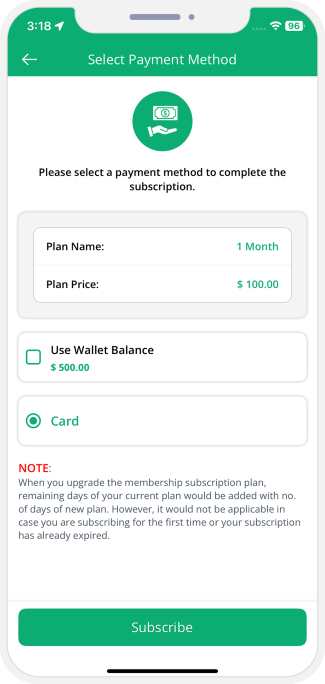

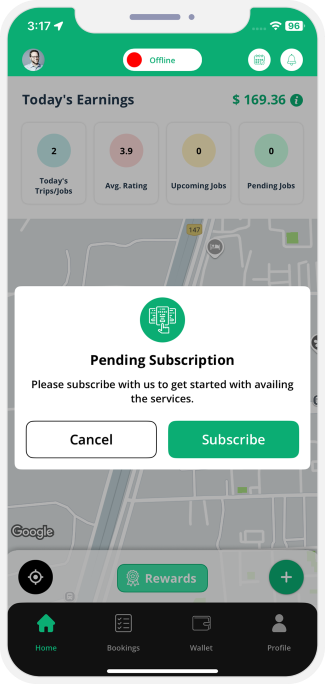
Manage Notification Sounds and Ringtones
Using this unique feature, you the owner of this expansive service provider app can manage the notification sounds and respective ringtones of the store, the service provider and the customers respectively.
The notification sounds may include the request sound for the driver and rider, notification sound for the service provider including the message and notifications, notification sound for the user including the message and notification, for the store including the message and notification and finally, the VOIP based (voice over internet protocol) call.
All these sounds are already present in the solution itself. However, other sounds may be downloaded from the admin panel.
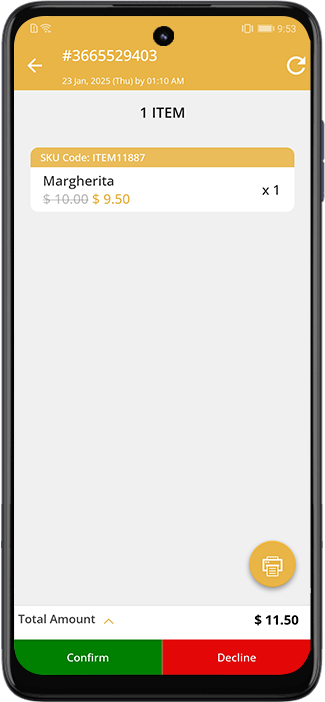
KOT Print via Wireless / Bluetooth printer in Android Food Delivery App of Restaurant
A unique feature to help restaurants efficiently manage the bills and process their orders and have it assigned to delivery drivers. As soon as the restaurant receives a new order from the customer, they shall receive the details of the same on their same. They now would be able to view the details of the same on their app. They now need to tap on KOT Print where KOT means kitchen order ticket and they would get the order printed via a wireless or Bluetooth printer and have it processed and confirmed and then assigned to the delivery drivers.
Tip Feature
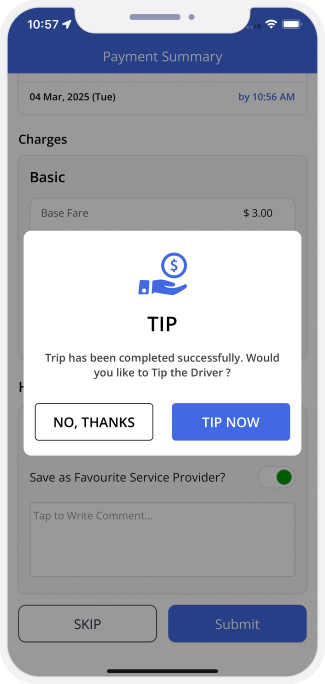
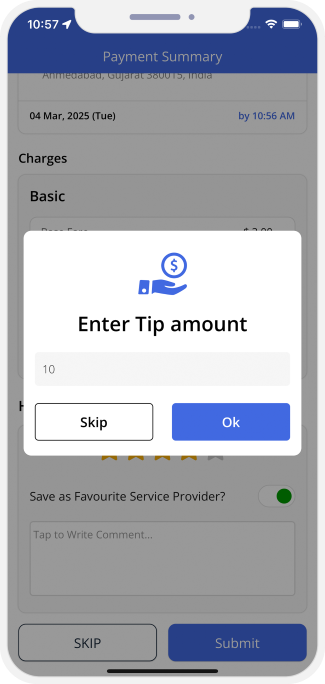 User can Tip the Driver.
Favorite Driver / Service Provider
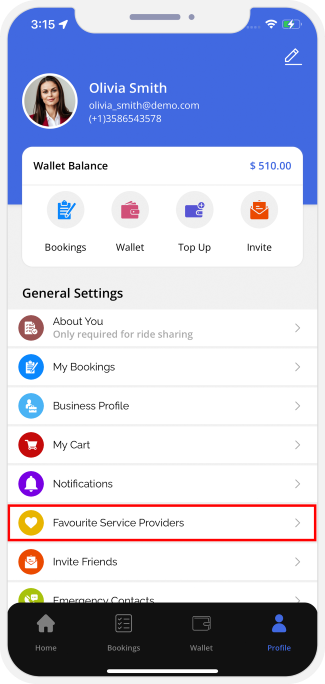

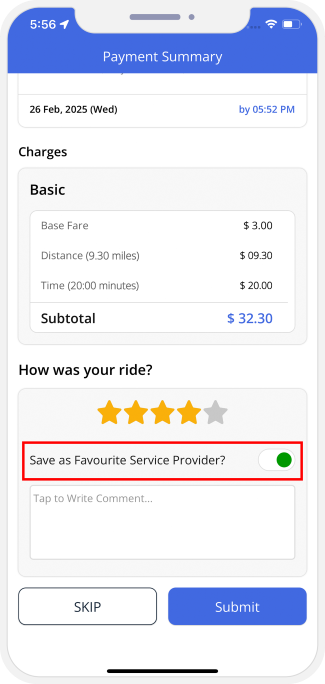
Edit Profile
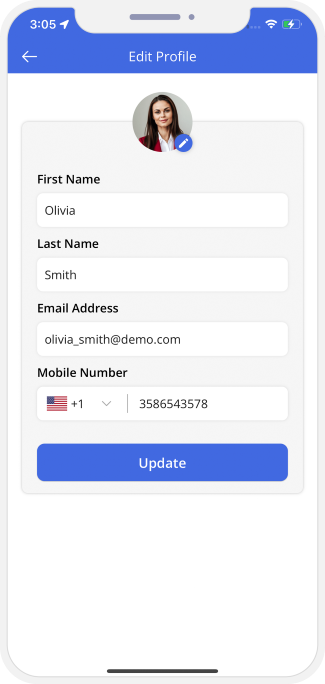
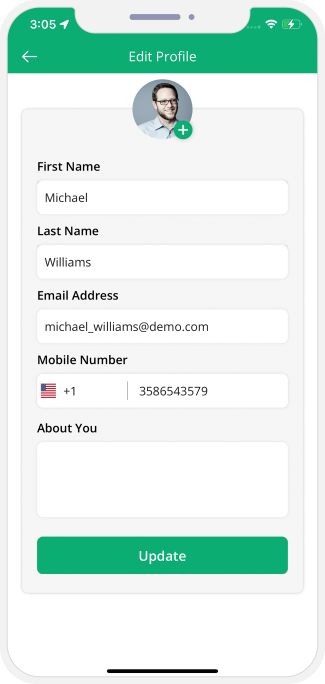
Wallet integration
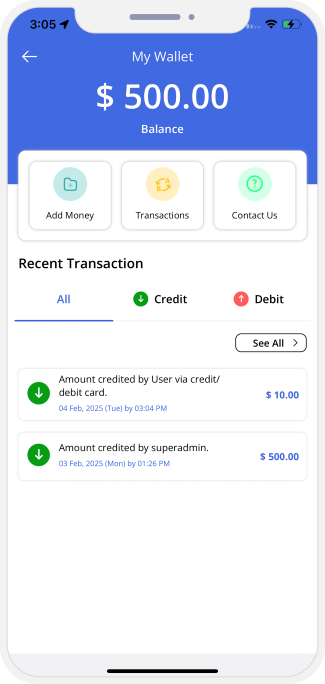
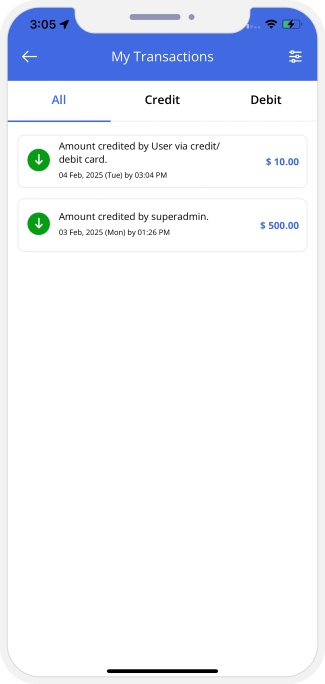
manage Vehicles & services
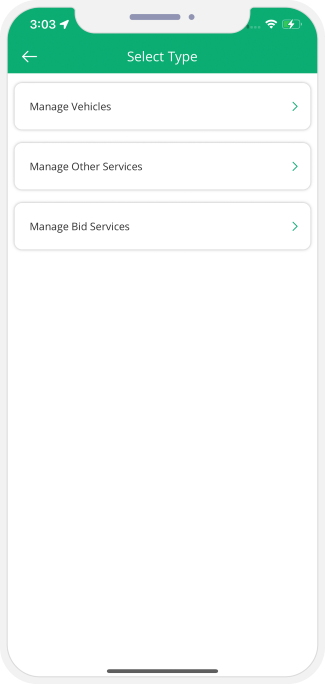
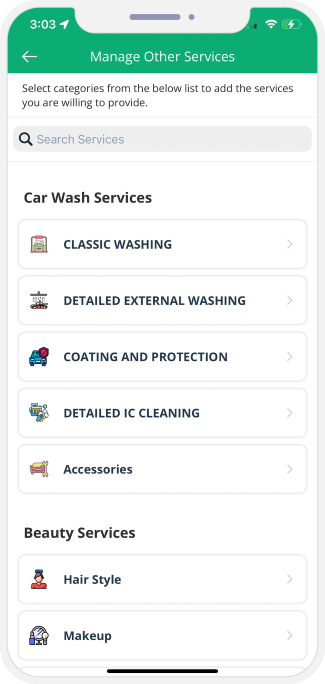

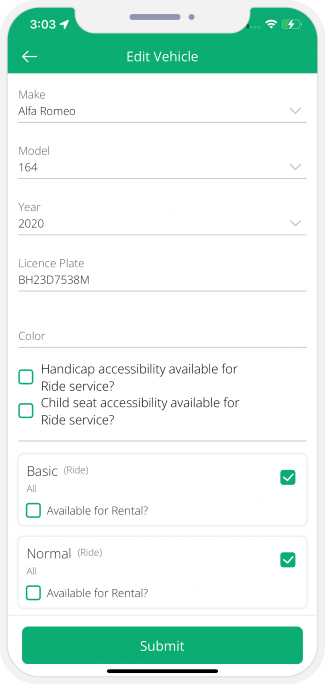
Manage Documents
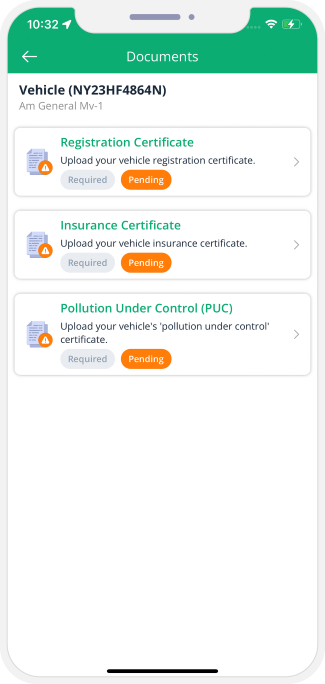
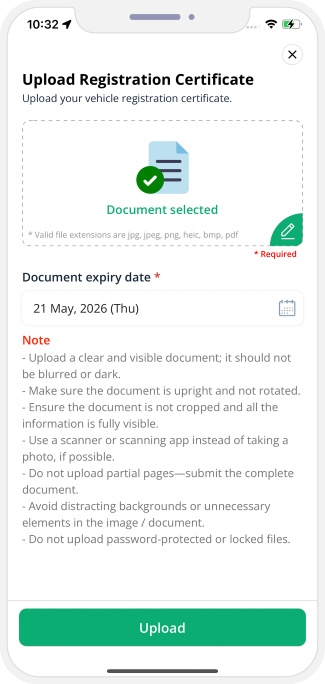
Manage Gallery
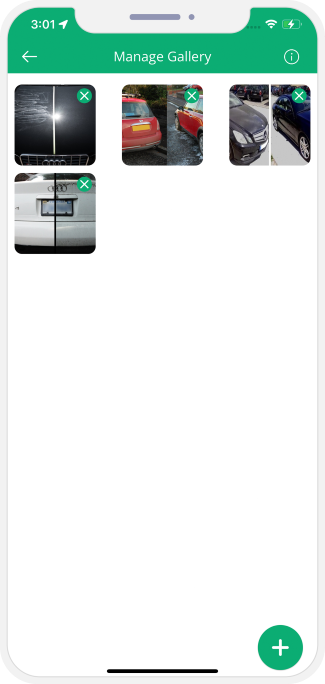
Payment
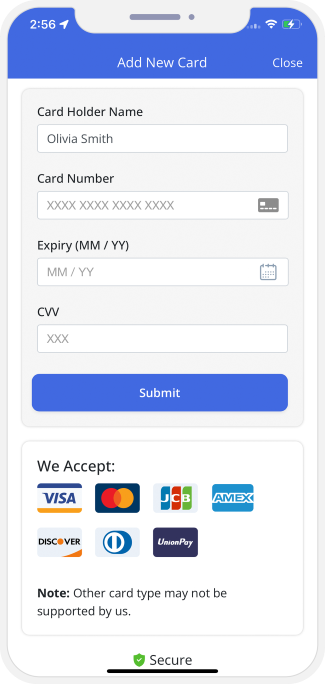

Multiple credit card management
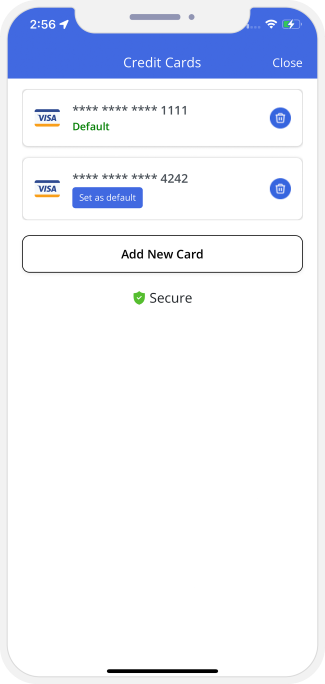
Booking History
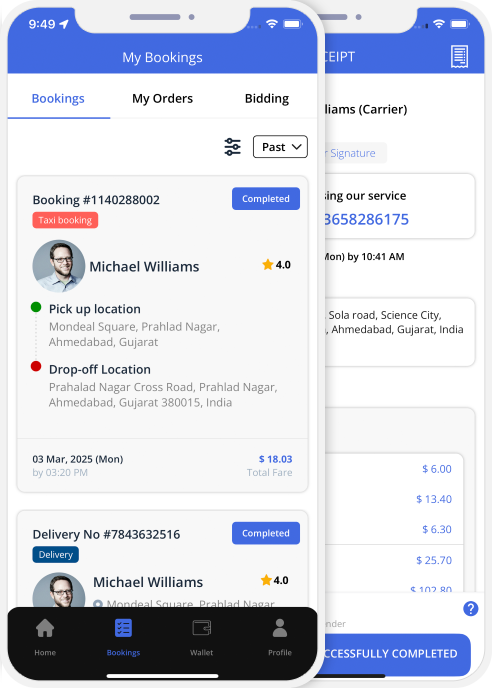
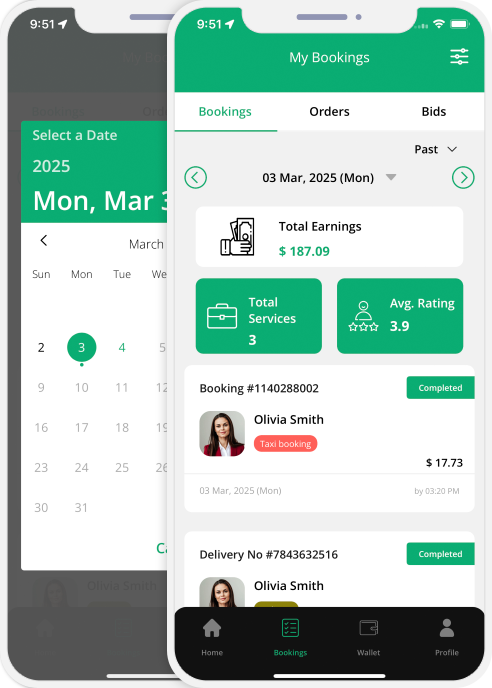
Waybill
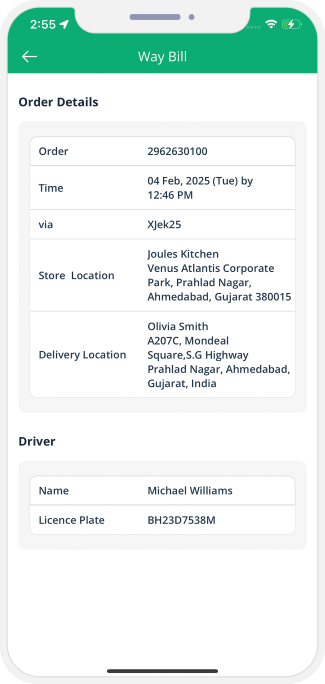
Heat View Of the service provider App
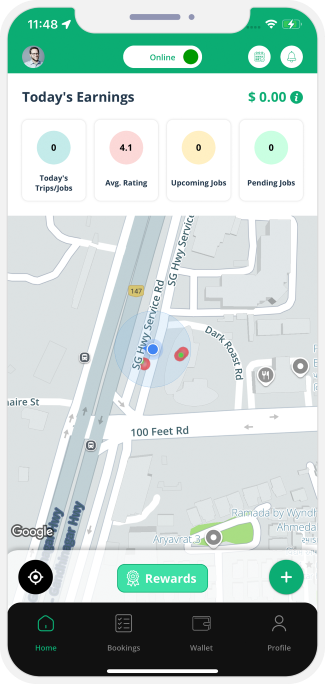
Notifications

Promo code
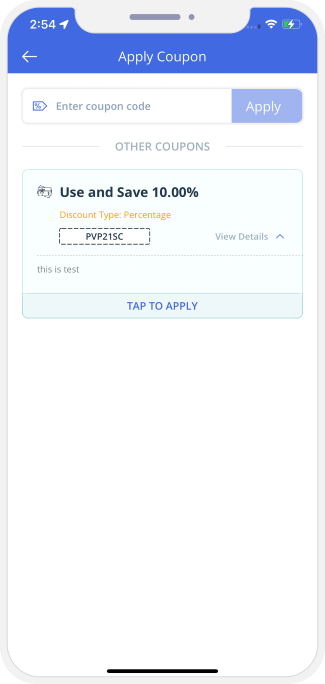
Multiple Item Images - Story Delivery Items
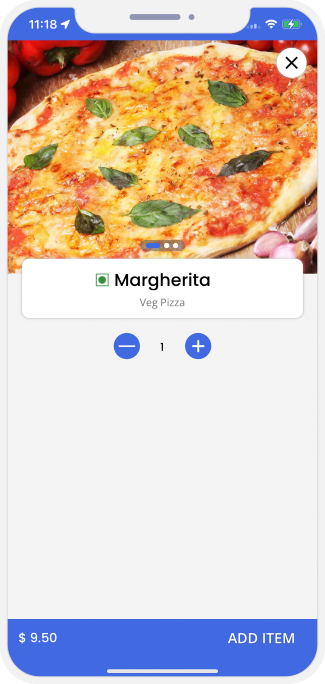
Feedback
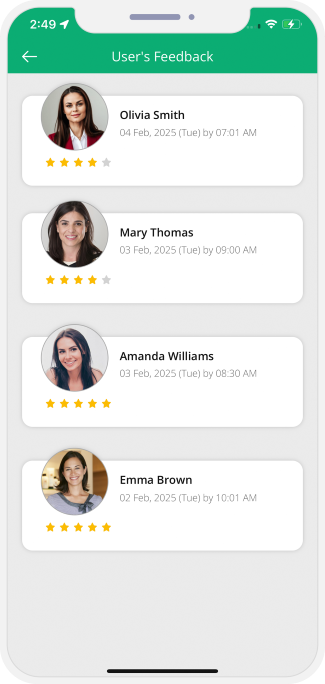
Invite Friends & Manage Bank Detail
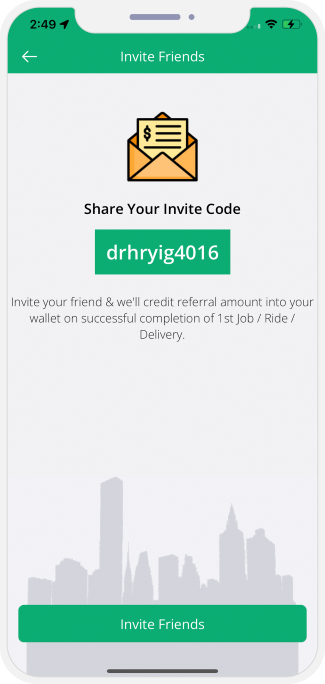
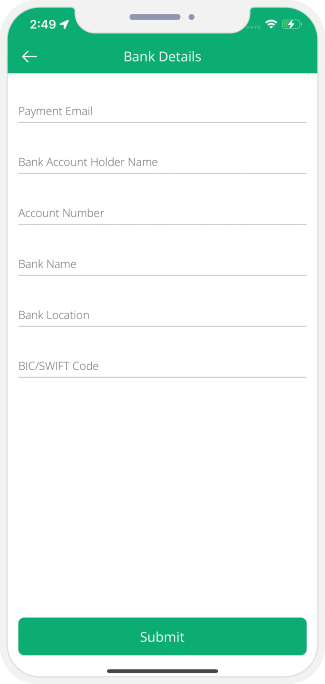
Earning Statistics
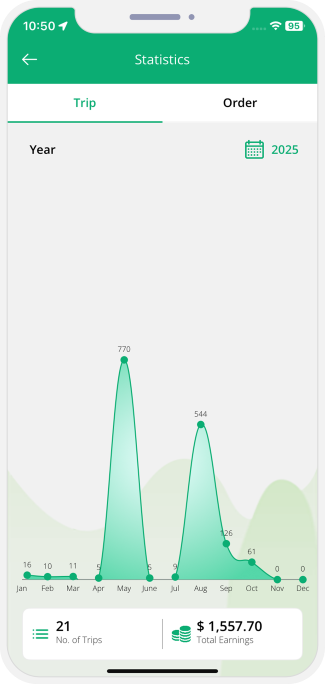
Other Information Screens
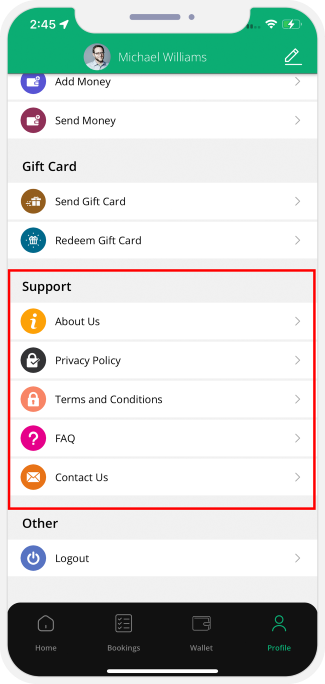
Advertisement Banners
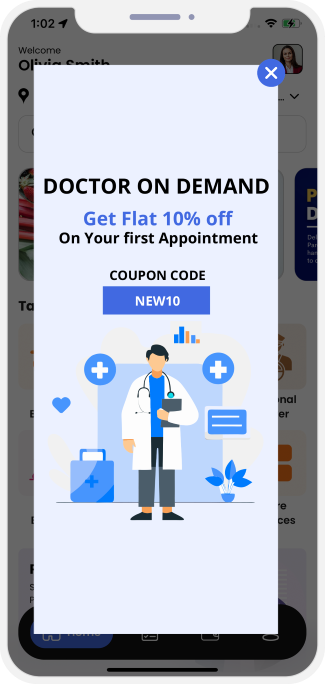
Facebook & Google Ads integration
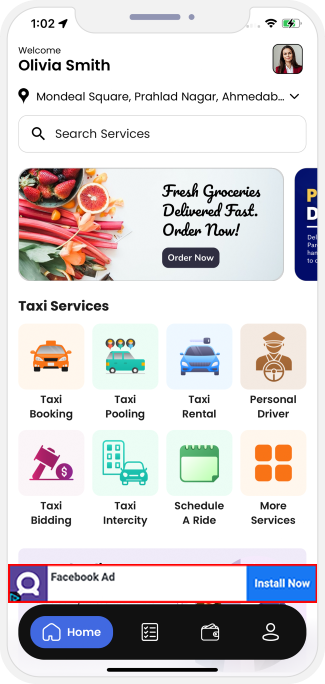
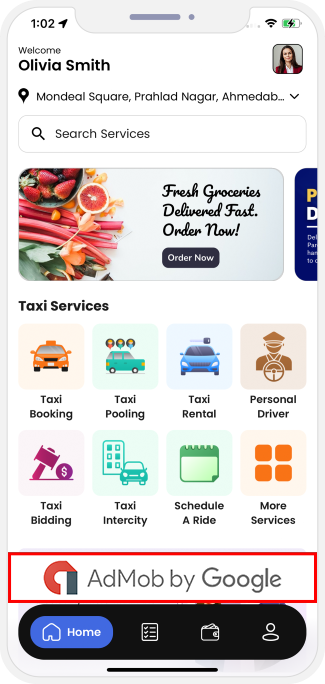
Contact Us & Help
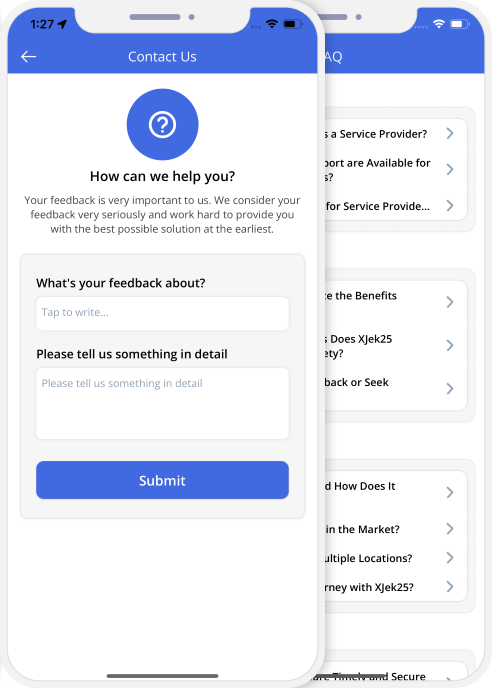
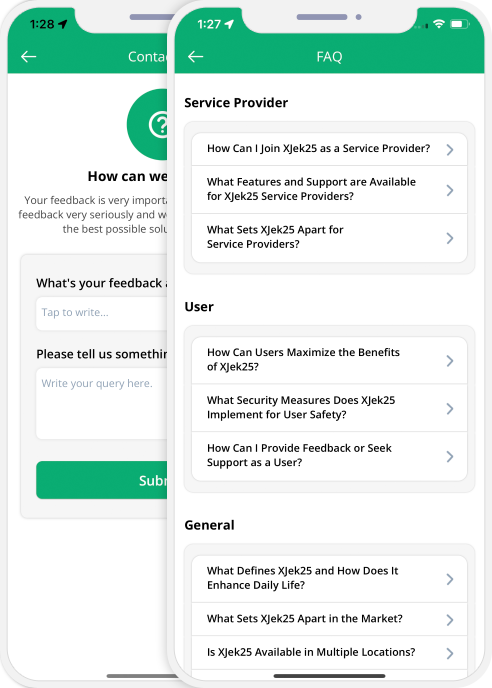
Demo Website and Administrator Panel - Graphical Flow
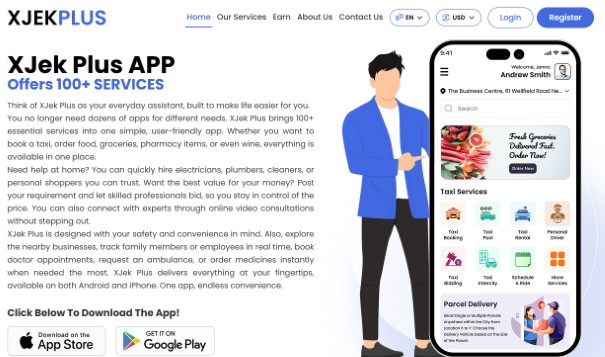
Website Details & Flow
See Major Pages of Website that we Offer with the App.
The Website is Multi Lingual. All Information Pages, Text of All Major Pages, Content, Images, etc that show on the Website are and Fully Dynamic and Managed from Admin Panel. Users, Service Providers and Restaurants/Stores can Login into Website to Manage their Profiles.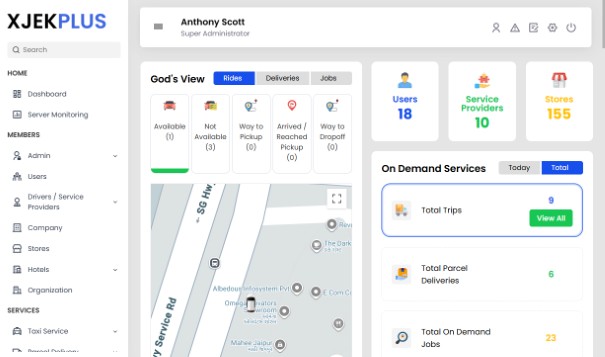
Admin Panel Details & Flow
See Major Features of Admin Panel that we Offer with the App.
The Apps and Website are fully Dynamic and Managed from the Powerful Admin Panel. App Owner will be able to Manage all Users, Service Providers, Drivers, Stores/Restaurants, Taxi Vehicles, Delivery Vehicles, Services, Rates, Revenue, Profits, Commission, etc from the Back End.
 On Demand Services
  Buy, Sell & Rent Real Estate
  Buy, Sell & Rent General Items
  Medical Services
  Track Family & Employees